Using time features with your ESP32 [Guide + Code]
- Time Servers, Unix Time and Local Time Discussion
- Test code for using timestamps with an ESP32
- Code Walkthrough
- The Arduino setup() Function
- Configuring time for your location
- Displaying times with the ESP32
- The Arduino loop() Function
- Testing The Arduino Time Sketch
- Where To Go From Here
Do you have a project where keeping time is important?
Then timestamps are something you will want to be aware of. Timestamps are very useful when adding dates and times to data you are logging or for creating file names with dates and times in them. You can also use timestamps when you need your ESP32 to turn on a light at a specific time, for example.
What is a timestamp you may be wondering? Timestamps are dates and times in human readable form.
In this article, we will demonstrate how to get timestamps using an NTP Server and an ESP32 with the Arduino IDE.
The process flow for the example sketch below will be to…
- Connect to a WiFi network
- Get the current time from a web API
- Display the retrieved time in human readable form in the serial monitor.
At the end of this article, you’ll be able to successfully connect to a wireless network (WiFi) and retrieve accurate timestamps from an NTP Server with your ESP32. Let’s go!
Time Servers, Unix Time and Local Time Discussion
A time server is a computer that you can connect to via the web to get the current time – we’ll talk more about them in detail below.
Some time servers use what is called the Network Time Protocol (NTP), these types of servers are referred to as NTP servers.
Keeping time using a time server follows a “client server” approach. The ESP32 device acts as the client and the time server acts as the server. .
Once you are connected to the internet via your WiFi connection, you will need to connect to a time server to get the current date and time.
The ESP32 device will then retrieve and internally store this NTP Server timestamp as the local system time.
In order to understand this entire process better, we need to expand on a few concepts below…
NTP Server: The U.S. government provides a time server (time.nist.gov) that employs the time serving Internet Protocol, NTP, and these servers can be used to accurately sync computer and device times for FREE. Once you connect to an NTP Server, you can then retrieve a Unix timestamp.
NTP Servers derive their times from atomic clocks or GPS signals. GPS (Global Positioning System) satellites also use atomic clocks as a means for keeping accurate times. Atomic clocks are extremely accurate clocks that can provide time keeping within a few milliseconds.
Epoch Time: Epoch time is defined as the number of seconds that have elapsed since midnight on January 1st, 1970. It’s also frequently referred to as Unix time. Or a Unix timestamp. The timestamp returned by an NTP Server is the Epoch Time or Unix timestamp.
This Epoch Time is stored in what is referred to as UTC (Coordinated Universal Time). UTC time is a worldwide time standard used to regulate clocks and times worldwide. UTC time is the same time all over the world. UTC time is similar to GMT (Greenwich Mean Time) time.
An Epoch time is effectively just a number. For example, an Epoch time or Unix timestamp of 1703099164 equates to Wednesday, December 20, 2023 7:06:04 PM in GMT format, U.S. Central Time Zone. Where “1703099164” is the number of seconds since 1/1/1970 at midnight.
A handy tool for converting between Epoch times and human readable times can be found here: Epoch Converter.
Local Time: Local time is simply the time in a given location. It can be achieved by retrieving the current Epoch time and applying any local offsets to the Epoch time. For example, regional time zone offsets and any daylight saving time values are typically applied to the Unix/Epoch time.
Test code for using timestamps with an ESP32
The following is the entire example sketch of how to access and use timestamps with your ESP32. In the sections below, we will walk through this code together step by step. But, if you want to see the final product right away, you can just upload this sketch to your ESP32 and try it out now!
//  ESP32 Time Example Sketch
//  Programming Electronics Academy

#include <time.h>     // include time library

#include <WiFi.h>     // include wifi library

const char* ssid     = "your-ssid";

const char* password = "your-password";

// (utc+) TZ in hours

long timezone = -6;

byte daysavetime = 1;

struct tm tmstruct;

// Setup

void setup()

{

  Serial.begin(115200);

  while (!Serial)

  {

    // Wait for serial port to connect. Needed for native USB port only

    ;

  }

  Serial.println();

  Serial.println("Setup start");

  // Start by connecting to a WiFi network

  Serial.println();

  Serial.print("Connecting to ");

  Serial.println(ssid);

  WiFi.begin(ssid, password);

  while (WiFi.status() != WL_CONNECTED)

  {

      delay(500);

      Serial.print(".");

  }

  Serial.println("WiFi connected");

  Serial.println("IP address: ");

  Serial.println(WiFi.localIP());

  Serial.println();

  Serial.println("Contacting Time Server");

  configTime(3600*timezone, daysavetime*3600, "time.nist.gov", "0.pool.ntp.org", "1.pool.ntp.org");

  delay(2000);

  char buffer[30];

  getLocalTime(&tmstruct, 5000);

  sprintf(buffer,"%d-%02d-%02d, %02d:%02d:%02d",(tmstruct.tm_year)+1900,( tmstruct.tm_mon)+1, tmstruct.tm_mday,tmstruct.tm_hour , tmstruct.tm_min, tmstruct.tm_sec);

  Serial.println(String(buffer));

  Serial.println();

  Serial.println();

  time_t now;

  time(&now);

  Serial.print("Epoch time (UTC): ");

  Serial.println(now);

  Serial.println();

  Serial.println("Setup complete");

}

// loop

void loop()

{

  char buffer[30];

  getLocalTime(&tmstruct, 5000);

  sprintf(buffer,"%d-%02d-%02d, %02d:%02d:%02d",(tmstruct.tm_year)+1900,( tmstruct.tm_mon)+1, tmstruct.tm_mday,tmstruct.tm_hour , tmstruct.tm_min, tmstruct.tm_sec);

  Serial.println(String(buffer));

  Serial.println();

  Serial.println();

  time_t now;

  time(&now);

  Serial.print("Epoch time (UTC): ");

  Serial.println(now);

  Serial.println();

  delay(5000);

}
Code Walkthrough
One of the great things about using the Arduino development environment is that there are so many awesome open source libraries available to use! So, at the top of the program we’ll take advantage of some of these libraries by including the WiFi library for connecting to a wireless network and the time library for manipulating time data.
Programming Electronics Academy members, check out the Internet of Things (IoT) Course to start programming your own IoT devices.
Not a member yet? Sign up here.
So, remember that anytime you see references to WiFi or time, you will know when and where these libraries are being used throughout the code. And, that’s just another reminder of what makes the Arduino platform so great….that we can take advantage of these libraries that have been shared by other developers!
#include <time.h>  // include time library
#include <WiFi.h>  // include wifi library
The Arduino setup() Function
Once we have included our libraries, we can move on to the setup() function. As you may already know, in the Arduino environment the first thing that runs on startup of the ESP32 is the setup() function. And, the first thing we need to do in the setup() function, is to initialize the serial communication with the serial monitor using a baud rate of 115200.
Serial.begin(115200);
After the serial data has been turned on, you can then connect to your WiFi network.
Important: Remember that before you upload your sketch to an ESP32, you will need to change these variables below at the beginning of your sketch to your WiFi authentication information.
const char* ssid     = "your-ssid";
const char* password = "your-password";
Now, connect to the WiFi network by using the WiFi.begin() function and passing in your SSID and Password as variables to the WiFi.begin() function.
  WiFi.begin(ssid, password);

  while (WiFi.status() != WL_CONNECTED)

  {

      delay(500);

      Serial.print(".");

  }
Configuring time for your location
The configTime() function gives us the ability to tell our device what time zone we are in and what time servers (and backup time servers if the primary server is busy) that we will be using to retrieve our time information. It also initializes the local system time in this example.
Important: The configTime() function, in addition to configuring our timestamp data, also stores the timestamp retrieved from the NTP Server as the local system time.
You may want to adjust the following variables in the example sketch to reflect your timezone and the correct daylight saving time.
These 2 variables are the first 2 parameters passed to the configTime() function. And the values for these 2 variables are passed in as offsets in seconds.
The time zone setting below is for the U.S. Central Time Zone. You can find a list of worldwide time zones here: List of Time Zones.
The daylight saving parameter is passed in as either 0 or 3600 depending on whether your area is observing daylight saving time or not.
The primary NTP Server to request the current time from is “time.nist.gov”. And the backup servers, if the primary server is busy or offline, are “0.pool.ntp.org” and “1.pool.ntp.org”.
long timezone = -6;  // (utc+) TZ in hours

byte daysavetime = 1;

Serial.println("Contacting Time Server");

configTime( 3600*timezone, daysavetime*3600, "time.nist.gov", "0.pool.ntp.org", "1.pool.ntp.org" );

delay(2000);
Displaying times with the ESP32
Below we will get the local time in both human readable form and we will also get an epoch time.
You get the system time by using the getLocalTime() function. The getLocalTime() function retrieves the system time from your ESP32 (which if you recall was saved by the configTime function) and stores it in a time structure named tmstruct in this example. The code below is the actual time structure that can be found in time.h.
struct tm {

        int8_t          tm_sec; /**< seconds after the minute - [ 0 to 59 ] */

        int8_t          tm_min; /**< minutes after the hour - [ 0 to 59 ] */

        int8_t          tm_hour; /**< hours since midnight - [ 0 to 23 ] */

        int8_t          tm_mday; /**< day of the month - [ 1 to 31 ] */

        int8_t          tm_wday; /**< days since Sunday - [ 0 to 6 ] */

        int8_t          tm_mon; /**< months since January - [ 0 to 11 ] */

        int16_t         tm_year; /**< years since 1900 */

        int16_t         tm_yday; /**< days since January 1 - [ 0 to 365 ] */

        int16_t         tm_isdst; /**< Daylight Saving Time flag */

    };
The getLocalTime() function has an optional timeout parameter in milliseconds (with the default value being 5 seconds). This timeout value is used in case there is an NTP server request being made in the background (for example when you just called the configTime() function before calling the getLocalTime() function like in this example sketch).
If needed, the getLocalTime() function will wait until either a valid system time is received or until the timeout occurs. The function will return false, if no valid system time was received before the timeout duration occurs.
More detail for how the ESP32 handles system time can be found here: ESP32 System Time.
You can format the time for displaying in the serial monitor by using the sprintf() function.
  char buffer[30];

  getLocalTime(&tmstruct, 5000);

  sprintf(buffer,"%d-%02d-%02d, %02d:%02d:%02d",(tmstruct.tm_year)+1900,(  tmstruct.tm_mon)+1, tmstruct.tm_mday,tmstruct.tm_hour , tmstruct.tm_min, tmstruct.tm_sec );

  Serial.println(String(buffer));
You can also get the epoch time by just using the now() function. And, then display the UTC time on the serial monitor.
  time_t now;

  time(&now);

  Serial.print("Epoch time (UTC): ");

  Serial.println(now);
The Arduino loop() Function
Now in the Arduino main loop, the getLocalTime() and now() functions are called again to display the current time in the serial monitor. After a delay() of 5 seconds, the program repeats itself displaying the updated times every 5 seconds.
  char buffer[30];

  getLocalTime(&tmstruct, 5000);

  sprintf(buffer,"%d-%02d-%02d, %02d:%02d:%02d",(tmstruct.tm_year)+1900,( tmstruct.tm_mon)+1, tmstruct.tm_mday,tmstruct.tm_hour , tmstruct.tm_min, tmstruct.tm_sec);

  Serial.println(String(buffer));

  Serial.println();

  Serial.println();

  time_t now;

  time(&now);

  Serial.print("Epoch time (UTC): ");

  Serial.println(now);

  Serial.println();

  delay(5000);
Testing The Arduino Time Sketch
Once you have connected an ESP32 to your computer, upload the above sketch to your device. After the sketch has been uploaded to your ESP32, press the reset (RST) button on your ESP32 device and you should see the following displayed on the serial monitor.
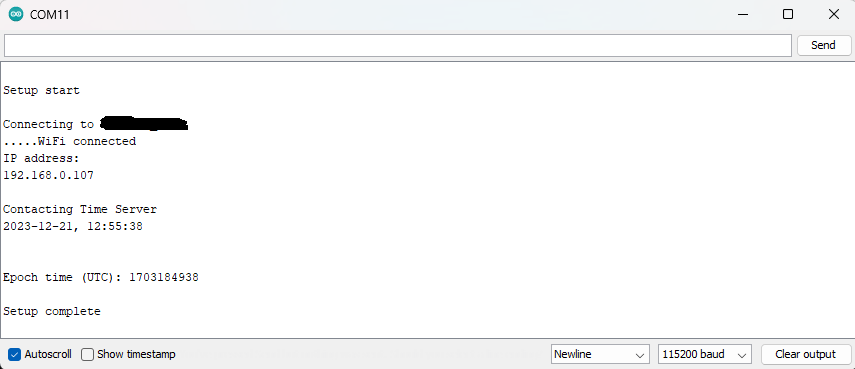
And that is all there is to it! It is that easy to use timestamps with your ESP32 device and the Arduino IDE!
Where To Go From Here
Using timestamps with your ESP32 device can add a lot of functionality to your ESP32 projects. This functionality is especially useful when creating data logging projects like tracking temperatures or humidity readings or other readings from sensors connected to your ESP32.
For practice, try retrieving the local time for your city / time zone during daylight saving time and display it in the serial monitor. After that, you can try and make a world clock by using different time zones throughout the world.


