Arduino Sugar Fill Machine :: Member Project
They say that a spoonful of sugar makes the medicine go down. But what’s even better than a spoonful of sugar?
A spoonful of sugar that fills up automatically! That’s what Henry made with his Arduino project that makes pouring and measuring sugar easy and automatic.
Because what’s better than a spoonful of sugar that pours itself!?
Read on to find out more about how this sweet project came to be!
Henry, tell us more about why the heck you built a ‘’Sugar Fill Machine?”
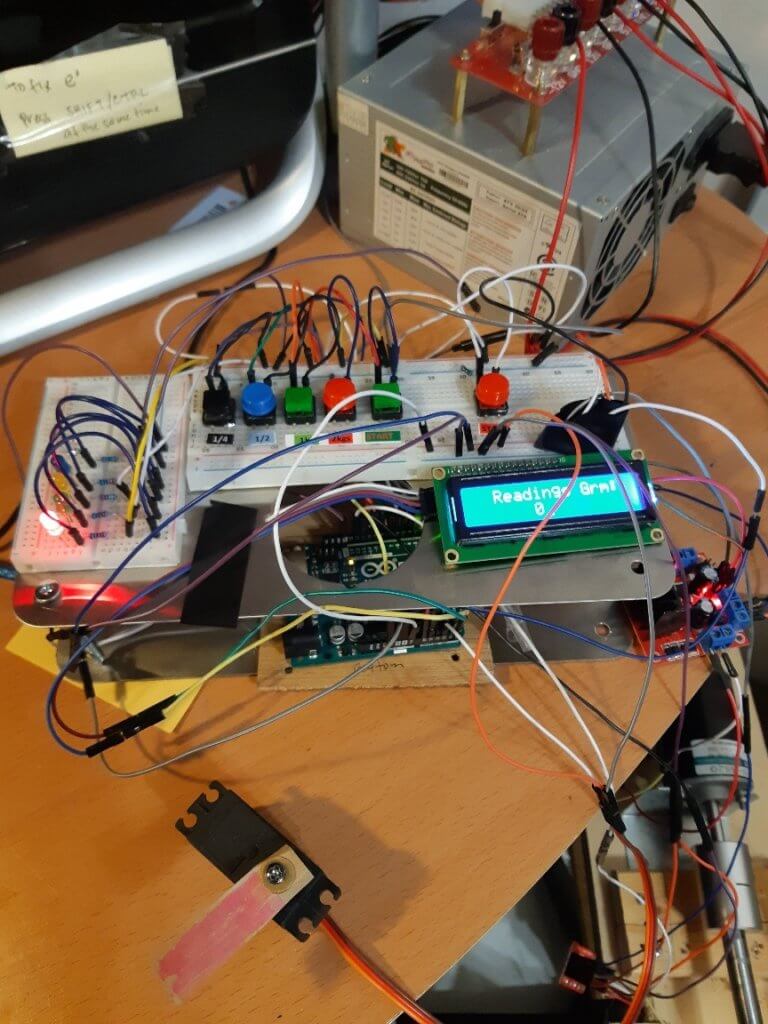
In the Philippines, all of the small retail stores manually pack their sugar in measurements of 250 grams, 500 grams, and 1,000 grams. This inspired me to create a product that semi-automated this current manual process.
How interesting! So how does your project even work?
I set up four buttons to push: a start/stop button, one button to disperse the 250 grams of sugar, one for the 500 grams, and one for the 1,000 grams.
You can choose how much sugar you would like to disperse by pressing the button for the weight you would like.
When you press the 250 gram, 500 gram, or 1,000 gram button, and LED light will light up. When you press the start button, the servo motor moves to open the hopper gate and the DC motor starts to run in order to move the sugar out from the hopper for weighing the sugar in the load cell.
Once the desired amount is poured out, the servo motor moves to close the hopper gate and the DC motor stops. To do another round of weighing, you can just choose a weight and press the start button. To end the process during the fill process, you can just press the stop button.
That’s amazing! So, what was your biggest struggle as you worked through this project?
I started with no background in electronics or Arduino coding. Every step was a challenge. However, the course modules offered by Programming Electronics Academy are very well organized.
I had this project in mind since the moment I started the course, and the modules helped me get through this project.
How inspiring! Well, did the project end up as you expected?
The code for the project did end up as I expected. The most apprehensive part of putting the program together was putting up the hopper since I was not initially sure how the sugar would flow.
Well, you did it! Looking back on this project, what can you say you have learned about programming and/or electronics through the creation process?
I learned about how to integrate push buttons, LEDs, servo motors, and DC motors. I also learned how to code using IF statements, which helped me integrate the load cells as well.
Learning about all of this allowed me to learn more about debounce circuits and apply that knowledge.
On the topic, was the training at programming electronics academy able to help you build your skill?
Absolutely! The course modules were well organized and are presented in a very comprehensive manner. The programming electronics academy helped me achieve my goal of completing this project, even though I had no background at all in electronics!
Can you show us some of your Arduino code?
#include <Servo.h>
Servo myservo;

#include <Wire.h>
#include <LiquidCrystal_I2C.h>
#define SCL A5
#define SDA A4
LiquidCrystal_I2C lcd(0x27,16,2);

#include <HX711.h>
#define DOUT  12
#define CLK  11
HX711 scale(DOUT, CLK);


int ENA = A2;
int IN1 = A0;
int IN2 = A1;

const byte ledPin1 = 3;
const byte ledPin2 = 4;
const byte ledPin3 = 5;
//const byte ledPin4 = ; not connected
const byte ledPin5 = 6;

const byte buttonPin1 = 7;
const byte buttonPin2 = 8;
const byte buttonPin3 = 9;
//const byte buttonPin4 = ; 2kgs button -not connected
const byte buttonPin5 = 10;
const byte buttonPin6 = 2;

boolean buttonPress5 = false;
volatile boolean buttonPress6 = true;

void setup() {
  Serial.begin(9600);
  lcd.init ();
  lcd.backlight();
  lcd.cursor();
  //lcd.blink();
  scale.set_scale(218);
  scale.tare();

  lcd.print("Let's do it!");
  delay (1000);
 // Serial.println("Readings:");

 myservo.attach (A3); //(5, 500, 2000);
  //myservo.write(90);
  myservo.write (5);

//led output
  pinMode (ledPin1, OUTPUT);
  pinMode (ledPin2, OUTPUT);
  pinMode (ledPin3, OUTPUT);
  //pinMode (ledPin4, OUTPUT);
  pinMode (ledPin5, OUTPUT);

 //setup button pins
  pinMode (buttonPin1, INPUT);
  pinMode (buttonPin2, INPUT);
  pinMode (buttonPin3, INPUT);
 // pinMode (buttonPin4, INPUT);
  pinMode (buttonPin5, INPUT);
  pinMode (buttonPin6, INPUT);

  pinMode(ENA, OUTPUT);
  pinMode(IN1, OUTPUT);
  pinMode (IN2, OUTPUT);

  digitalWrite (IN1, LOW);
  digitalWrite (IN2, LOW);
  attachInterrupt(digitalPinToInterrupt(buttonPin6),stopButton,CHANGE);
}

void loop () {

 boolean buttonPress1 = digitalRead(buttonPin1);
 boolean buttonPress2 = digitalRead(buttonPin2);
 boolean buttonPress3 = digitalRead(buttonPin3);
// boolean buttonPress4 = digitalRead(buttonPin4);
 boolean buttonPress5 = digitalRead(buttonPin5);
 boolean buttonPress6 = digitalRead(buttonPin6);

//Variables set on the condition to stop the motor when desired weight is achieved

 int ledState_1 = digitalRead(ledPin1);
 int ledState_2 = digitalRead(ledPin2);
 int ledState_3 = digitalRead(ledPin3);
// int ledState_4 = digitalRead(ledPin4);

  byte Open_Position = 5;
  byte close_Position = 90;

 long actual_Weight = (scale.get_units());
 lcd.clear();
 lcd.setCursor (2,0);
 lcd.print ("Readings Grm: ");
 lcd.setCursor (6,1);
 lcd.print(actual_Weight);
 //Serial.print(actual_Weight);
 //Serial.println(" g");
 Serial.println ("Sta  ");
 Serial.print (ledState_3);


// 250 grams fill weight

 if (buttonPress1 == true){
    digitalWrite (ledPin1, HIGH);
 }
  if (buttonPress5 != false){
    myservo.write(Open_Position);
    delay(1000);
    digitalWrite (ledPin5, HIGH);
    digitalWrite (IN1, HIGH);
    digitalWrite (IN2, LOW);
    analogWrite (ENA, 250);

 }

 if ((actual_Weight >= 250)&& (ledState_1 == HIGH)) {
    myservo.write(close_Position);
    digitalWrite (IN1, LOW);
    digitalWrite (IN2, LOW);

 }

// 500 grams fill weight

    if (buttonPress2 == true){
    digitalWrite (ledPin2, HIGH);
    }
    if (buttonPress5 != false){
    digitalWrite (IN1, HIGH);
    digitalWrite (IN2, LOW);
    analogWrite (ENA, 250);
    }
   if ((actual_Weight >= 500)&& (ledState_2 == HIGH)) {
    digitalWrite (IN1, LOW);
    digitalWrite (IN2, LOW);
 }

 // 1000 GRAMS

 if (buttonPress3 == true){
    digitalWrite (ledPin3, HIGH);
 }
if (buttonPress5 != false){
    digitalWrite (IN1, HIGH);
    digitalWrite (IN2, LOW);
    analogWrite (ENA, 250);
    }
 if ((actual_Weight >= 1000)&&(ledState_3 == HIGH)) {
    digitalWrite (IN1, LOW);
    digitalWrite (IN2, LOW);
 }

//2000 GRAMS (not connected)

//if (buttonPress4 == true){
   // digitalWrite (ledPin4, HIGH);
// }
//if (buttonPress5 != false){
  //  digitalWrite (IN1, HIGH);
  //  digitalWrite (IN2, LOW);
//    analogWrite (ENA, 250);
  //  }
// if ((actual_Weight >= 2000)&& (ledState_4 == HIGH)) {
  //  digitalWrite (IN1, LOW);
  //  digitalWrite (IN2, LOW);
 //}

}//close loop

void stopButton (void){
  buttonPress6 != true;
  digitalWrite(ledPin1, LOW);
  digitalWrite(ledPin2, LOW);
  digitalWrite(ledPin3, LOW);
//  digitalWrite(ledPin4, LOW);
  digitalWrite(ledPin5, LOW);

  digitalWrite (IN1, LOW);
  digitalWrite (IN2, LOW);
  }
What type of Arduino board, Arduino clone, or Arduino compatible board does your project use?
Arduino Uno
What components did you use in your project?
Resistor, LED, H-Bridge, Servo Motor, DC Motor, LCD Display, and a Button
How do you power your project?
I used a PC Power Supply
About Henry:
Henry is a certified public accountant from the Philippines. While Henry had experience programming smaller commands in Microsoft Excel, such as IF statements, he had no other prior background in electronics!


Henry, GREAT project. I love how you used the interrupt function as part of your sketch. I have just this week been watching the modules on that and think that I can use it in my project.
Did you think about using the switch/case control for sketch? If you chose not to use it, why?
How much do you think that the “A Prototyping Process” module help you in your endeavors?
All in all, great job! Salamat.
Jim
Hi Jim,
Thank you for your feedback. In the first place, I was inclined to use the switch/case. The only idea I can think of to apply the switch/case in this project is to use a potentiometer to select the value on my pre-defined weight (250grms; 500 grms; 1000grms and 2000 grms.) but I find more convenient for the actual user to use a push button thus, I changed my thought to apply the If statements. The prototyping process helps a lot. It serves as my guide on how to organize things and my thought.
Right now I have the printed circuit board just waiting delivery on the 3d printed hopper/canister to test run this project. Looking forward to submitting a video to see this project in action.
Regards,
Henry
That makes sense!
Hey Henry, are you keen to share the full code and electronic diagram of your project?
I would like to use it on a coffee packing machine.
Thanks
The above skekch is not working, will you share the circuit diagram.
Hello dear friend, could you pass me the complete code to implement it, I am a newbie in arduino and I found your project interesting.
I really appreciate it if you share it, thank you very much.
hi henry, can you share the circuit diagram using TinkerCad, i really need this for my final project.
yes Henry, I need also a circuit diagram, i’v been try made by my circuit but i have a so many troble, please to share your circuit diagram if you don’t mind