Swarf Dewatering with Arduino:: Member Project
Have some swarf you need to dewater?
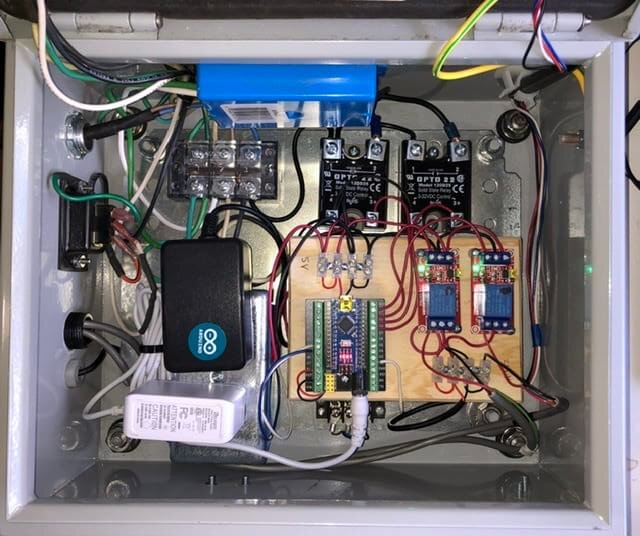
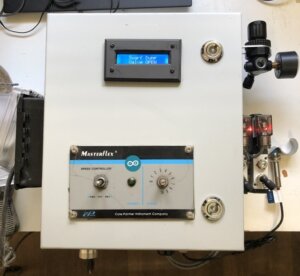
PEA member, James Hicks, has a lot of swarf he needed dewatered so he built a machine that does just that, using an Arduino Nano, LCD displays, pumps, servo motors, and more.
Wondering what swarf is, and why it needs dewatered? Read on!
What is swarf?
Swarf are fine chips or filings of stone, metal, or other material produced by a machining operation. The swarf talked about here is the “sludge” left in a coolant after the grinding/cutting process.
So why the heck did you build a swarf dewaterer?
The swarf would plug the filter bag. By removing extra water first, the dewatering filter bag lasts 2X longer.

Good ‘ol swarf
How does your project work?
Concentrated swarf is transferred into the tub. (Grinding waste and machining coolant.). The Arduino Nano adds flocculent and stirs the mixture to create floc – which settles out during the settling step by gravity, leaving clean coolant on top and swarf below.
An air pinch valve opens to bypass the clean water and then the dirty valve opens to empty the concentrated swarf into the filter bag.
The final step is to reset the interrupt flag and wait for the next dump cycle.
What was your biggest struggle as you worked through this project?
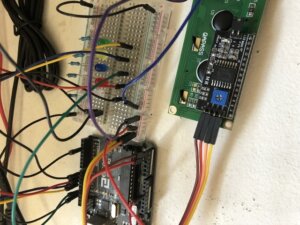
Initially it was learning about interrupts and getting the inductive prox switch to work properly.
Extended testing showed that the system was ready to install! But I immediately started getting false interrupt signals.
It turns out that when the air solenoid valves turned off, they induced significant electrical noise, and this was the root cause of the false interrupt signals.
I identified 2 solutions…
The first was to add a delay after the solenoid valves turned off and then reset the interrupt flag variable.
A second approach was to add fly back diodes (1N4007) across the solenoid coils.
Both worked and both were implemented – belts and suspenders!
Did the project end up as you expected?
The controls are working but I need to improve the tub design. The original tub is a $35 wheelbarrow tub. The new design will have to be custom fabricated.
Looking back on this project, what can you say you have learned about through the creation process?
I learned about interrupts!
And functions!
And electrical noise
And fly back diodes
And air control valves
And programming fixes/modifications
And loose connections….
And relays
And connecting 5v and 120v ground together
And still learning!
Was the training at Programming Electronics Academy able to help you build your skill?
Yes! This is where I learned about interrupts and functions. Plus much more, but interrupts were the key to getting my project off the ground.
Arduino Code:
About James:
James is a Sr. Equipment Engineer. He studied basic electrical things with CIE (Cleveland Institute of Electronics) back in the days when things were done by snail mail. He dabbled in Arduino off and on but never got any traction until the Coronavirus got him started working from home. He spent several months just doing online lessons and finally got the confidence to start this project – his programming experience started with the onset of the coronavirus.


Wow!!! that took some work and engineering….
Hi James, That looks great and I bet it’s very useful and cost saving will pay for itself in no time. Love the wheel barrow bit, something I would do that. hope the effort was appreciated. The code looks great and being on the starter course surprisingly, I can understand it all , the logic and everything, even the revisions make sense. The trouble with me is, as soon as I start to right any code then everything goes out of my head, is there a bracket ? is it in caps? do I put it before set up or after.? and I haver to copy code from elsewhere and amend it to what I want. so well done, I am similar in that covid has sparked my interest in Ardruino. trouble is it may be over before i get any good….. cheers………… Daz