
3D Printed PIR Arduino Nano Alarm Clock
Combining electronics and 3D printing never ceases to amaze me. It feels like the possibility for creating exists within the walls of our own homes like never before.
This smart alarm clock project by James Greeve, a student of Arduino Course for Absolute Beginners, is a perfect example of a functional 3D printed object.
This project was submitted by one of our members. You can see more of our member's projects here.
Not a member yet? Sign up here.
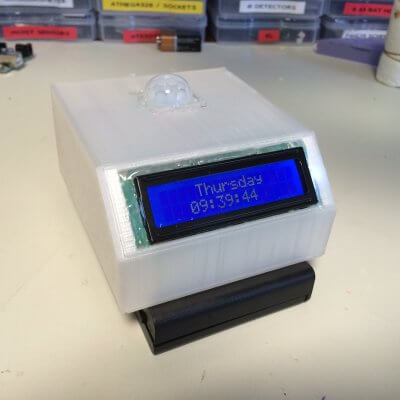
James writes:
I recently purchased two things, a Dremel 3D printer and DS1307 RTC. I decided to use them both in a simple project.
I built an alarm clock, that uses a PIR (passive infrared sensor), 16×2 LCD, piezo buzzer, DS1307 RTC, and the Arduino Nano.
I printed a simple enclosure that would house everything. Since the 16×2 LCD has a backlight, I have the PIR set to brighten the display every time I wave my hand nearby. It immediately goes dim to help save battery life and not be distracting on my night stand.
The alarms are all set to activate during the weekday, the backlight display will be extra bright and the piezo buzzer will sound.
The alarm can be reset by simply waving my hand over the PIR.
As with most of my projects the intent was simple:
Use and apply more code learned, learn to draw and fabricate a 3d printed object and finally make it functional.
Arduino Code
/* This is first attempt at building an alarm clock.

It uses a DS1307 RTC board to keep time.

A LCD 16 X 2 display.

One POT to adjust cursor contrast.

The LCD background is controlled on a PWM output.

Piezo buzzer used for audio alarm.

By James Greeve

*/

#include

#include "RTClib.h"

#include

LiquidCrystal lcd(12, 11, 5, 4, 3, 2);

RTC_Millis rtc;

int background = 6;

int brightness = 1;

int sound = 10;

int motion = 13;

int PIR;

int PIRlaststate;

unsigned long previousMillis = 0;

const long interval = 1000;

void setup () {

  pinMode(sound, OUTPUT);

  pinMode(motion, INPUT);

  Serial.begin(9600);

  Wire.begin();

  lcd.begin(16, 2);

  rtc.adjust(DateTime(2015, 1, 2, 11, 41, 00));

}

void loop () {

  brightness = 1;

  PIR = digitalRead (motion);

  if (PIR == HIGH) {

    brightness = 10;

  }

  unsigned long currentMillis = millis();

  analogWrite(background, brightness);

  DateTime now = rtc.now();

  //lcd.setCursor(0, 0);

  //lcd.print("Digital Clock");

  lcd.setCursor(4, 0);

  int dayofweek = now.dayOfWeek();

  switch (dayofweek) {

    case 1:

      lcd.print("Monday  ");

      break;

    case 2:

      lcd.print("Tuesday  ");

      break;

    case 3:

      lcd.print("Wednesday");

      break;

    case 4:

      lcd.print("Thursday ");

      break;

    case 5:

      lcd.print("Friday  ");

      break;

    case 6:

      lcd.print("Saturday");

      break;

    case 0:

      lcd.print("Sunday  ");

      break;

      if (currentMillis - previousMillis >= interval) {

      }

  }

  lcd.setCursor(3, 1);

  if (now.hour() < 10)

    lcd.print('0');

  lcd.print(now.hour(), DEC);

  lcd.print(':');

  if (now.minute() < 10)

    lcd.print('0');

  lcd.print(now.minute(), DEC);

  lcd.print(':');

  if (now.second() < 10)     lcd.print('0');   lcd.print(now.second(), DEC);   if (currentMillis - previousMillis >= interval) {

  }

  if (PIRlaststate == LOW && dayofweek == 1 || dayofweek == 2 || dayofweek == 3 || dayofweek == 4 && (now.hour() == 4) && (now.minute() == 45)) {

    Alarm();

  }

}

void Alarm() {

  PIR = digitalRead(motion);

  PIRlaststate = PIR;

  if (PIR == LOW) {

    lcd.clear();

    analogWrite(background, 200);

    lcd.setCursor(5, 1);

    tone(10, 2000, 1200);

    lcd.print("ALARM");

    delay (1000);

    analogWrite(background, 0);

    noTone(10);

    delay (1000);

  }

}
You can download the electrical schematic here.
As always James is looking for some feedback on the project and would love to hear your thoughts and suggestions in the comments.









Hi James! We want to feature this project on EEWeb.com. If you are interested, kindly drop me a message on my business e-mail: cexclamador.eeweb@gmail.com. I’ll be looking forward to your response! Thanks.
Code error dayOfWeek