ESP32 iBeacon for beginners [Guide + Code]
iBeacon is a powerful BLE (Bluetooth Low Energy) communication protocol made by Apple that allows for any BLE enabled device to find its location and send information with the user’s permission.
Even though this was published by Apple, any device that has BLE enabled can use the iBeacon protocol (No iPhone needed!)
At the end of this article, you will be able to use the ESP32 to make your own device running the iBeacon protocol and use all of its basic functions. Let’s see what you can do with an iBeacon below.
Table of Contents
- What can you do with iBeacon?
- Setting up the ESP32 to make an iBeacon
- Getting a UUID for your iBeacon
- Picking a BLE Scanner application
- ESP32 iBeacon Code Walk through
- Library Inclusions
- Defining Constants and Global Variables
- Class: My Server Callbacks
- Class: My Callbacks
- Function: Initialize Service
- Function: Initialize Beacon
- Function: Setup
- Function: Main Loop
- Running the code
- iBeacon Advertising
- iBeacon Proximity
- iBeacon Server
What can you do with iBeacon?
One of the coolest iBeacon projects I have seen used the technology to automatically lock and unlock their smart-home based on the proximity of their phone. This allowed them to walk up to their house and have the door magically unlock without them having to do anything.
They could also walk through their house and apps would automatically open based on where they were at (i.e. TV remote in the living room or cooking app in the kitchen). But this technology is used for more than personal projects.
iBeacon is used in a variety of industries to help with indoor tracking and asset tracking to creating unique experiences for people based on their location.
In a lot of ways, the iBeacon technology is similar to an Airtag (A tracking device Apple sells) but with a purpose of providing information at a location and less about location tracking. Apple uses its network of phones to make Airtags a better location tracking device and has a proprietary tracking algorithm that allows it to find devices no matter the distance.
But the iBeacon BLE is the foundational technology that makes Airtags possible. Unlike an Airtag, iBeacons can also provide services for any application you would want to build, making it a powerful tool for combining tracking with functionality, which is why they are still used today.
So let’s get to programming and build our first iBeacon!
Setting up the ESP32 to make an iBeacon
If you haven’t set up an ESP32 before I would recommend going to the ESP32 setup guide here (It can be surprisingly tricky). Once you have that set up, you should have access to the example library and the board drivers necessary for the project.
Do note that there are a ton of different ESP32 board models out there and some may require additional drivers before you can use it. After the basics, we can begin to customize your code to work for you.
Getting a UUID for your iBeacon
To help with setting up and testing your iBeacon, you will need to use a few tools outside of the Arduino IDE. You can use this tool to generate a random and secure UUID (Universally Unique IDentifier) for testing.
UUID’s are important to get the best functionality out of your iBeacon and I will explain how to use them below shortly.
Picking a BLE Scanner application
You will also need an app that will allow you to detect your iBeacon.
There are a ton of options if you type in BLE Scanner in a general app store, but my personal favorite is LightBlue (available in iOS or android), due to it having excellent features for free and being extremely easy to use.
You should now have everything you need to start making and playing with your own ESP32 iBeacon device!
ESP32 iBeacon Code Walk through
To set up your first iBeacon, we will be using the example sketch provided by the open source community (Attributed authors: 31337Ghost and Neil Kolban).
Here is the code in its entirety.
Below we will go through each section of the code and what it does so you can start to understand exactly how it works and change things for your own project!
#include <BLEDevice.h>
#include <BLEServer.h>
#include <BLEUtils.h>
#include <BLE2902.h>
#include <BLEBeacon.h>
#define DEVICE_NAME            "ESP32"
#define SERVICE_UUID           "7A0247E7-8E88-409B-A959-AB5092DDB03E"
#define BEACON_UUID            "2D7A9F0C-E0E8-4CC9-A71B-A21DB2D034A1"
#define BEACON_UUID_REV        "A134D0B2-1DA2-1BA7-C94C-E8E00C9F7A2D"
#define CHARACTERISTIC_UUID    "82258BAA-DF72-47E8-99BC-B73D7ECD08A5"
BLEServer *pServer;
BLECharacteristic *pCharacteristic;
bool deviceConnected = false;
uint8_t value = 0;

class MyServerCallbacks: public BLEServerCallbacks {
    void onConnect(BLEServer* pServer) {
      deviceConnected = true;
      Serial.println("deviceConnected = true");
    };

    void onDisconnect(BLEServer* pServer) {
      deviceConnected = false;

      Serial.println("deviceConnected = false");
      // Restart advertising to be visible and connectable again
      BLEAdvertising* pAdvertising;
      pAdvertising = pServer->getAdvertising();
      pAdvertising->start();
      Serial.println("iBeacon advertising restarted");

    }

};

class MyCallbacks: public BLECharacteristicCallbacks {
    void onWrite(BLECharacteristic *pCharacteristic) {

      std::string rxValue = pCharacteristic->getValue();
      if (rxValue.length() > 0) {
        Serial.println("*********");
        Serial.print("Received Value: ");
        for (int i = 0; i < rxValue.length(); i++) {
          Serial.print(rxValue[i]);
        }

        Serial.println();
        Serial.println("*********");

      }

    }

};

void init_service() {
  BLEAdvertising* pAdvertising;
  pAdvertising = pServer->getAdvertising();
  pAdvertising->stop();

// Create the BLE Service
  BLEService *pService = pServer->createService(BLEUUID(SERVICE_UUID));

  // Create a BLE Characteristic
  pCharacteristic = pService->createCharacteristic(
                      CHARACTERISTIC_UUID,
                      BLECharacteristic::PROPERTY_READ   |
                      BLECharacteristic::PROPERTY_WRITE  |
                      BLECharacteristic::PROPERTY_NOTIFY
                    );

  pCharacteristic->setCallbacks(new MyCallbacks());
  pCharacteristic->addDescriptor(new BLE2902());
  pAdvertising->addServiceUUID(BLEUUID(SERVICE_UUID));

  // Start the service
  pService->start();
  pAdvertising->start();

}

void init_beacon() {
  BLEAdvertising* pAdvertising;
  pAdvertising = pServer->getAdvertising();
  pAdvertising->stop();

  // iBeacon
  BLEBeacon myBeacon;
  myBeacon.setManufacturerId(0x4c00);
  myBeacon.setMajor(5);
  myBeacon.setMinor(88);
  myBeacon.setSignalPower(0xc5);
  myBeacon.setProximityUUID(BLEUUID(BEACON_UUID_REV));
  BLEAdvertisementData advertisementData;
  advertisementData.setFlags(0x1A);
  advertisementData.setManufacturerData(myBeacon.getData());
  pAdvertising->setAdvertisementData(advertisementData);
  pAdvertising->start();
}

void setup() {
  Serial.begin(115200);
  Serial.println();
  Serial.println("Initializing...");
  Serial.flush();
  BLEDevice::init(DEVICE_NAME);
  pServer = BLEDevice::createServer();
  pServer->setCallbacks(new MyServerCallbacks());
  init_service();
  init_beacon();
  Serial.println("iBeacon + service defined and advertising!");
}

void loop() {
  if (deviceConnected) {
    Serial.printf("*** NOTIFY: %d ***n", value);
    pCharacteristic->setValue(&value, 1);
    pCharacteristic->notify();
    value++;
  }

  delay(2000);

}
Library Inclusions
First we need to include the libraries that handle communication to the BLE module and server generation.
You don’t need to understand exactly what they do in order to make an iBeacon but they are important if we want to make the code work on the ESP32.
#include <BLEDevice.h>
#include <BLEServer.h>
#include <BLEUtils.h>
#include <BLE2902.h>
#include <BLEBeacon.h>
Defining Constants and Global Variables
This section of the code will allow us to define the iBeacon UUID’s and allow for the publishing of location information.
The reason we use UUID’s in any application is because they allow us to make a unique identifier that is specific only to our application and its data. It is technically possible to generate the same UUID but with 340 undecillion possible UUID’s (340,282,366,920,938,463,463,374,607,431,768,211,456 to be exact 😉), I would buy a lottery ticket if that happens.
There is one name and 4 UUID’s you need to generate, but all of them can be random (If you want to start testing ASAP, just use the provided values and skip this section).
#define DEVICE_NAME            "ESP32"
#define SERVICE_UUID           "7A0247E7-8E88-409B-A959-AB5092DDB03E"
#define BEACON_UUID            "2D7A9F0C-E0E8-4CC9-A71B-A21DB2D034A1"
#define BEACON_UUID_REV        "A134D0B2-1DA2-1BA7-C94C-E8E00C9F7A2D"
#define CHARACTERISTIC_UUID    "82258BAA-DF72-47E8-99BC-B73D7ECD08A5"
DEVICE_NAME: This is just the name of the device so change it to whatever you would like. It makes it easier to find and connect to it when looking at a list of BLE devices.
SERVICE_UUID: This UUID is associated with the custom BLE service that you create and uniquely identifies your service among other BLE services. You can think of it as the “Service UUID” that allows devices to discover and recognize your specific service when they scan for nearby BLE devices.
BEACON_UUID: The BEACON_UUID is specific to the iBeacon technology and is part of what makes it so powerful. Below I made a diagram that will make it easy to understand how you can use it.
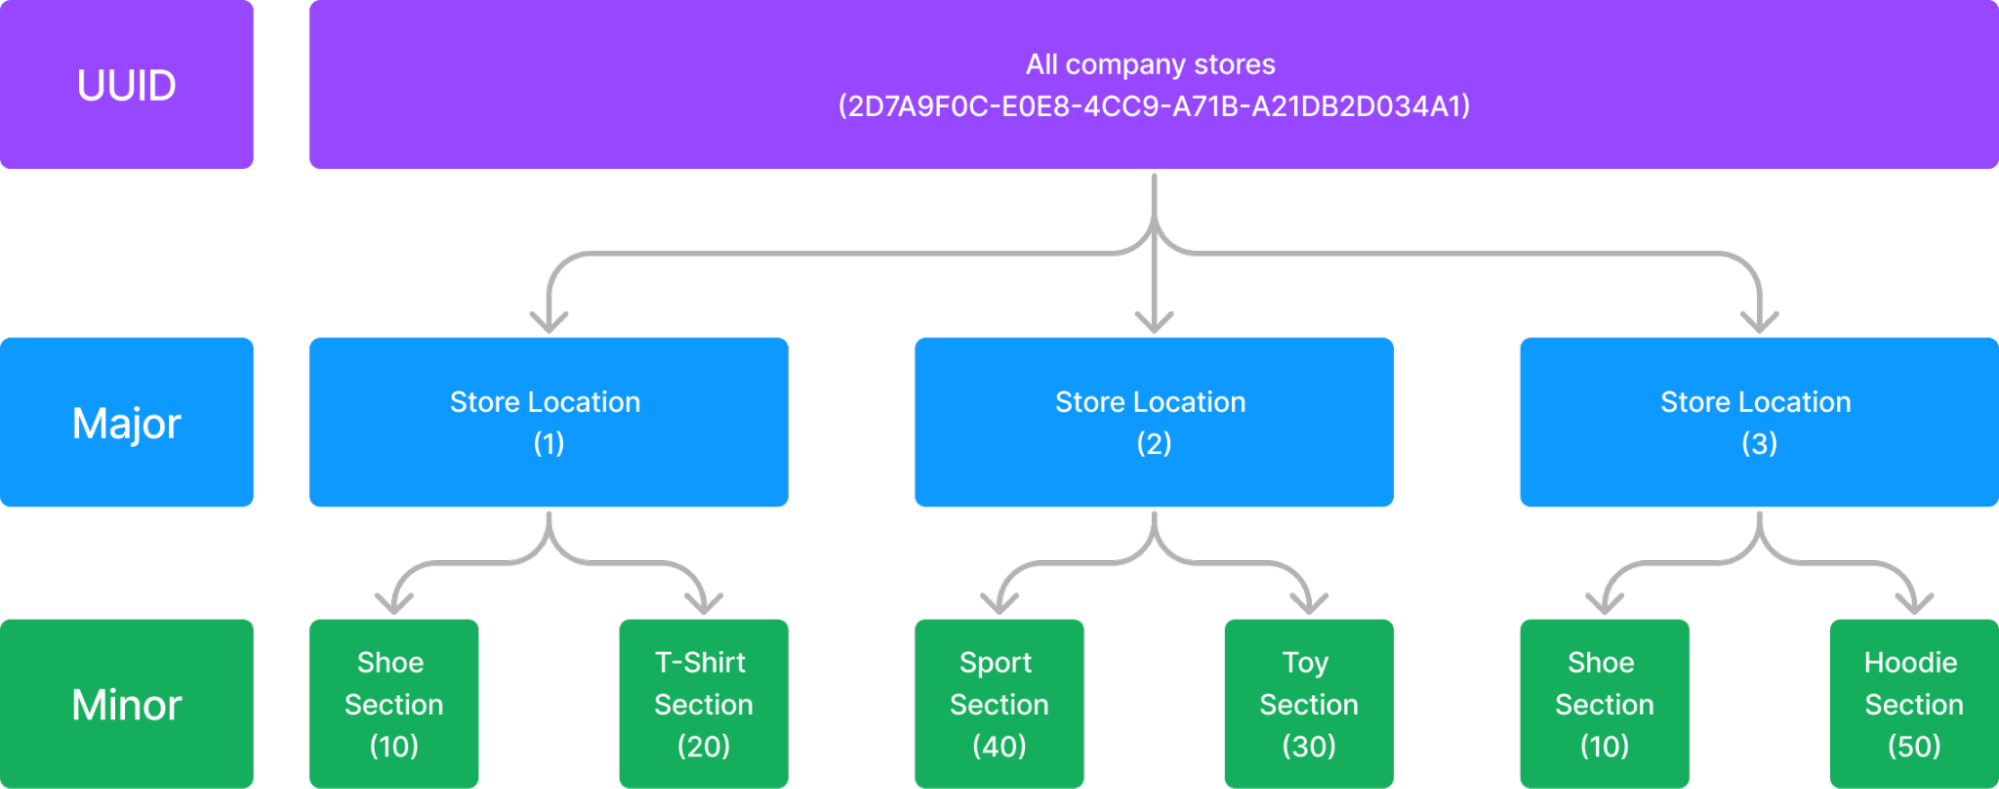
Imagine you are making an iBeacon network for a company that owns multiple super stores. The BEACON_UUID is what you would use to tag every single iBeacon that you are using for that company. You will also need to set a Major and a Minor value, but we don’t need to set that up until later in the code.
BEACON_UUID_REV (Reversed Beacon UUID): This UUID is a reversed version of the BEACON_UUID that is used for proximity measurement in this code. While it’s not strictly necessary to reverse it, doing so is a common practice for compatibility reasons, and it’s a requirement for some iBeacon implementations (but you should be fine to use a random value for this app).
CHARACTERISTIC_UUID: This UUID is associated with the BLE characteristics which represent data that can be exchanged between your device and a connected device allowing you to read and write data.
Here we are setting up the unique pointer variables that are going to be used to help deal with the data for the iBeacon server. It is not important to understand what a pointer is in this code in order to use it, but I recommend learning about them if you want to get into programming, especially with hardware.

BLEServer *pServer;
BLECharacteristic *pCharacteristic;

bool deviceConnected = false;
uint8_t value = 0;
Class: My Server Callbacks
This class defines a callback function for handling connecting and disconnecting from the BLE server that you are setting up.
class MyServerCallbacks: public BLEServerCallbacks {
    void onConnect(BLEServer* pServer) {
      deviceConnected = true;
      Serial.println("deviceConnected = true");
    };

    void onDisconnect(BLEServer* pServer) {
      deviceConnected = false;
      Serial.println("deviceConnected = false");

      // Restart advertising to be visible and connectable again
      BLEAdvertising* pAdvertising;
      pAdvertising = pServer->getAdvertising();
      pAdvertising->start();
      Serial.println("iBeacon advertising restarted");
    }

};
Class: My Callbacks
Similar to the class above, this class defines a callback for handling how the iBeacon will function, this time handling any data that the device might receive. Essentially the code works by pulling any string information using the getValue() function and saving that information the the rxValue variable.
If you receive any information from the get value function it will then print out the information, one character at a time, in the serial log. Later on in the guide we will show you how to read this information.
class MyCallbacks: public BLECharacteristicCallbacks {
    void onWrite(BLECharacteristic *pCharacteristic) {

      std::string rxValue = pCharacteristic->getValue();
      if (rxValue.length() > 0) {
        Serial.println("*********");
        Serial.print("Received Value: ");
        for (int i = 0; i < rxValue.length(); i++) {

          Serial.print(rxValue[i]);

        }

        Serial.println();
        Serial.println("*********");

      }

    }

};
Function: Initialize Service
This function is where we initialize the “service” for the device. Your ESP32 is a “server” that is providing the iBeacon “service”. Using the pointers we made above we can add the UUID information as well as activate the BLE characteristics.
BLE characteristics are what your device is allowed to do when serving information. In the code below you can see that we activate the read, write, and notify properties allowing the device to read, write, and notify information to any other devices like your smartphone.
At the end of the code we start the server and begin to advertise data, allowing for your device to communicate with other devices via BLE protocol.
void init_service() {
  BLEAdvertising* pAdvertising;

  pAdvertising = pServer->getAdvertising();
  pAdvertising->stop();

  // Create the BLE Service
  BLEService *pService = pServer->createService(BLEUUID(SERVICE_UUID));

  // Create a BLE Characteristic
  pCharacteristic = pService->createCharacteristic(

                      CHARACTERISTIC_UUID,
                      BLECharacteristic::PROPERTY_READ   |
                      BLECharacteristic::PROPERTY_WRITE  |
                      BLECharacteristic::PROPERTY_NOTIFY

                    );

  pCharacteristic->setCallbacks(new MyCallbacks());
  pCharacteristic->addDescriptor(new BLE2902());
  pAdvertising->addServiceUUID(BLEUUID(SERVICE_UUID));

  // Start the service
  pService->start();
  pAdvertising->start();

}
Function: Initialize Beacon
This is one of the most important functions in the code if you want to set up a full iBeacon system with multiple devices. This is where the advertising of your iBeacon occurs which is where the UUID, Major, and Minor are set up to publish from the BLE device.
Below is another reminder of how to use this in the context of your project.
| Field | Size | Description |
|---|---|---|
| UUID | 16 bytes | Application developers should define a UUID specific to their app and deployment use case. |
| Major | 2 bytes | Further specifies a specific iBeacon and use case. For example, this could define a sub-region within a larger region defined by the UUID. |
| Minor | 2 bytes | Allows further subdivision of region or use case, specified by the application developer. |
From: Getting Started with iBeacon
To set up the major and minor all you have to do is use the myBeacon.setMajor() and myBeacon.setMinor() and set them to whatever value you want. You can also use the myBeacon.setSignalPower() if you have an ESP32 module that supports variable transmissions. With that set up, you are now ready to start your ESP32 in the next block of code.
void init_beacon() {

  BLEAdvertising* pAdvertising;
  pAdvertising = pServer->getAdvertising();
  pAdvertising->stop();

  // iBeacon
  BLEBeacon myBeacon;
  myBeacon.setManufacturerId(0x4c00);
  myBeacon.setMajor(5);
  myBeacon.setMinor(88);
  myBeacon.setSignalPower(0xc5);
  myBeacon.setProximityUUID(BLEUUID(BEACON_UUID_REV));
  BLEAdvertisementData advertisementData;
  advertisementData.setFlags(0x1A);
  advertisementData.setManufacturerData(myBeacon.getData());
  pAdvertising->setAdvertisementData(advertisementData);
  pAdvertising->start();

}
Function: Setup
This section of the code starts up the server of the iBeacon as well as sets up a serial log so you can see your device in action.
void setup() {

  Serial.begin(115200);
  Serial.println();
  Serial.println("Initializing...");
  Serial.flush();

  BLEDevice::init(DEVICE_NAME);
  pServer = BLEDevice::createServer();
  pServer->setCallbacks(new MyServerCallbacks());
  init_service();
  init_beacon();
All of the setup is done in the code above and the last section below is your device in action!
Function: Main Loop
This loop will run a simple notification loop that will iterate a number every 2 seconds and publish that to any devices connected to the ESP32 iBeacon.
This is perfect for testing, but if you wanted to create a service for your BLE , this is where you would put that code. For example, you could have it send information about a product in the store using Serial.print(“This is a nice product”).
Now that we have gone through the code and set everything up, it’s time to upload it to your ESP32.
void loop() {

  if (deviceConnected) {
    Serial.printf("*** NOTIFY: %d ***n", value);
    pCharacteristic->setValue(&value, 1);
    pCharacteristic->notify();
    value++;

  }

  delay(2000);

}
Running the code
Make sure you have your ESP32 connected and set up properly before attempting to upload the code. For this project you need nothing other than your ESP32 and a USB cable to connect it to your computer.
Once that is set up, press the upload button and hopefully you should get a read out like this:

If you encounter any errors, make sure to check your code or the set up to your ESP32. Sometimes there can be an issue with frequency on your BLE chip that can cause upload failures.
Once you have that sorted out you now have a working iBeacon, so let’s see how to use it in the next section!
iBeacon Advertising
The first and most important feature of your iBeacon is its ability to transmit advertisement data to devices like your smartphone. This is where you can use the LightBlue app or any other app that allows you to detect BLE devices.
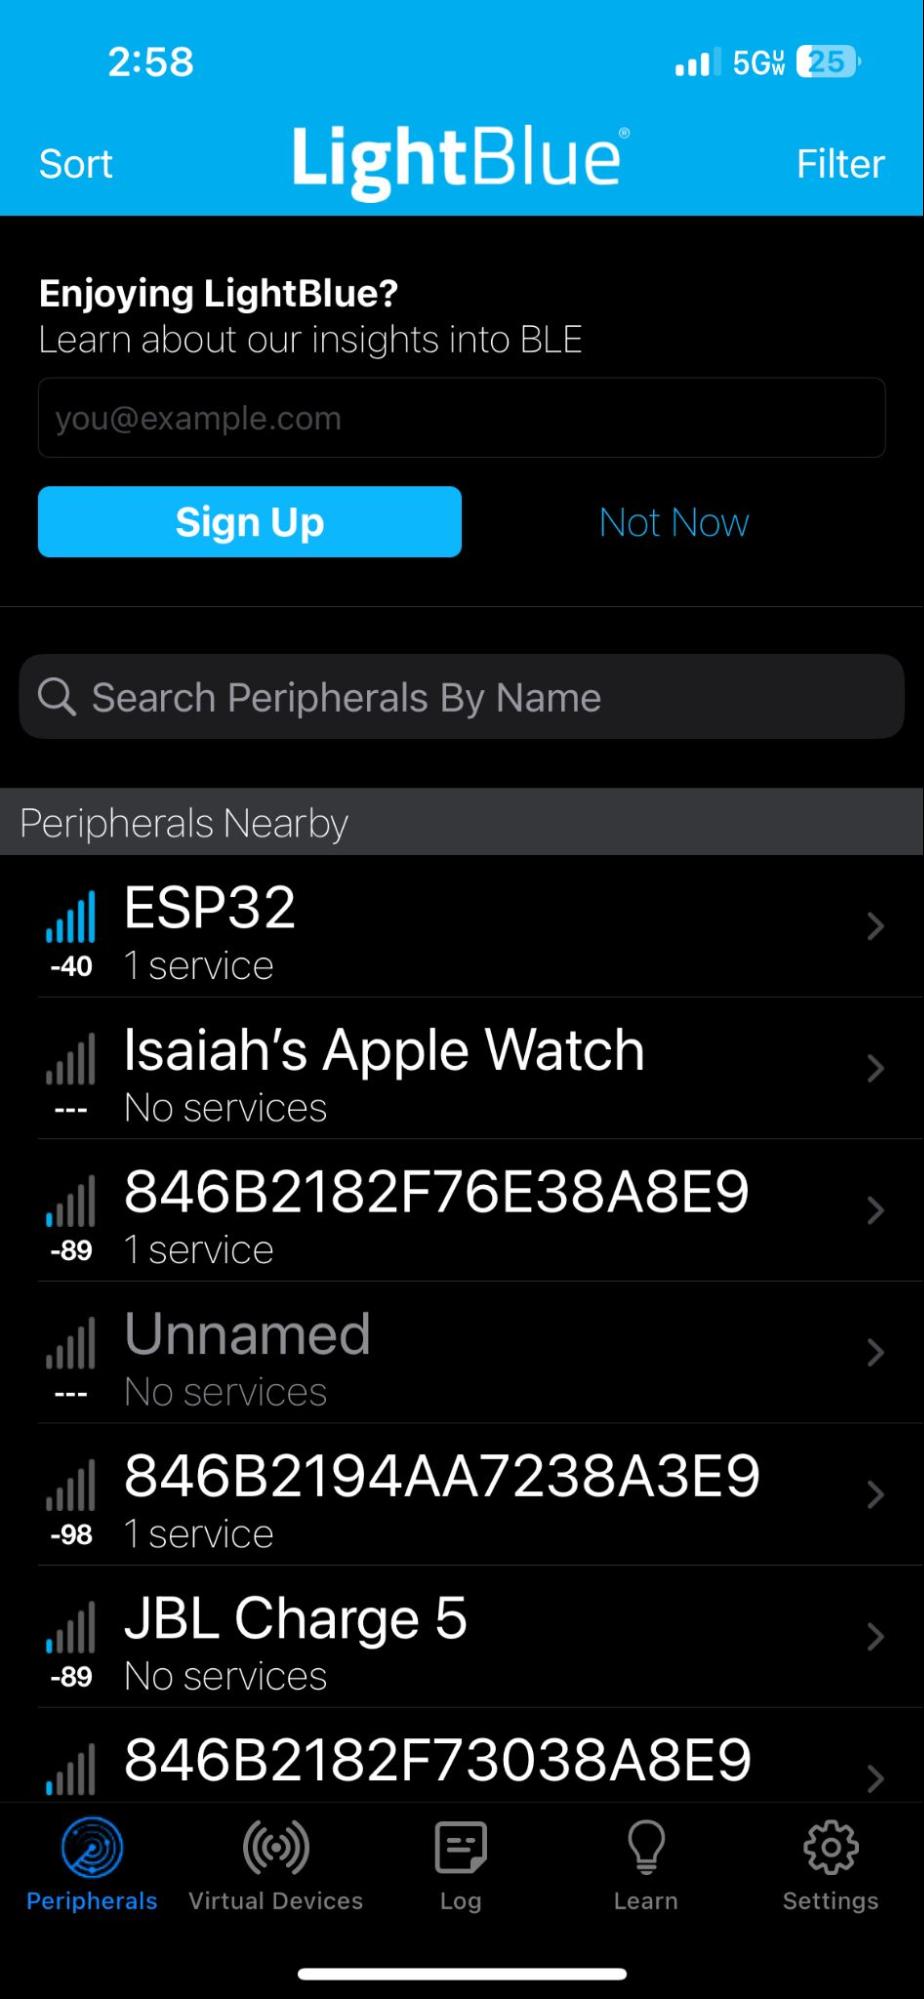
Opening up the LightBlue app, you will be greeted with this screen:

You should be able to find the ESP32 under the name you set as DEVICE_NAME in the setup of the code (Mine is still ESP32). Go ahead and select that device, allowing us to see the advertising data from the device.
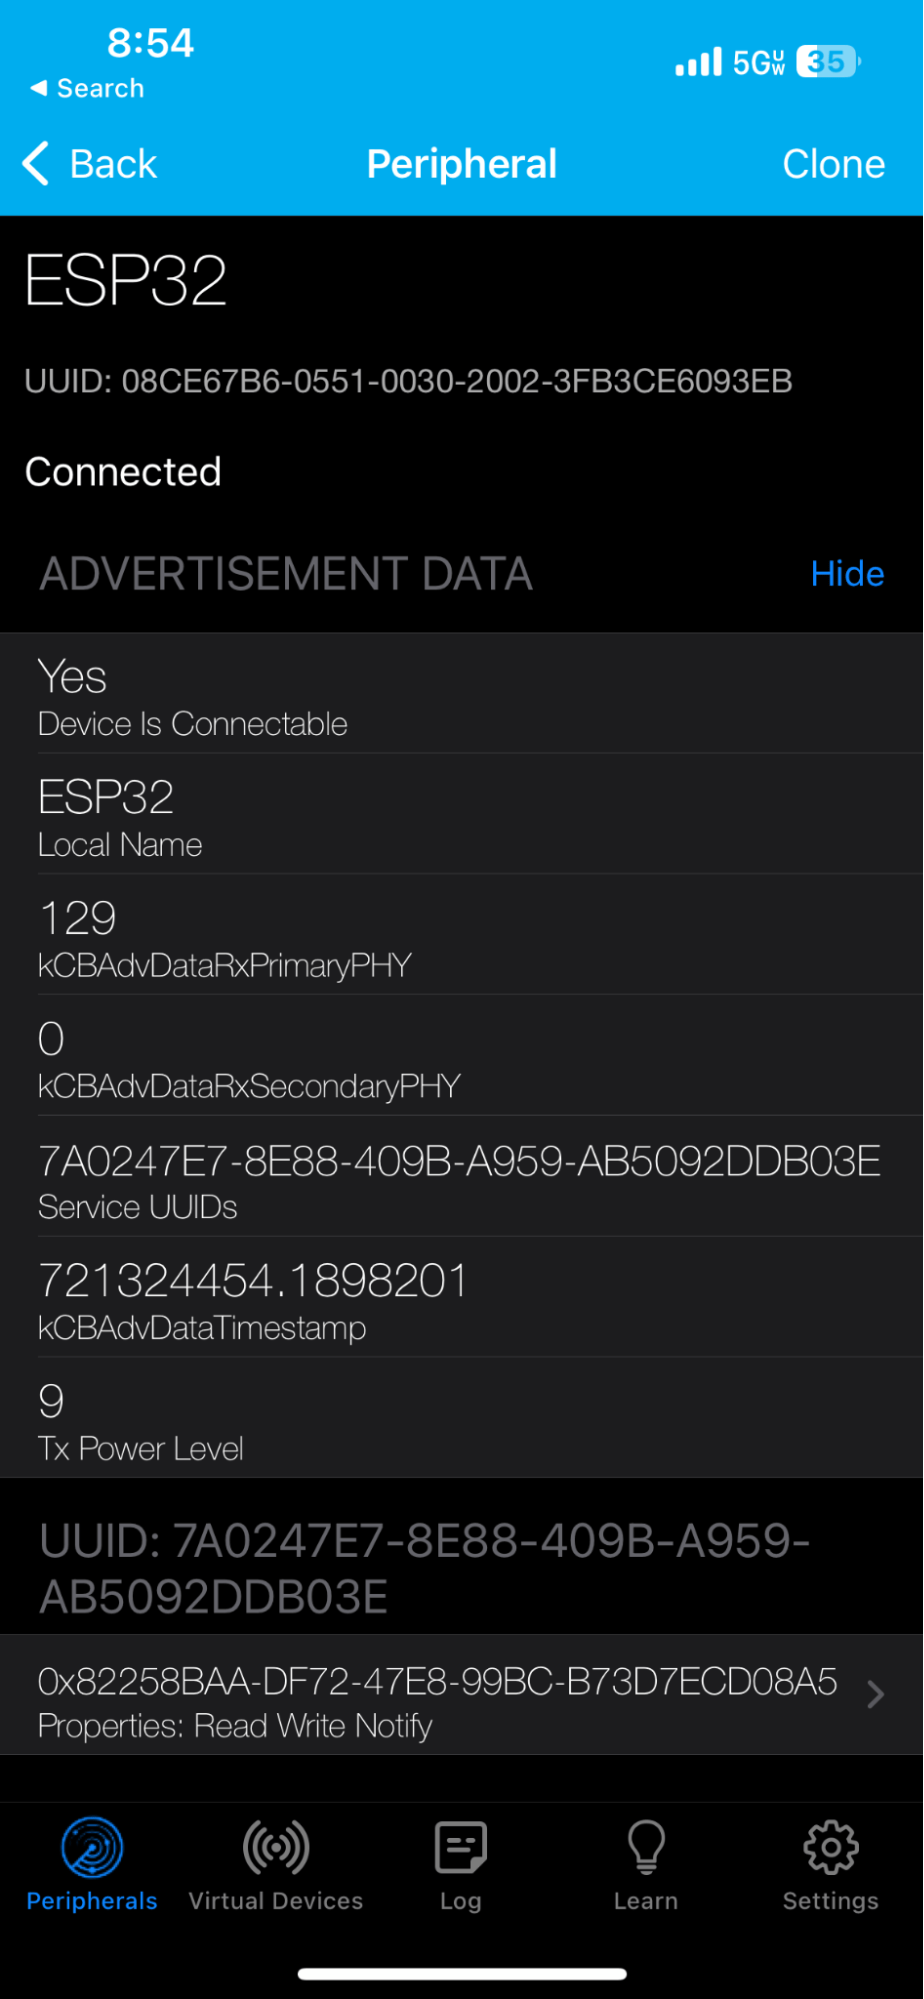
Make sure you press show advertisement data and now we can see all of the UUID information that you set up. This is where you can begin to use the UUID, Major, and Minor to identify the location of a particular iBeacon and use its service. (It is important to note that it is difficult to access UUID information unless you are developing an Apple application. Here is the application for a developer license if you are interested in building an iBeacon app.)
You may have noticed that there is more information at the bottom of the app, which we will cover down below. With this you now know how to find the advertising data for the iBeacon location and we will now look at how to find the proximity of your ESP32.
iBeacon Proximity
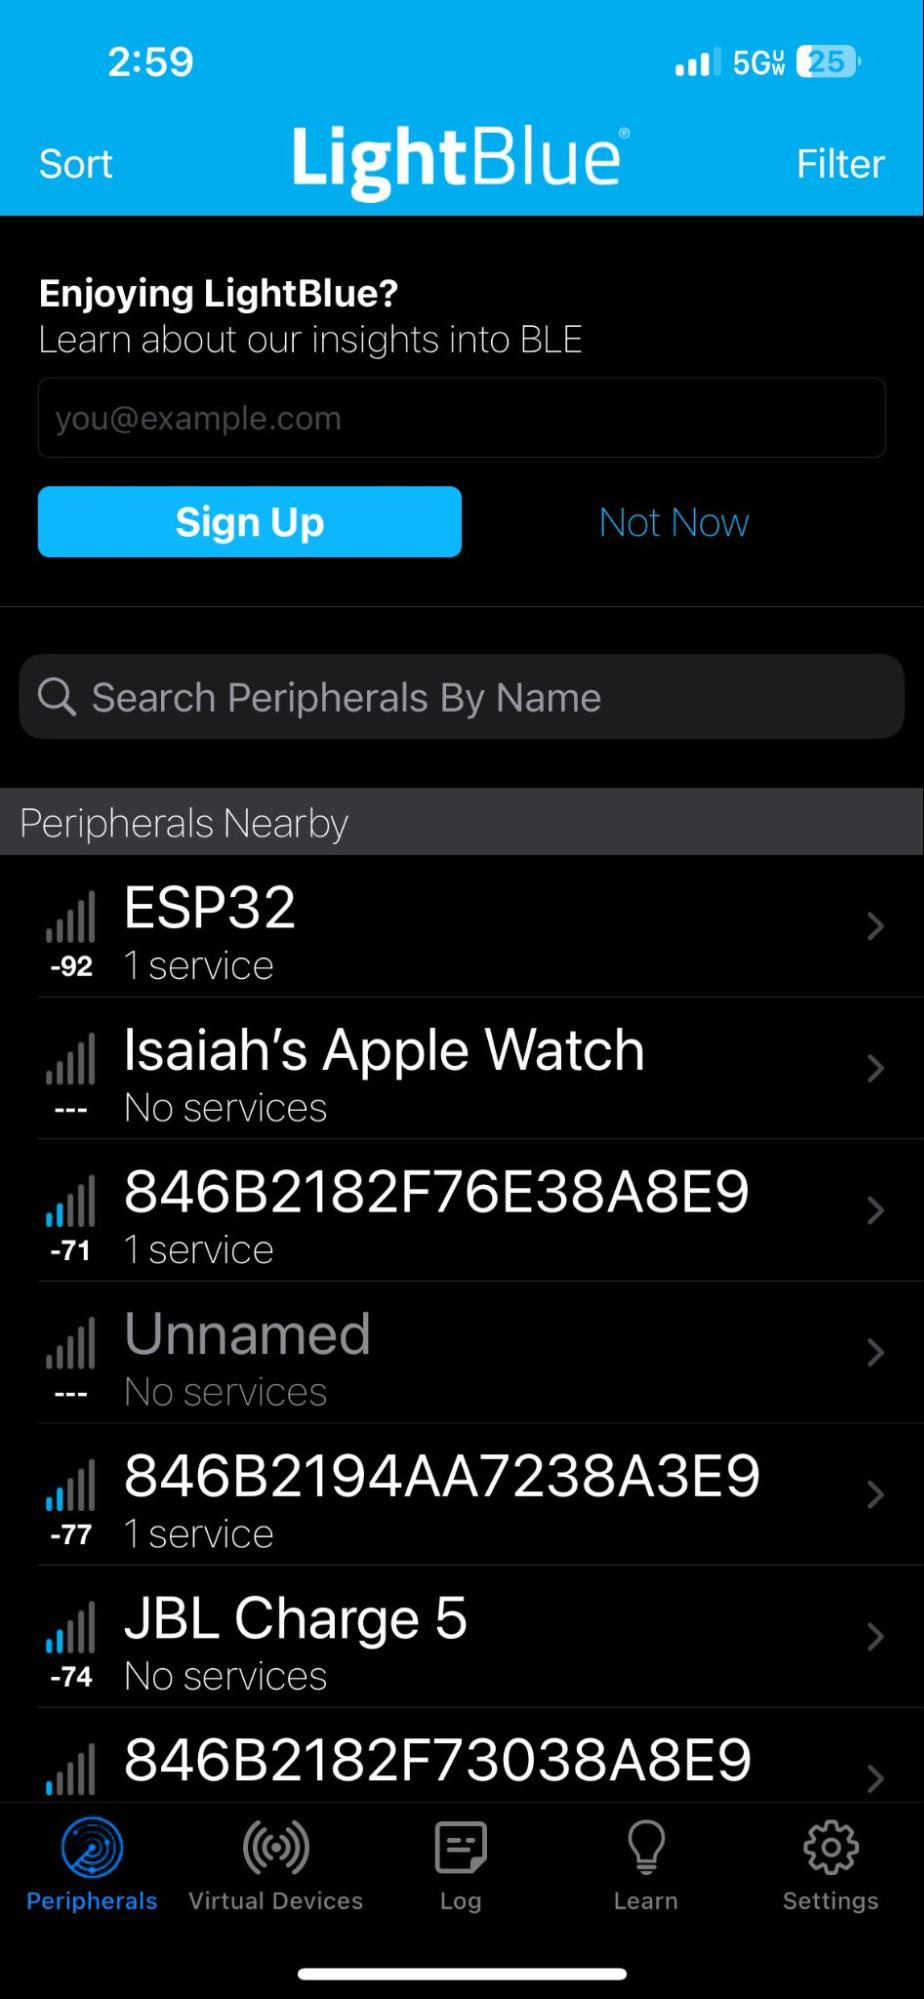
If you want to find your proximity to an iBeacon, there are a few options. First you can simply use the signal strength of the iBeacon to approximate its location to your device. Below is an example of the signal strength difference between my phone right next to the device to all the way outside of my house:
In the same room
In another room
Outside
But this feature is standard in all BLE devices. Apple also includes a proprietary detection algorithm if you want to build an iOS app that deals with the inconsistency of BLE signal strength readings and gives you 4 location options.
Using Apples development docs for Swift, you can build an app that can identify if a beacon is Immediate, Near, Far, or Unknown. Below is a diagram of how Apple has designed their proximity system.
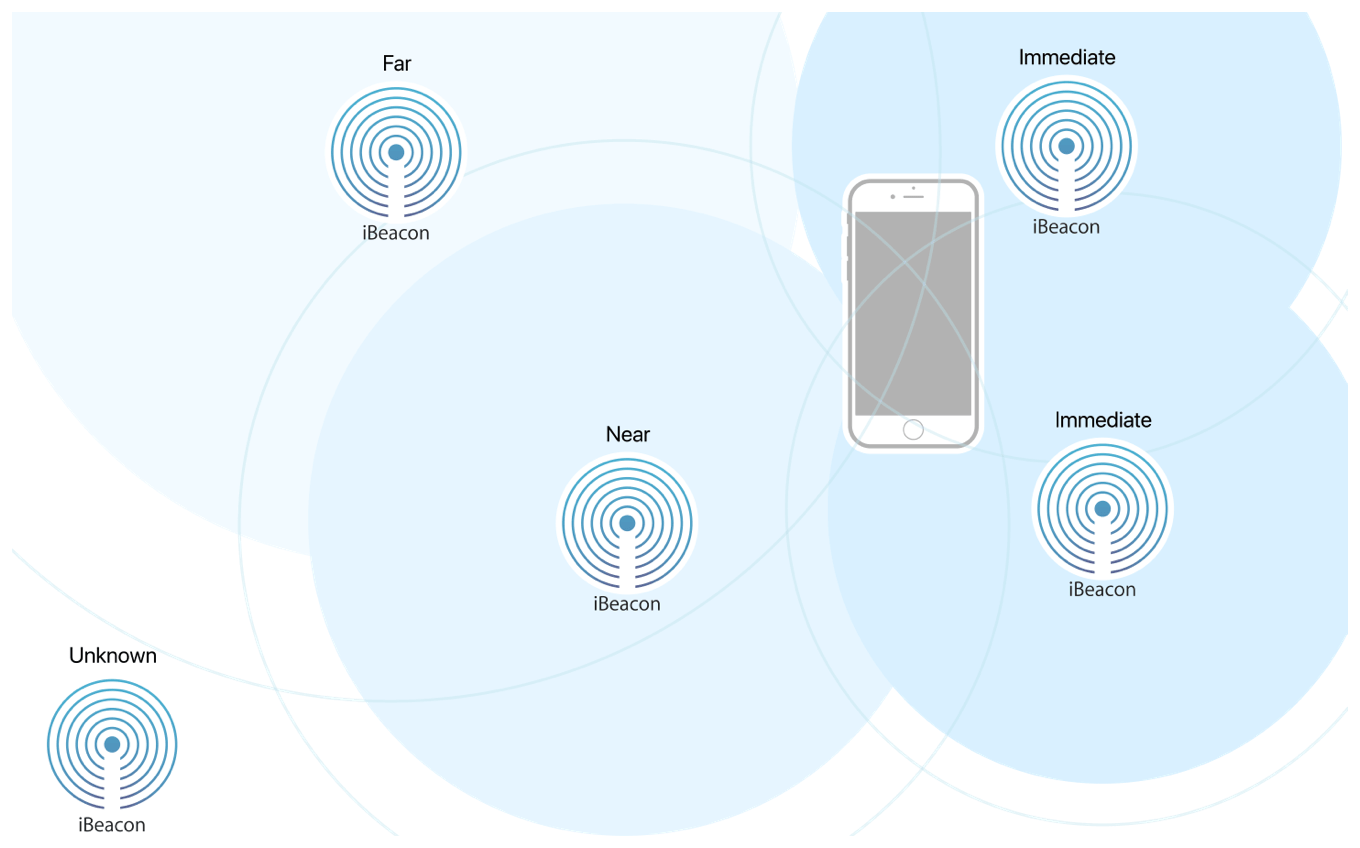
From: Getting Started with iBeacon
The limitation of this is that you will have to use it in an Apple application, so if you are limited by your platform, there are lots of resources for setting up BLE proximity detectors that have comparable performance to the Apple system.
iBeacon Server
The iBeacon ESP32 server can also send and receive data from your smartphone, which could allow you to create interactions with any service that you set up.
For now we can only send information that can be read in the serial monitor, but you could use this information to have the user change the information that the iBeacon sends (like an interactive art exhibit) or can even control the ESP32 hardware to control other devices (this is how the smart-lock was controlled in the example project I mentioned).
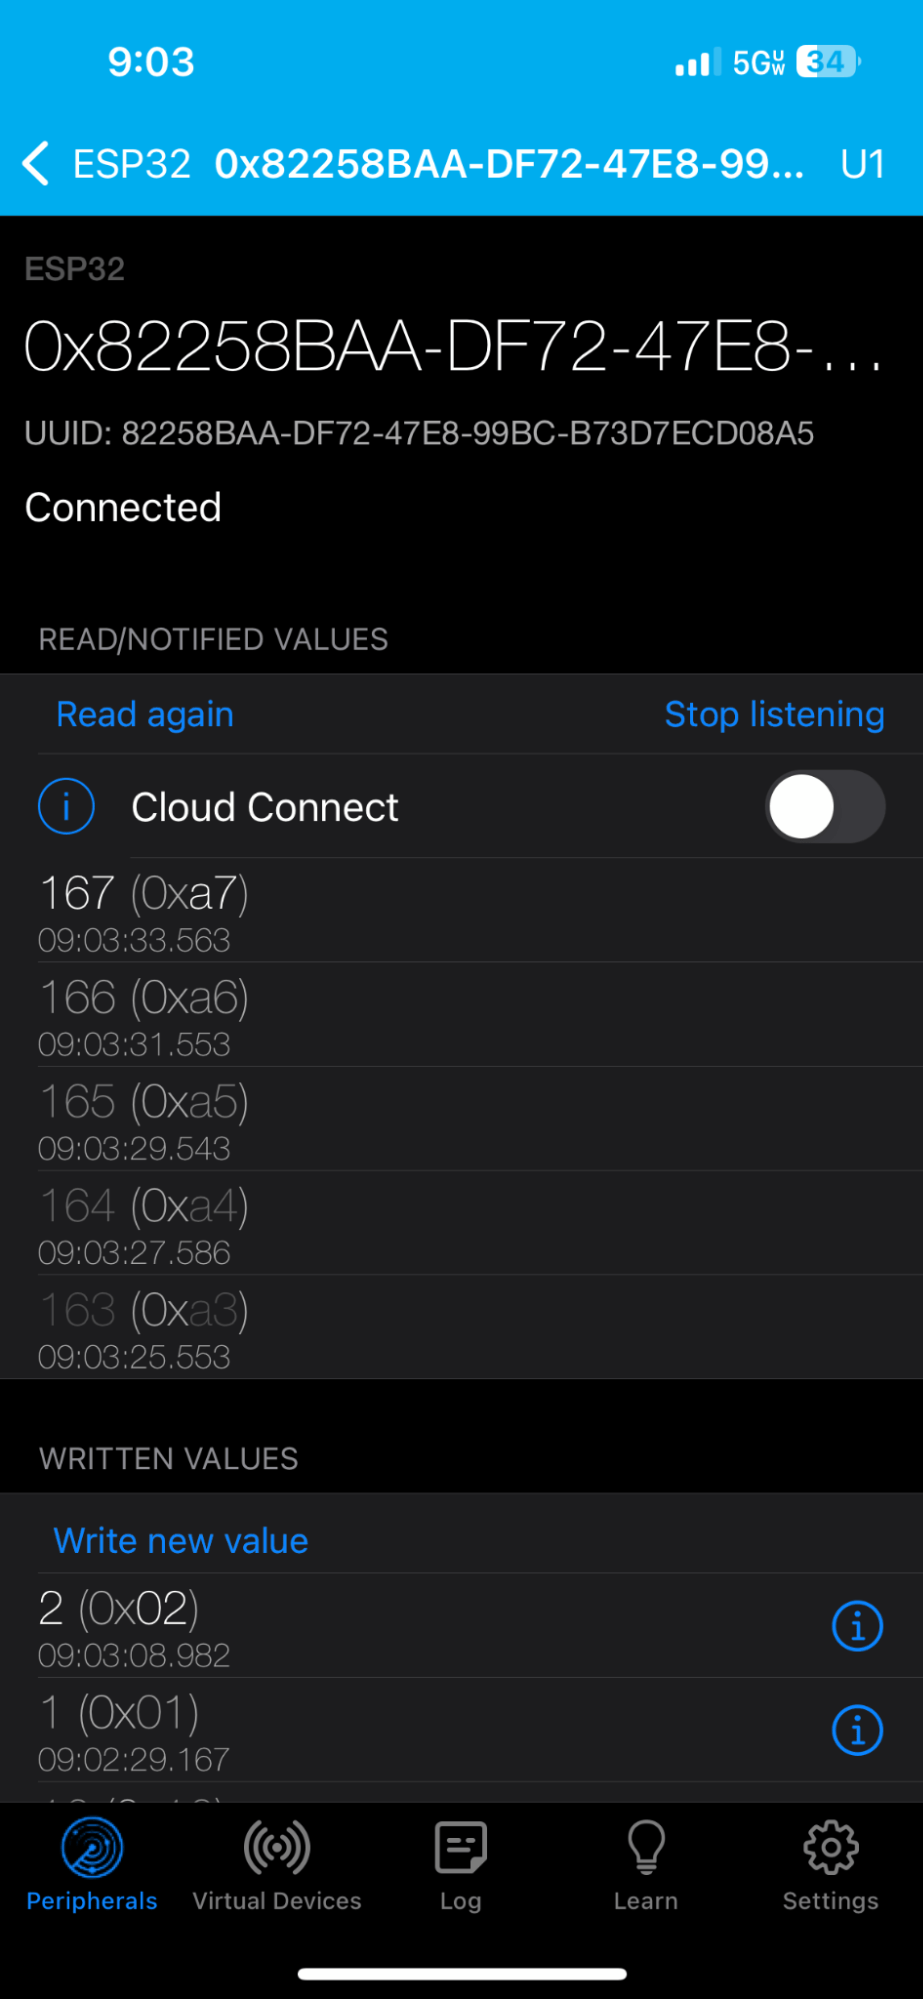
To use the service, press the bottom most data stream to open the service that has the number iterator.
First make sure that your encoding is set to 1 byte unsigned int, which can be set in the top right app (If you are confused about what a byte is, Stanford has a great article on it here).
Press the start listing button and you should be able to read each of the new values that the device is publishing, counting up from 0 to 255 (this is the maximum amount that a single byte can count up to).
This can be replaced by whatever service you would like to set up for your project, as long as you remain within the size of a byte per package sent to the device.
We can also write information to the iBeacon using the app. First change the encoding to UTF-8 strings in the top right (here you can learn more about UTF-8 encoding). Select the write new value in the service and input whatever information you would like and press send.
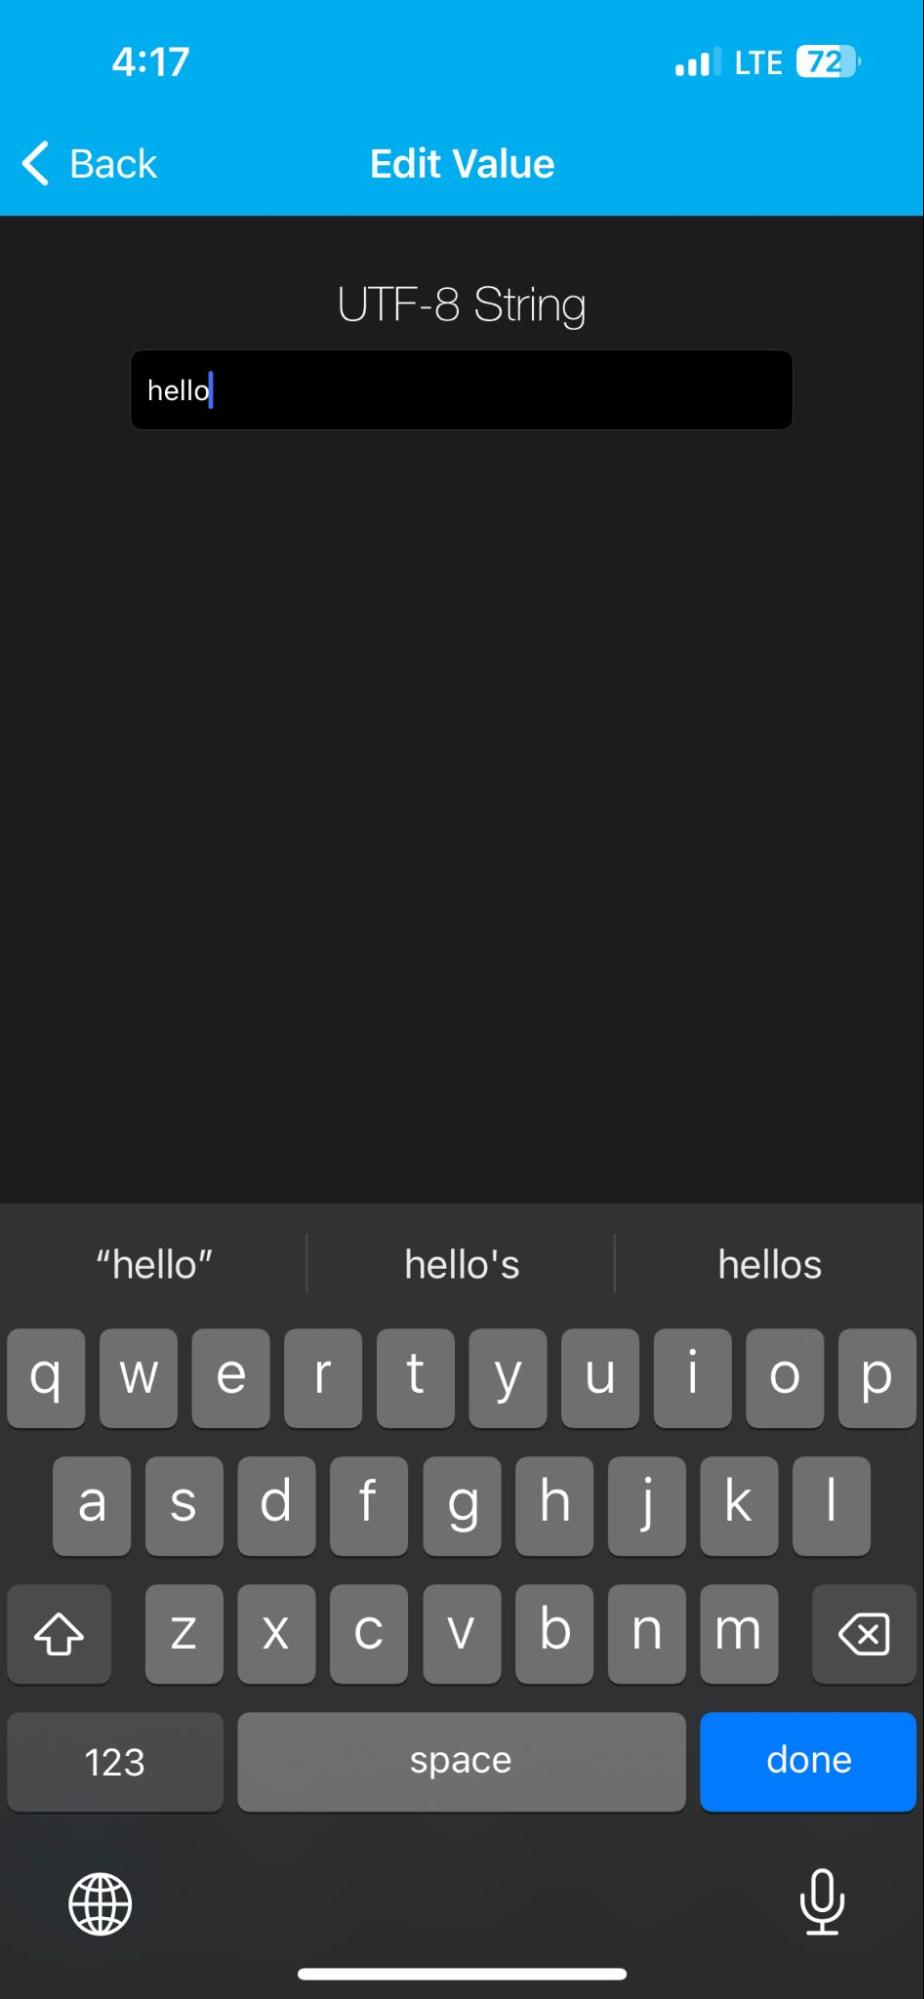
You will now be able to read this value from the ESP32 in the serial monitor. You could use this to add all sorts of interactions to your project.
You will also notice that you had to convert the sent value to a UTF-8 string, but you can build an encoder on your iBeacon device to allow for it to read any information you would like or use the host of Arduino libraries that can do that for you.

Build something cool!
Congratulations, you now have a working iBeacon using the ESP32’s BLE capabilities and know how to use all of its functionality. I know that it can be challenging to get your project up and running but I hoped this helped you get a foundation for what you would like to build.
Whether you are building a personal project or something for a company, keep going!
We only covered the basics but iBeacon technology is extremely powerful and you could build a company from this project alone. I built my first company using articles like this to make IoT devices for helping farmers grow their plants and I’m now an expert in hardware programming.
I went to school for electrical engineering, but I learned most of my skills by projects like this. So keep going and build something cool, I promise you it’s worth it!


