Arduino Remote Sketchbook? Super helpful or a waste of time?
The Arduino remote sketchbook allows you to access and update Arduino sketches regardless of what computer you’re on.
This solves a pretty common problem – maybe you have dealt with it yourself.
You write an Arduino program using one computer, but then want to access that same sketch on a different computer! For me, I jump between my desktop computer and laptop pretty often, so this becomes a pain!
With the Arduino remote sketchbook you can access all your files from your Arduino cloud repository, so you don’t have to email sketches to yourself, save them to dropbox, Google drive, or Microsoft OneDrive, or use your floppy disk to transfer your files 😉
The remote sketchbook is one part of the Arduino Cloud ecosystem, a platform that Arduino has been beefing up over the last several years.
In this lesson you’ll learn the 3 simple steps to get up and running with the Arduino remote sketchbook, a tip for avoiding major mental anguish with remote files, and an alternative to the remote sketchbook.
Let’s go!
Enable your Arduino remote sketchbook in 3 easy steps…
The first thing you’ll need to do is create an Arduino Cloud account.
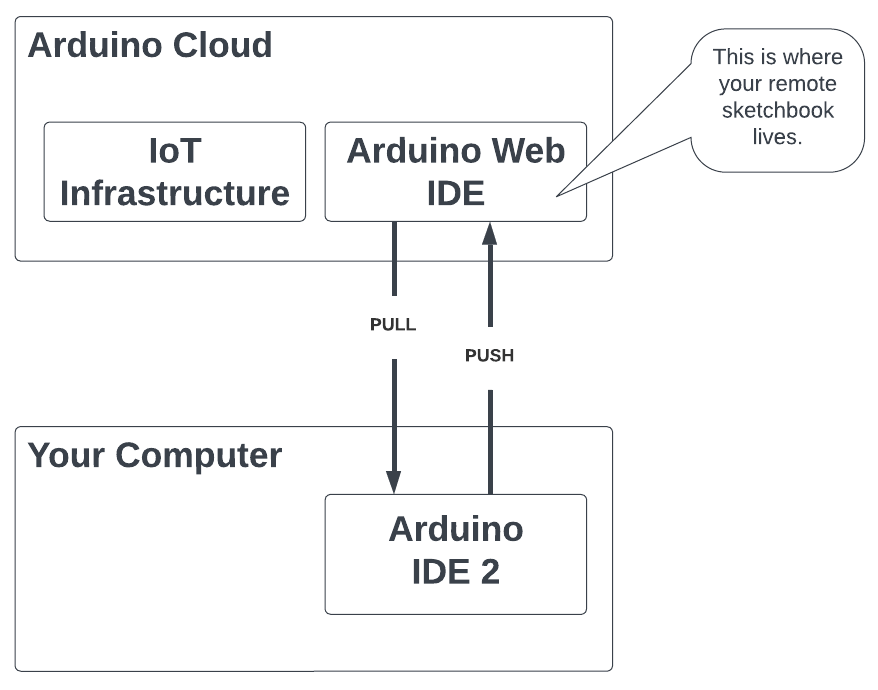
The Arduino Cloud is an online platform that provides an Internet of Things infrastructure for your projects. So you can build IoT dashboards, connect devices, and update software remotely – all that IoT kind of stuff.
But what is also part of the Arduino Cloud is the Arduino Web IDE. The Web IDE is where you’ll find your Arduino remote sketchbook.
It’s pretty straightforward to sign up. You’ll notice they have paid plans (mostly for the IoT stuff), all you’ll need to use the remote sketchbook is the free plan they offer.
Create a Sketch in the Arduino Web IDE
Once you’ve signed up to the Arduino Cloud, the next step is to open the Arduino Web Editor.
The Arduino Web Editor is an online IDE where you can write code for Arduino. It pretty much works just like Arduino IDE 1 or 2.
If you look to the left of the editor space, you’ll see a series of tabs, and you’ll want to select Sketchbook.
This will show you your remote sketchbook.

It will be empty to start with, but this is the repository in the Arduino Cloud where all your remote sketches are stored.
A quick note if you’re new to Arduino – and this can be confusing as all get out…
When you create a file in Arduino, it ALWAYS must be in a folder of the same name. All the different Arduino IDEs will handle this for you.
So whenever you create a sketch, the IDE also creates an enclosing folder of the same name, and puts your new .ino file in that folder. However, in the Arduino Web Editor, it will not show the enclosing folder.
The next step will be to create a sketch.
Create a shell program in the Web IDE Remote Sketchbook
Now to demonstrate the Arduino Remote Sketchbook, go ahead and create and save an Arduino program.
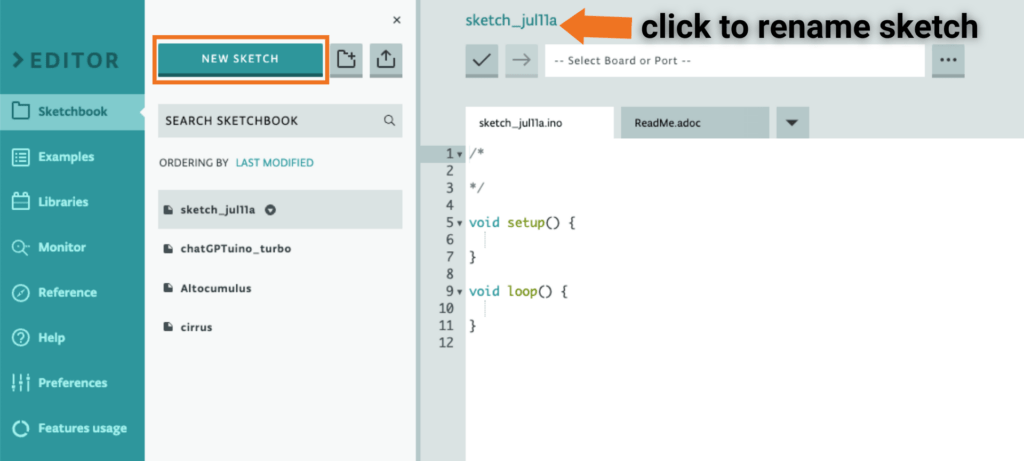
To do this, just click the “NEW SKETCH” button.
This will create a folder with a generic name composed of the date and a file inside that folder of the same name.
You don’t need to write any code in the sketch, for now it’s just a shell for us to demonstrate syncing files between your local computer and the Arduino IDE Cloud. But go ahead and add a single line comment.
Also, change the name of the sketch to something that you’ll remember. To do this, just click on the name of the file at the top of the editor screen. This will open up a model box where you can rename your program (it will rename the .ino file and the enclosing folders name).
Finally click the checkmark button to verify and save the program.
OK! You have a file saved in your Remote Sketchbook, the next step is to access it from your local computer.
Connect Arduino IDE 2 with the Arduino Cloud
Now go ahead and open up Arduino IDE 2.
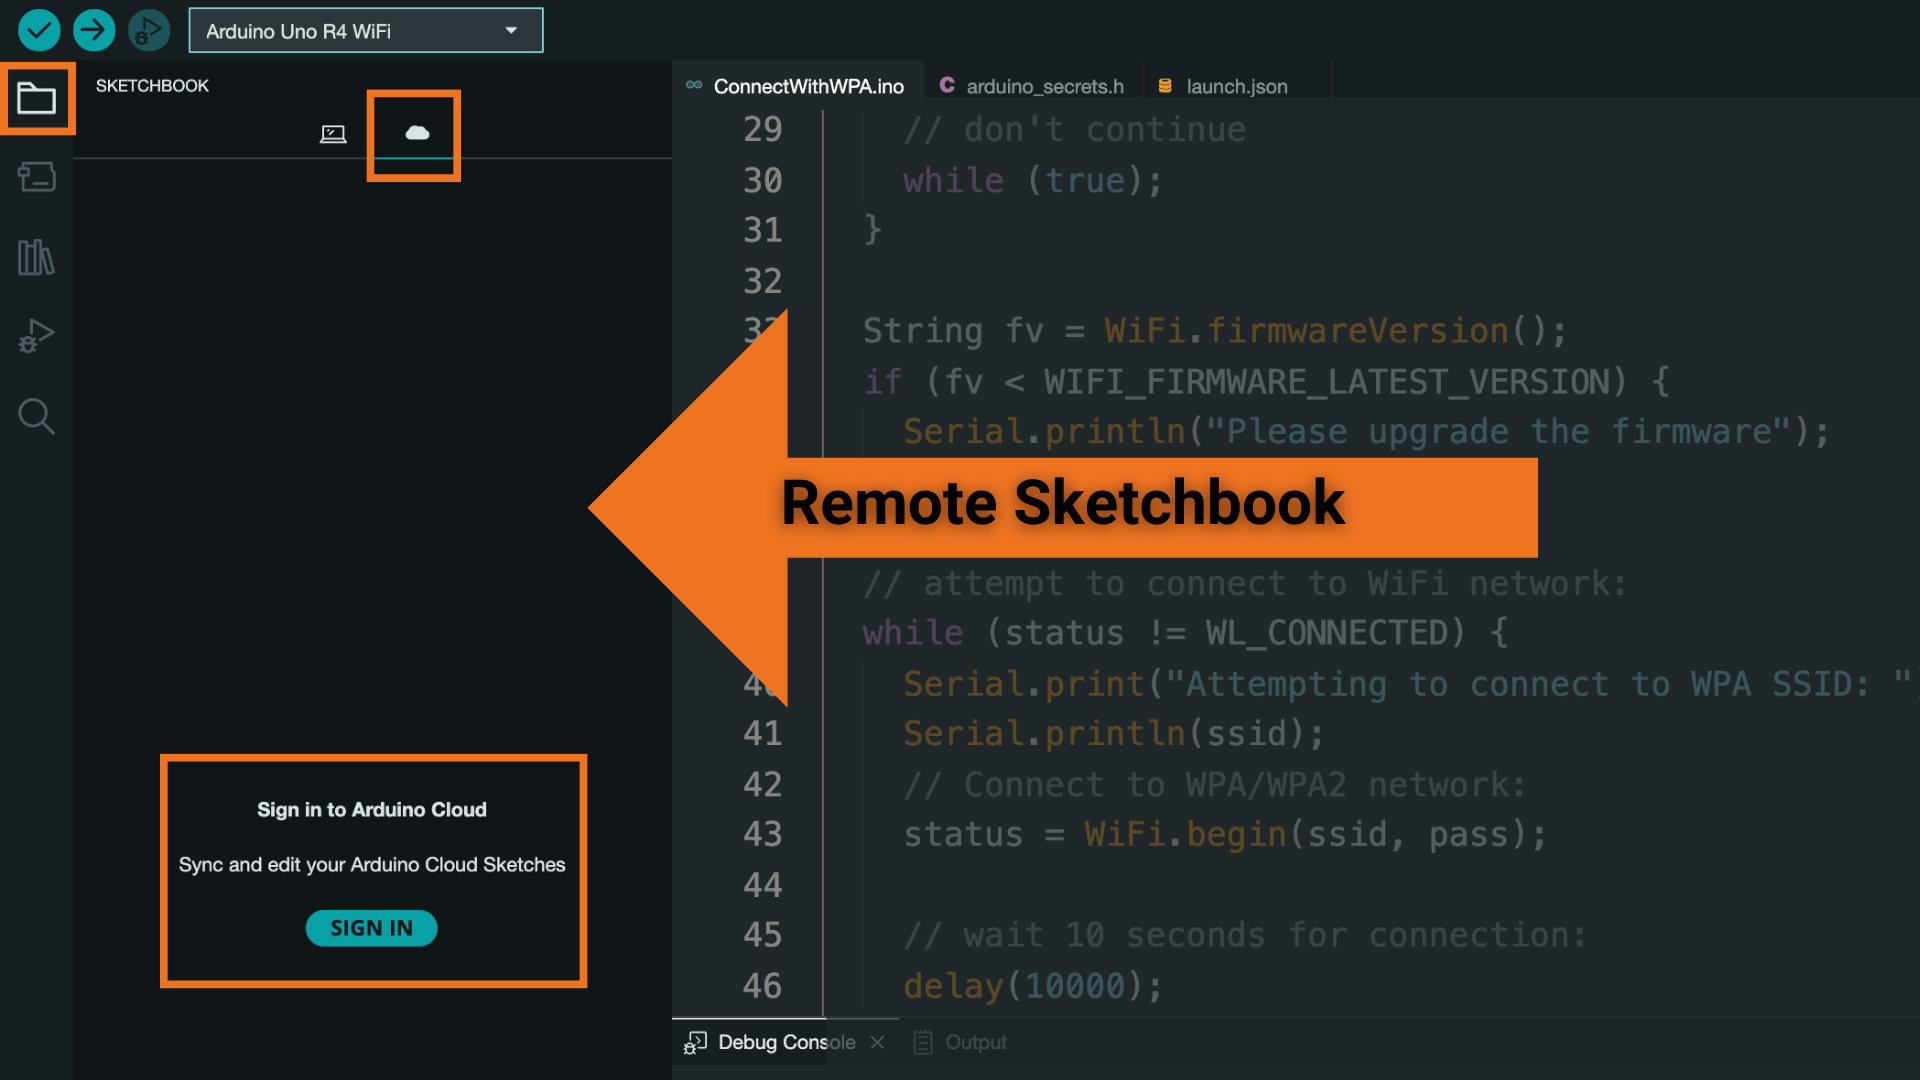
On the left side of the IDE you’ll see a toolbar with several icons. Select the topmost icon that looks like a folder – this will open your local Arduino sketchbook folder.
Above the list of sketches are 2 icons, one for a computer, and one for a cloud. Select the cloud icon.
You’ll see a button to sign into the Arduino Cloud – go ahead and click this. It will open up a web browser window and walk you through a common authentication process. If you’re still logged into the Arduino Cloud on an open web browser, this may happen automatically.
Once you sign in, you should now see the files in your remote sketchbook folder!
At the bottom of the sketchbook panel, you should see a green dot and the word connected, letting you know that you are signed into your Arduino Cloud account.
TIP: If for some reason you don’t see your remote files, try clicking the refresh button at the bottom right of the sketchbook folder panel.
Now look closely at your file, you’ll see the outline of a cloud next to the folder name. If you want to work with this file on your local machine, you’ll need to “pull” it down from the cloud.
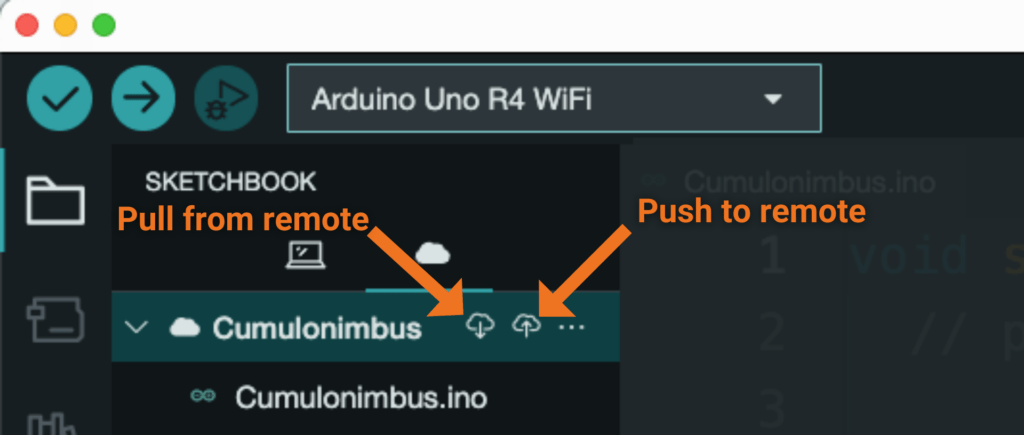
To pull the file, mouse over the name and click the cloud icon with an downward facing arrow. You’ll see some notices that the file is being pulled. Once this is completed, the cloud icon next to the name will be filled in to let you know this file is now both local and cloud.
If you double click the folder name it will open up the file locally in a new window. You can also click the greater than arrow to show all the files in the folder.
Now you’re cooking remotely! But there are a couple gotchas you REALLY need to pay attention to!
Push changes to the Arduino remote sketchbook
Now that you have your remote sketch saved to your local computer, make a simple change and save the file.
Go back to the Web IDE and look at the file you had created – wait… why don’t you see the change in the file?!
It’s because you have not PUSHED the changes up to the Arduino Web IDE. The change you made only exists locally on your computer. If you want the change locally to propagate to your remote sketchbook you need to PUSH it to the remote sketchbook.
To push your changes, go to Arduino IDE 2, mouse over the name of the file. Now you should see 2 cloud icons, one with a downward arrow (that’s the pull button) and one with an upward arrow (that’s the push button).
Click the upward arrow cloud icon and you’ll get a pop-up box appear that advises you of the following:
“Pushing this Sketch will overwrite its Cloud version. Are you sure you want to continue?”
As well as a check box next to “Don’t ask again”.
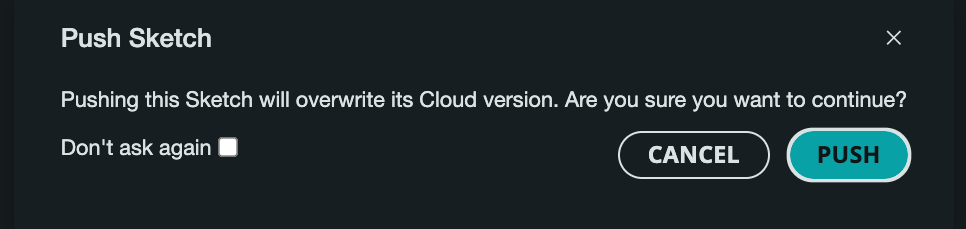
I know it says this plain as day, but this is a WARNING! If you click push – any code that you had added to the cloud IDE file WILL BE GONE! It will be overwritten by your current sketch!
Take heed of the most current version
You want to make sure that the code on your local computer is the most current version of your code before you overwrite the cloud version – because you can’t get back the previous cloud version once it has been overwritten.
Personally, I would recommend never, ever, ever, clicking the “Don’t ask again” checkbox. It should serve as a reminder every time you push, that you are about to overwrite the cloud version.
Since we know we have the most current version of this sketch on our computer, we can safely press the push button.
Now if you go to the Arduino Web IDE and refresh the page, you should see the changes to the file.
Pretty cool!
Push a new sketch to the Remote Sketchbook
What if you want to create a new sketch in Arduino IDE 2 and push it to the remote sketchbook?
So you can do this, and it’s easy – BUT, there is a caveat.
When you first create the sketch on Arduino IDE 2, you need to create a new remote sketch.
To do this is simple, just go to File > New Remote Sketch, and you’re all set. You can also open up the sketchbook panel in Arduino IDE 2, click on the cloud sketch section and then click the button at the bottom that says “New Cloud Sketch”.
If you create the sketch the “normal” way, you will not have the option to push it to the cloud. But there is a work around for this…
Import files into the Remote Sketchbook
If you have a bunch of local files you would like to be on the cloud, you can use the import feature in the Web IDE to pull in as many files as you like.
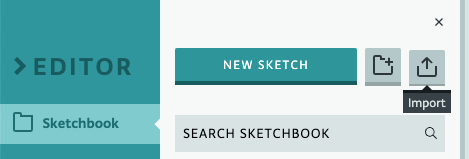
In fact, you can even import all your files in one fell swoop by making a zip file of your Arduino folder, and using the import button to bring them all in at once.
What to avoid when pushing and pulling
Being able to store your files remotely and access them from anywhere can be super helpful! Not only that, but it provides a backup should your computer die.
The main thing you need to keep an eye on is accidentally overwriting your hard programming work.
Remember, when you push and pull, it will OVERWRITE code on the receiving end.
Please avoid doing this:
- Pull old code from remote to local -> bad juju… you just overwrote your newest local sketch.
- Push old code from local to remote -> more bad juju… you just overwrote your newer remote sketch.
This kind of thing could happen if you develop on different computers and or on the Web IDE and accidentally (or absent-mindedly) click push to remote, instead of pull.
What about GitHub?
If you have any experience with version control systems like git, then the terms push, pull, and remote are likely familiar to you. You also might have heard of a website called GitHub, which is a huge code repository and used by millions of developers as a tool for version control.
This begs the question? Is this Arduino remote sketchbook a form of version control, or something like GitHub?
So first off, the remote Arduino Sketch is definitely NOT version control. Nor is it in any way intended to be.
But it’s fair to say it’s a code repository. A place where you can keep your code remotely, and share it with others.
So is GitHub an alternative to the Arduino remote sketchbook for storing your sketches in a cloud and accessing them from any computer?
It definitely is.
However, it comes with a learning curve. You’ll need to learn some git – which is a version control system (VSC) language. You’ll also want to get comfortable using the command line, which is generally how developers interact with GitHub.
Truth be told though, git and GitHub are relatively easy to learn with some repetition and the juice is worth the squeeze if you are booking for version control and having a cloud repository.


You are an awesome person. Thank you very much for sharing your knowledge!
Thanks – I hope you found it useful!