Voice Control Arduino Project
- Voice Recognition Module 3
- Voice Control Workflow
- Arduino Voice Control Circuit
- Installing the Voice Recognition Arduino Library
- Training your Voice Commands
- Loading in a Voice Command into the Recognizer
- Training Multiple Voice Commands at Once
- Bare Minimum Code to use the Voice Recognizer
- Troubleshooting (NOT)
- Arduino Voice Recognition Module 3 Limitations
Want to get your Arduino projects to work with voice control?
In this lesson I’ll show you an easy way to add voice control to your Arduino project with the inexpensive Voice Recognition Module 3.
Links from video (some are affiliate links to help us buy golden toilets for our mega yachts):
- Voice Recognition Module 3 (Amazon)
- Right Angle Pin Headers (Amazon)
- How to solder pin headers on a development board
- Voice Recognition Module Manual
- Code demoed in video
Voice Recognition Module 3
Here it is, the Voice Recognition Module 3, or VR3 for short.
It can store up to 80 voice commands that can be used as triggers in your Arduino program – so when you say something, you can get your Arduino to do something interesting, like give your dog a treat, or whatever.
It has an operating voltage of 5 volts – so if you are going to use it with a 3.3V dev board, then you’ll need to do some level shifting.
Everything I am about to walk you through comes directly from this manual I found online that I will link to in the description – you can tell it was translated from Chinese to English, but it’s very reasonable documentation.
There will also be a link for where to buy this unit as well.
Now, there are actually a couple ways to use this thing – with an Arduino board, with a different microcontroller using a special protocol, and then just as a standalone unit.
In this lesson, I am going to show you the easy way, and that is with an Arduino board using just 2 pins to communicate with the Voice Recognition Module.
I’ll be referring to the Voice Recognition Module as “VR3” – since it sounds way cooler.
Voice Control Workflow
Here is a basic overview of what you need to do to use this Voice Recognition Module.
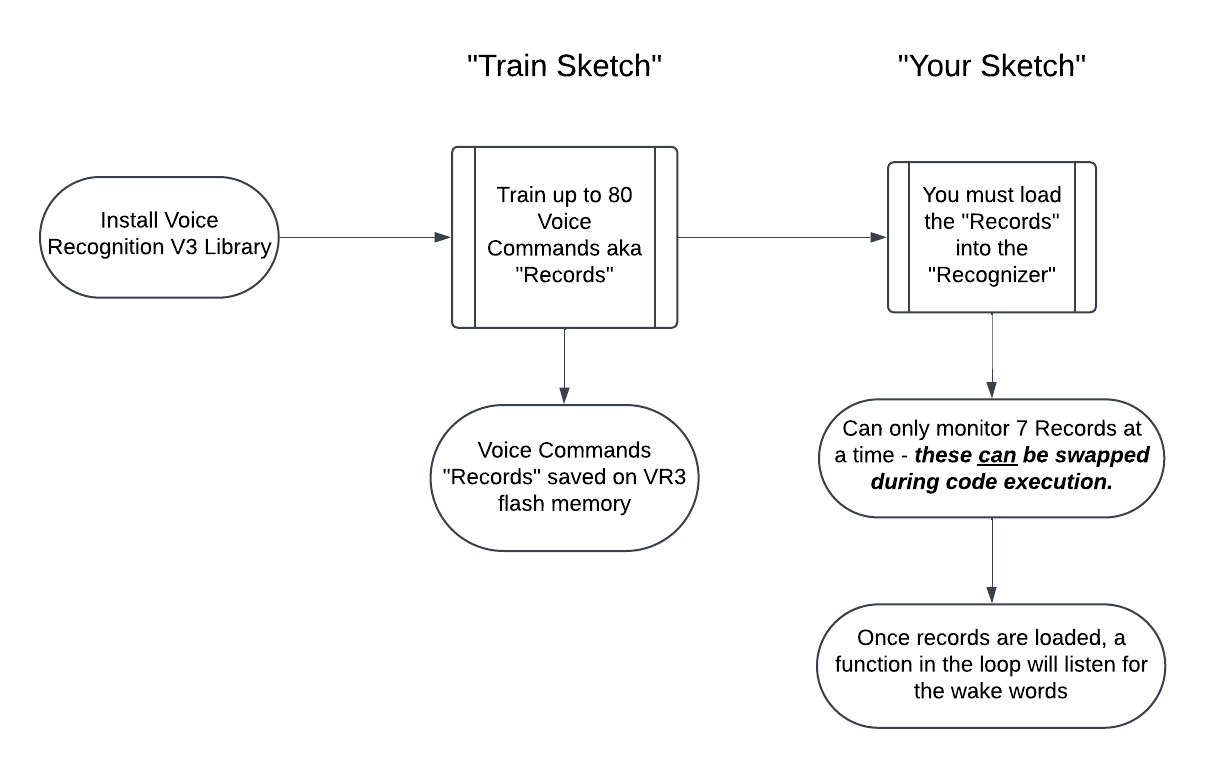
First, you’ll install the Voice Recognition V3 Arduino Library into your Arduino IDE. (I’ll show you how easy that is in just a moment)
Once the library is installed, then you’ll open up a special sketch that is used to train the unit for whatever voice commands you think would be useful. Like, “On”, “Off”, “Cabbages”, whatever.
You can train up to 80 one word voice commands – each individual command is referred to as a “Record”. I’ll show you how to do this too – it’s easy.
These voice commands get stored to the VR3 flash memory. So you can remove power and those words you saved will still be there.
You don’t have to train all 80 words, you can just train as many as you need.
Once you’ve added records to the VR3 with the special training sketch, then it’s time to write your own sketch.
In your own sketch, you can load up to 7 active records into the “Recognizer”. The Recognizer is the fancy name they gave to the container that will hold your active trigger words.
So at any given time, your sketch can actively listen for 7 different words that you trained. While the sketch is running, you can in your code swap out different records. But the most it can ever recognize at any given moment is 7 records.
Once your Recognizer is loaded with records, then in your loop you use a single line of code to listen for the trigger words, and then some other code to handle the actions you want to happen for different words.
I’ll walk you line by line through a bare-minimum sketch on how to do this, but first, let’s set up the circuit.
Arduino Voice Control Circuit
You’ll notice my unit already has these pins soldered on. But when you buy the unit, they won’t be like this – you’ll need to solder them on. These pins are called “pin headers” – I’ll link to some in the description.
But I have a soldering condition, where I solder every possible pin header I can, when for this application, you only need to solder 4 pins at the opposite side of the microphone jack, and it really works best if you use right angle pin headers.
Here’s a video on soldering pin headers.
So let’s build this circuit. It’s super easy.
The VR3 has 4 connections we are interested in: GND, VCC, RXD and TXD.
| Arduino | ←→ | Voice Recognition Module V3 |
| GND | ←→ | GND |
| 5V | ←→ | VCC |
| 3 | ←→ | RXD |
| 2 | ←→ | TXD |
The VR3 GND (aka ground) will connect to the board Arduino Ground. The VR3 VCC will connect to the Arduino 5V and RXD (Receive Data) and TXD (Transmit Data) pins will connect to any 2 digital pins you want on the Arduino.
In our case I’ll be using pins 2 and 3.
Tip: You might think that using the RX and TX pins on the Arduino would be perfect for this, but you’ll actually want to avoid them, because those pins are used to communicate with the other microcontroller on the board that handles the USB connection.

Installing the Voice Recognition Arduino Library
Now that we have our circuit setup, we need to train the module for our voice commands, however, we can’t do that until we have the Arduino library installed in the Arduino IDE.
Unfortunately, this library is not available in the Arduino IDE Managed Libraries, so you need to download it as a zip file and install it.
But it’s a cinch to install an Arduino library from a zip file 🙂
Check out the link in description to grab the Arduino library zip file.
- Grab the library zip file – The repository for the code is here. Or you can just download the library zip file here.
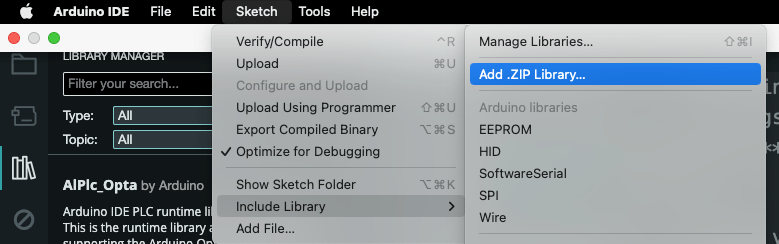
- In the Arduino IDE, go to Sketch > Include Library > Add .ZIP Library… and select the zip file that you downloaded above.
That’s it! That Voice Recognition library has just been added.
To prove it, in the Arduino IDE go to File > Examples > VoiceRecognitionV3 and you should see some example sketches provided.
One of these is REALLY important as you’ll see in a moment.
Training your Voice Commands
Now it’s time to train your voice commands.
In the Arduino IDE, go to File > Examples > VoiceRecognitionV3 > vr_sample_train
This will open the sketch you need to train your voice commands onto the voice recognition module.
This is a busy sketch – but don’t worry, you won’t need to change anything in here except maybe adjust some pin numbers if you used different pins.
VR myVR(2,3); // 2:RX 3:TX, you can choose your favorite pins. (line 36 in code)
Now make sure your Arduino is connected to your computer and press the upload button to load the sketch.
Once the sketch is loaded, open up the Serial Monitor Window (Tools > Serial Monitor).
It’s important that you set the baud rate drop down to 115200 and the line terminator drop down is sent to “New Line” or “Both NL & CR”.

In the Serial Monitor window you should see something like this:
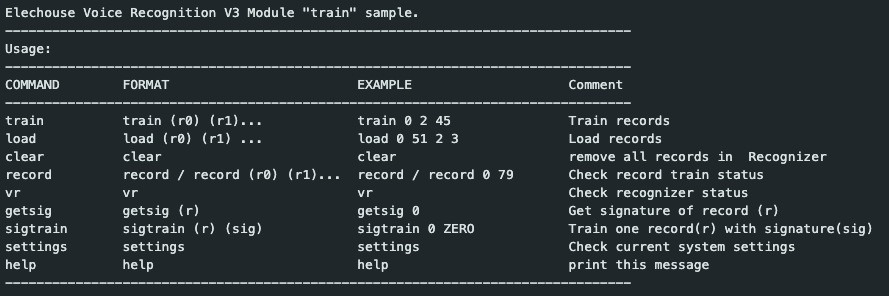
There are 9 commands here, and if you read the chart, it’s pretty straight forward.
To execute a command, you just type in the Serial Monitor send bar the pattern shown in the FORMAT column.
For example, look at the last command, it’s “help”. If you look in the FORMAT column it just says “help”, so if I type “help” into the Serial Monitor send bar and then press enter, the help command will execute. In this case, the help command simply reprints this chart to the serial monitor window.
The command we are interested in is the sigtrain command – this stands for Signature Train. What it allows us to do is train a single record, and give that record a readable name (in addition to its index value you choose) – that name is called its signature.
The FORMAT for sigtrain is:
sigtrain (r) (sig)
The (r) stands for the record index number, this can be 0-79 (for a total of 80 voice commands!). And the “sig” stands for signature, which is how you are referring to the record.
So let’s say you want to train record 0, and give it the name “On”. You would type…
sigtrain 0 On
And then press enter. Once you do this, the VR3 will prompt you to speak your command word. You’ll do this at least twice. If the module is able to match the first and second voice commands, it will give you a training success prompt, otherwise, it will have you say the command again until it can make a match.
There are also some lights that blink on the module during training that let you know when to speak.
When the yellow light is blinking rapidly, that is telling you to get ready to speak. When the red LED turns on, that is when you speak.
When the red and yellow lights blink together, it means you have successfully trained the record.
If the LEDs blink together, but rapidly, it means the training failed, and somewhere a fairy lost its wings.
Loading in a Voice Command into the Recognizer
Let’s assume you were able to train a record, now you want to check that it actually works.
But before we do that, recall that the Recognizer is where you have to load the records in order for the VR3 to be able to listen to them.
The Recognizer can only hold up to 7 of your 80 records.
We can see which records are loaded into the recognizer by using the “vr” command.
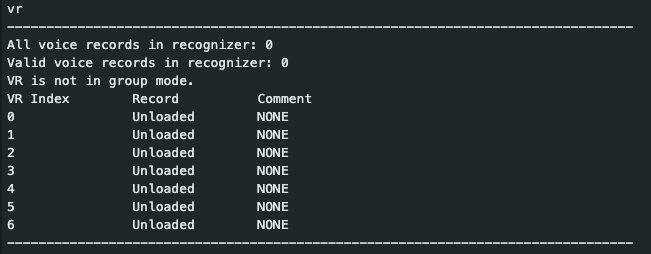
This prints a chart that tells us what records we have loaded into the Recognizer.
- The VR Index column is the index for Recognizer (0-6).
- The Record column is the index of your Voice Command (0-79).
- And the Comment column will tell you if the record is valid or not.
You can see that we don’t have any of our trained records loaded into the Recognizer yet.
To do that, you use the load command.
The load FORMAT is as follows:
load (r0) (r1) ...
Where (r0) (r1) represent the record numbers, each separated by a space.
So if we want to load the record we trained, we’d just type:
load 0
If we had more records we wanted to load, we’d append them to the end with a space between them…
load 0 33 5
Again, the number represents the index of each trained record.
Calling this command will load the record(s) into the Recognizer in the next available spot. So if you already have a couple records loaded, into say index 0 – 3, then if you load another, it will go into index 4.
Once the recognizer is loaded with 7 records, you can’t load any more. And you can’t overwrite just a single record, if you want to load different records, you need to use the clear command to clear them all out, and then load the different ones you want.
Training Multiple Voice Commands at Once
Now if you have a laundry list of voice commands you want to save, then doing each one at a time might be a bear. So instead, you can use the “train” command.
The FORMAT of the train command is as follows:
train (r0) (r1)...
Where (r0) is the index of the record you want to train (0-79).
For example, we could train the 42nd and 63rd indexes with this command:
train 42 63
Note: You can always retrain the same index with a different voice command.
When you press enter, the Serial Monitor will prompt you to train the first entered record (in this case 42), once this is trained, then it will prompt you to train the next record (63).
Notice you cannot add a signature for each record. This isn’t the end of the world, but it can be handy when trying to remember what is loaded where.
I would recommend building yourself a small chart for reference, so you can remember what index refers to which voice commands when the time comes to write your own program.
So hopefully you have the jist of how this training program works. Make sure to check out the troubleshooting section if you’re having issues training commands!
For the following program
Bare Minimum Code to use the Voice Recognizer
Now that we have trained some voice commands, I am going to go over the bare minimum code to use the Voice Recognizer.
Tip: Make sure to look through the example programs that come with the library to see handy demonstrations of using the Voice Recognition Module 3.
Here is the code:
/* Records saved on Voice Recognition module 3

  Index | Signature

 -------------------

    0   |  YoMama

    1   |  KnockKnock

    42  |  HeresAGood(one)

*/

#include <SoftwareSerial.h>

#include "VoiceRecognitionV3.h"

VR myVR(2, 3);    // 2:RX 3:TX

uint8_t buf[64];  // Used by the VR3 to write information about detected words

//Record Numbers

byte const YoMama = 0;

byte const KnockKnock = 1;

byte const GoodOne = 42;

void setup() {

  /* initialize */

  myVR.begin(9600);

  Serial.begin(115200);

  /* load records */

  myVR.load(KnockKnock);

  myVR.load(YoMama);

  myVR.load(GoodOne);

}  // close setup

void loop() {

  // Return value is length of valid data in buffer

  int ret = myVR.recognize(buf, 50);

  if (ret > 0) {

    switch (buf[1]) {

      case YoMama:

        Serial.println("YoMama Joke detected");

        break;

      case KnockKnock:

        Serial.println("KnockKnock Joke detected");

        break;

      case GoodOne:

        Serial.println("Dad Joke detected");

        break;

    }  // close switch

  }  // close if

}  // close loop
Now I want to be clear – when you are going to write your own program, you’ll want to start with one of the example programs – they have good coding guards in them to display an error message if something goes wrong, and serial prints to help troubleshoot what is going on.
But for our purposes, I just want to identify the minimal code to make the voice recognition module work.
Let’s go through this line by line…
First, you’ll import two libraries:
#include <SoftwareSerial.h>

#include "VoiceRecognitionV3.h"
The SoftwareSerial library comes preinstalled with the Arduino IDE, so you do not need to add it with the library manager.
Next we create a Voice Recognition object, it takes the two pin numbers that we connected to the module.
VR myVR(2, 3); // 2:RX 3:TX
This VR object (that we named myVR) is what we’ll use through the program to run the functions associated with the Voice Recognition Library.
Next comes a buffer. This buffer is where the VR object will write information about the detected records when they are recognized.
uint8_t buf[64]; // Used by the VR3 to write information about detected words
Then we list the records we want to identify. Strictly speaking, this is not necessary, as you could just refer to their index numbers in the code, but to make the code more readable, having these record indexes as named variables is my preference.
//Record Numbers

byte const YoMama = 0;

byte const KnockKnock = 1;

byte const GoodOne = 42;
In the setup() function we need to initialize the VR object, so we use the begin function from the Voice Recognition Library.
/* initialize */

myVR.begin(9600);
Once the module has been initialized, then we load the records into Recognizer using the load function.
/* load records */

myVR.load(KnockKnock);

myVR.load(YoMama);

myVR.load(GoodOne);
The order you load them doesn’t matter, just remember that you can only load up to a total of 7 records.
Another way to use the load function is with 2 parameters.
First you specify an array:
uint8_t record[3] = {0,1,42}; // your trained voice command indexes
Then, when you call load, you give it the array and the len of the array:
myVR.load(record, 3);
This does the same thing, but with fewer calls to the load function.
In the loop() function, in order to get the program to actually listen for the command words, you need to call the recognize function.
// Return value is length of valid data in buffer

  int ret = myVR.recognize(buf, 50);  // buffer, size of buffer
The recognize function is what tells the Voice Recognition Module to listen for the records loaded into the Recognizer.
When a word is detected, the recognize function writes some information to the buffer provided and then returns the length of valid data it wrote (0 means no data received).
Here is what is stored in each buffer position:
buf[0]  -->  Group mode(FF: None Group, 0x8n: User, 0x0n:System

buf[1]  -->  number of record which is recognized.

buf[2]  -->  Recognizer index(position) value of the recognized record.

buf[3]  -->  Signature length

buf[4]~buf[n] --> Signature
The information we care about most is which record index was detected, and that can be found at buf[1].
To check if we have detected a record, we use the return value from the recognize function, and then jump into a switch-case statement to do different things based on which command was heard.
if (ret > 0) {

    switch (buf[1]) {

      case YoMama:

        Serial.println("YoMama Joke detected");

        break;

      case KnockKnock:

        Serial.println("KnockKnock Joke detected");

        break;

      case GoodOne:

        Serial.println("Dad Joke detected");

        break;

    }  // close switch

  }  // close if
A final note on the code. It’s important to make sure that the recognize function is called often, otherwise the module will not be listening frequently enough and miss your command words.
Troubleshooting (NOT)
Usually the biggest hangup comes when training the voice records.
If you keep getting “timed out”, or “Train with signature failed or timeout” messages when trying to load the module then I have some bad news…
You may have gotten a faulty unit. It’s apparently pretty common.
Of course you should first check your wiring, and make sure no pins are loose, and that the yellow LED on the unit is lighting up (blinking) when power is applied and the train sketch is loaded
But if you have triple checked the wiring and your pin numbers then it’s likely an issue with the unit. I can’t vouch for this GitHub issue, but it appears this is a known issue for boards manufactured in 2023.
I would reach out to where you purchased the board and request a new one.
Arduino Voice Recognition Module 3 Limitations
I’ve been playing around with the board for a couple days now, and I have to say, it’s about so-so on recognizing the command words.
It seems to depend a lot on the word that you train. Snappy words seem to be recognized better.
Overall though, after figuring out some of its nuances, I’ve been happy overall.
It has been able to detect my command words in a quiet room from over 12 feet away – that’s reasonable in my opinion.
I’m excited to work on a more involved project. Let me know in the comments your experience with this Voice Recognition Module 3.


Thank’s for this awesome walkthrough on gettig to know this module. I purchased one of my own and followed your guide from beginning to end. I did run into the issue with time outs and had I read the Troubleshooting (not) paragraph I might have given up but right then and there but I didn’t read it. So I figured I hade wired it in the wrong way (which was not the case) or that there were something bug or hang up somewhere, that could be sorted with just rebooting or messing about or give it time etcetera (sometimes electronics are just behaving weirdly), and I just kept trying until I actually could train some words. And load them. Now, I’ve just started experimenting with this so the problem could come back and be unbearable to live with but at least my unit doesn’t seem to be completely busted.
I look foward to keep learning and include this module in one of my existing projects. It should be fun!
Thanks for the note Klas! I can’t say I love these units, but the price is right, and I think if I can find a good use case they could be great. I look forward to see what you do with them!