Using Arduino to charge and monitor capacitors
Interested in building your own battery charger? So is Jeremy Hemming , who has been exploring ways to create an Arduino based intelligent battery charger for his car battery and his 18V drill batteries.
This video is a demonstration of charging and monitoring capacitors using external power supply, an Arduino board and an LCD as a display.
This project was submitted by one of our members. You can see more of our member's projects here.
Not a member yet? Sign up here.
Jeremy would love to hear any feedback or ideas on the project.
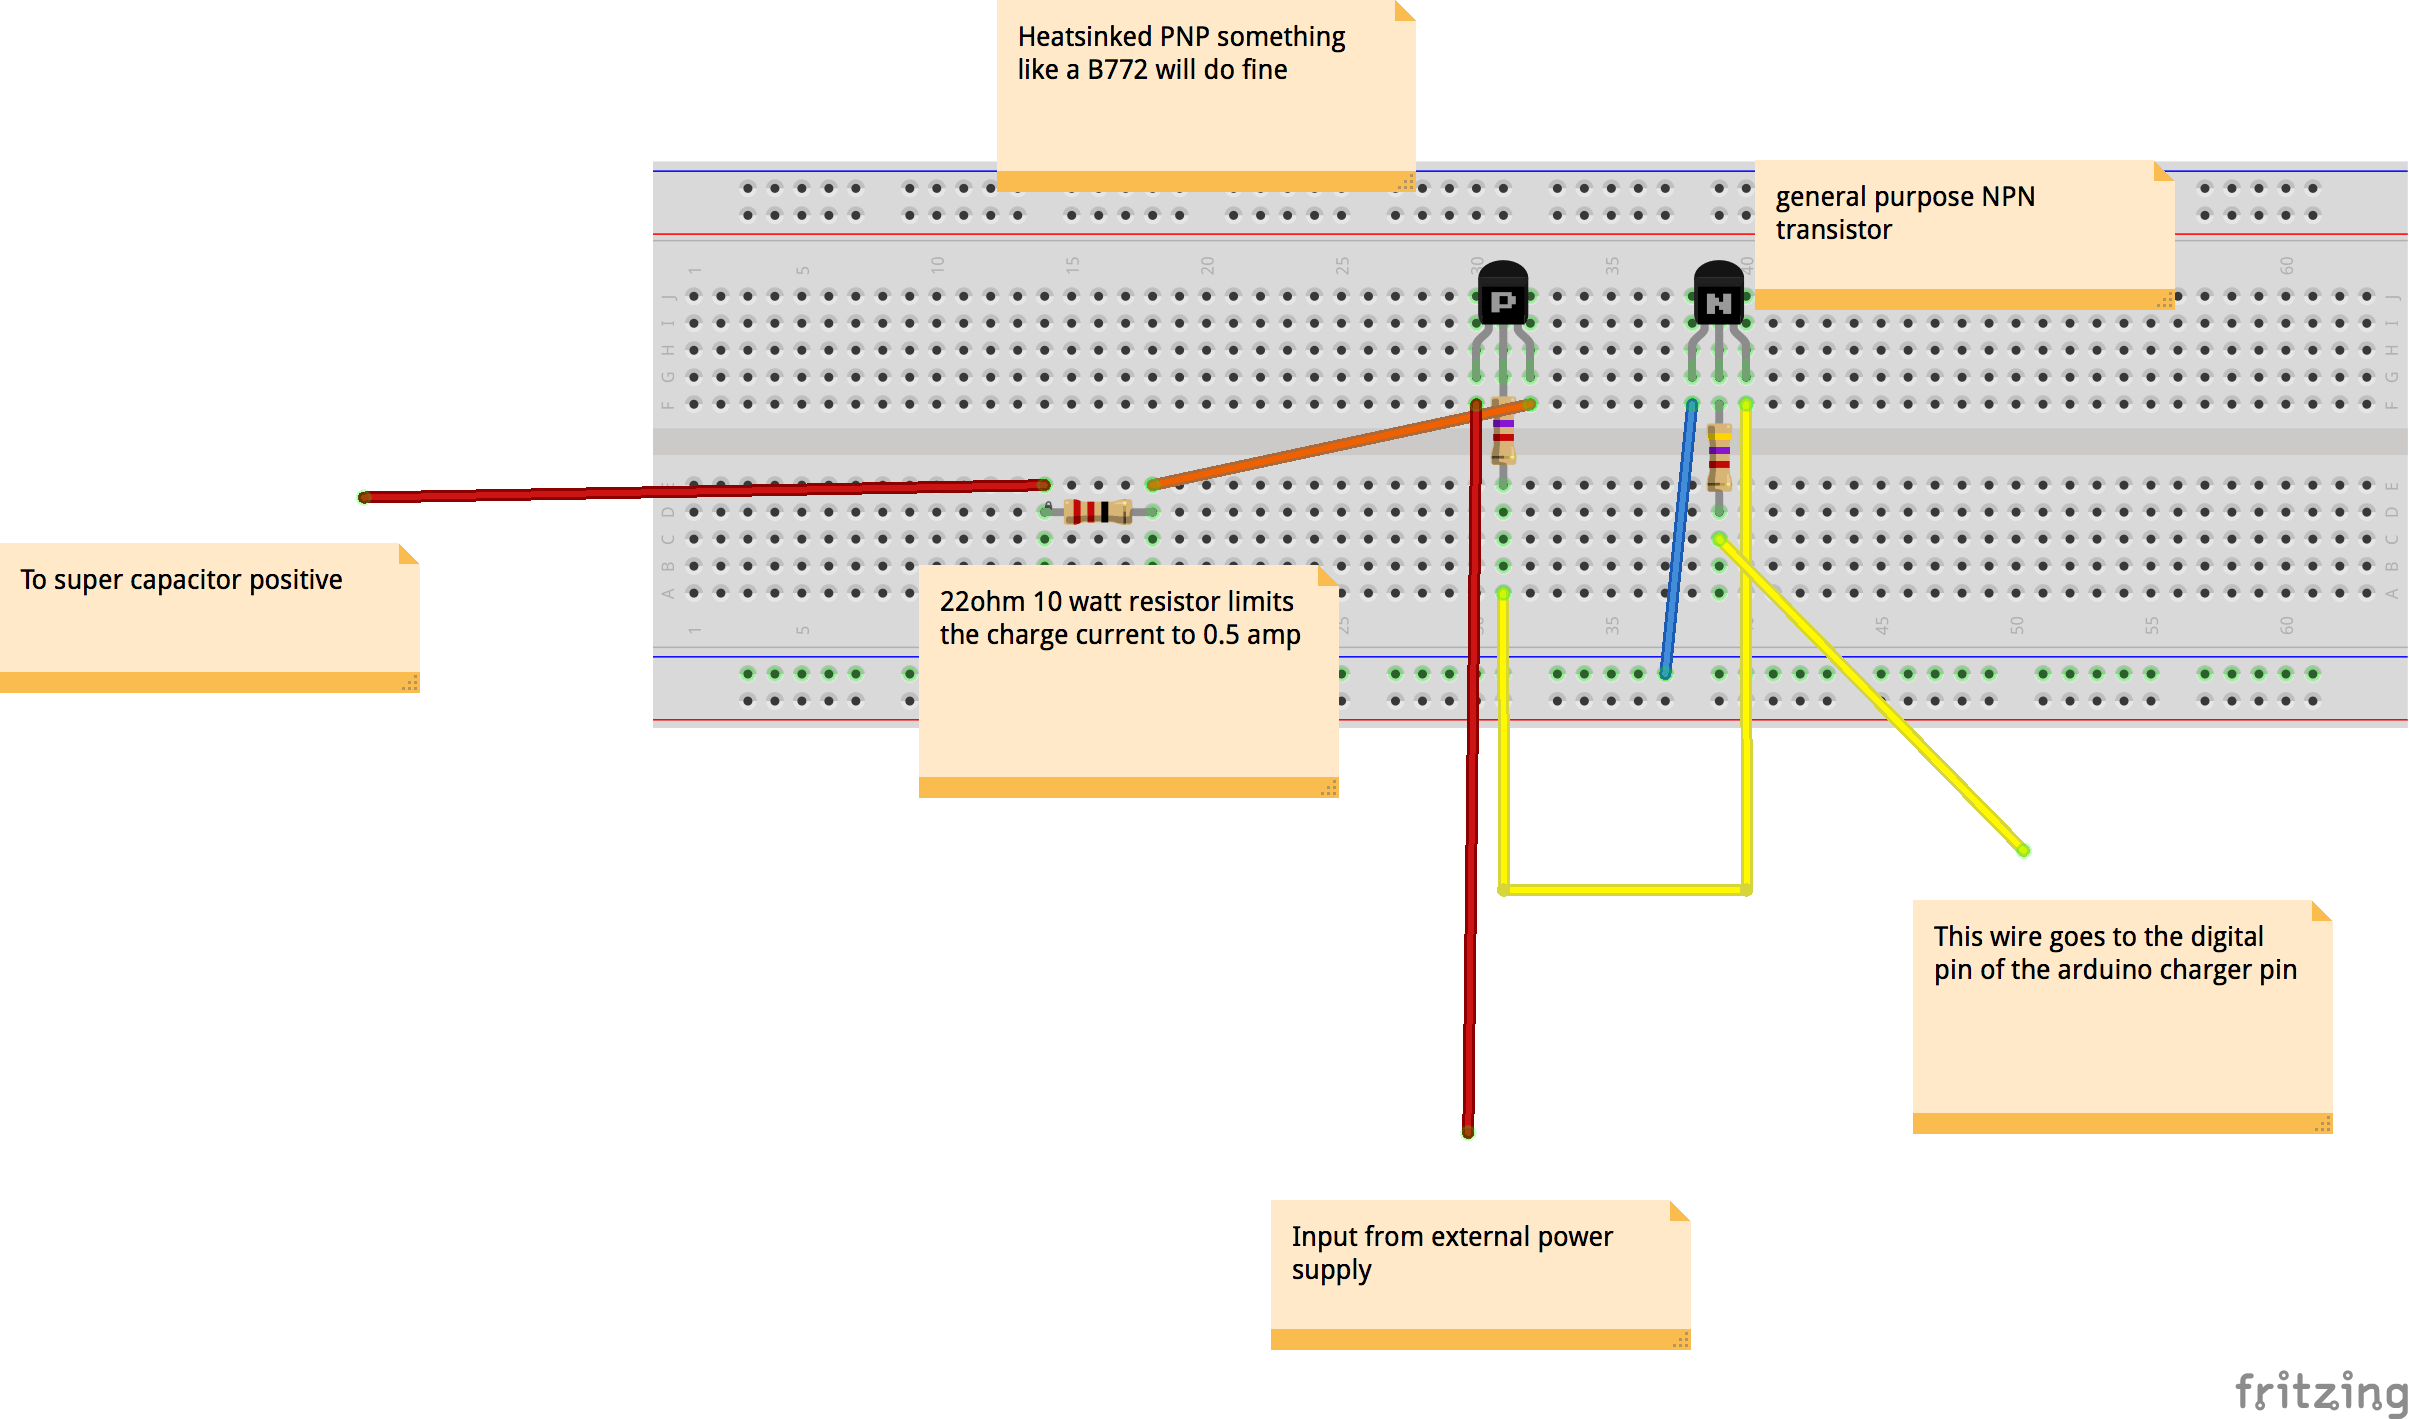
Schematic
Here is the breadboard layout that Jeremy made using Fritzing. It may be slightly different from the video (he does not include the lightbulb below), but otherwise it should work well.
Arduino Code
/*
This is my intellegent Super capacitor/ battery charger circuit.
The idea is to build a battery charger that will handle
a 12v car battery, my 18v drill battery and also a 6v
motor cycle battery. I have found that my drill battery gets hot
and have had the batteries loose capacity and eventually
fail alltogether. This charger will not overcharge but will
stop at a set voltage. It will monitor the state of charge and
charge again should the battery start to drop in power.
I am using my Super Capacitors for demonstration purposes.
my power regulator switch is made up from a general purpous
NPN transistor and a PNP poer transistor switching the charge
on and offi I used 2 4.7k resistors too one from the output
from my arduino to trigger the NPN and one from the
NPN to trigger the PNP transistor. I then used a 10 watt 22ohm
resistor to limit my output to 0.5 of an amp.

I hope you enjoy it. Jeremy Hemming

This part is the lcd borrowed from
the Hello World lcd project I just changed
the pins for ease of wiring.
  The circuit:
 * LCD RS pin to digital pin 2
 * LCD Enable pin to digital pin 3
 * LCD D4 pin to digital pin 4
 * LCD D5 pin to digital pin 5
 * LCD D6 pin to digital pin 6
 * LCD D7 pin to digital pin 7
 * LCD R/W pin to ground
 * 10K resistor:
 * ends to +5V and ground
 * wiper to LCD VO pin (pin 3)

 Library originally added 18 Apr 2008
 by David A. Mellis
 library modified 5 Jul 2009
 by Limor Fried (http://www.ladyada.net)
 example added 9 Jul 2009
 by Tom Igoe
 modified 22 Nov 2010
 by Tom Igoe

 This example code is in the public domain.

 http://www.arduino.cc/en/Tutorial/LiquidCrystal
 */

// include the library code:
#include <LiquidCrystal.h>

// initialize the library with the numbers of the interface pins
LiquidCrystal lcd(2, 3, 4, 5, 6, 7);
// Led's
int greenLed = 12; // charging
int yellowLed = 11; // charged
int redLed = 13; // discharging
//buttons
int switchPin = 9; //Mode select
int offButton = 10; // power off button
//other connections
int sensePin = A0; // reading from capacitors
int discharge = 8; // load to discharge the Capacitors
int charger = 15; // switches charger on and off
int buttonState;// monitors the switchPin
int Mode = 0; // our mode for our charger
void setup() {
  // set up the output pins.
  pinMode(greenLed, OUTPUT);
  pinMode(yellowLed, OUTPUT);
  pinMode(redLed, OUTPUT);
  pinMode(charger, OUTPUT);
  pinMode(discharge, OUTPUT);
  // set up the input pins
  pinMode(switchPin, INPUT);
  pinMode(offButton, INPUT);
  pinMode(sensePin, INPUT);


  // set up the LCD's number of columns and rows:
  lcd.begin(16, 2);
  // Print a message to the LCD.
  lcd.print("Cap Level= Volts");
  Serial.begin(9600);


}
void loop() {
  int off = digitalRead(offButton);// variable to read the state of the offButton.
  int chargeLevel = analogRead (sensePin);// variable to monitor the state of charge
  int val = digitalRead(switchPin); //read the button pin and store it in val
  delay(10);   // wait 10 milliseconds to debounce the button.
  int val2 = digitalRead (switchPin); //read the buttonPin again check for bouncing

  if (val == val2) {             //will make sure you have 2 consistent readings
    if (val != buttonState) {     // the button state has changed
      if (val == LOW) {           // check if button is pressed
        if (Mode == 0) {
          Mode = 1;   // this is how we flip through the modes
        }
        else {
          if (Mode == 1) {
            Mode = 2;
          }
          else {
            if (Mode == 2) {
              Mode = 3;
            }
            else {
              if (Mode == 3) {
                Mode = 4;
              }
              else {
                if (Mode == 4) {
                  Mode = 5;
                }
                else {
                  if (Mode == 5) {
                    Mode = 6;
                  }
                  else {

                    Mode = 0;
                  }

                }
              }
            }
          }
        }
      }

      buttonState = val;                 // save the new state in our variable
    }
    // Now do whatever the Mode indicates
    if (Mode == 0) { // all-off ready to go
      digitalWrite(greenLed, LOW);// turn off green led
      digitalWrite(yellowLed, LOW); // turn off yellow led
      digitalWrite(redLed, LOW); // turn off red led
      digitalWrite(charger, LOW); // turn off charger
      digitalWrite(discharge, LOW); // turn off charger
      lcd.setCursor(0, 1);// set the cursor to  line two position 1// set the cursor to  line two position 1

      lcd.print("Mode=0      ");// print to lcd

    }

    if (Mode == 1) {// Charge to 2.5 volts
      lcd.print("                ");// clear rhe bottom line of the display
      lcd.setCursor(0, 1);// set the cursor to  line two position 1// set the cursor to  line two position 1

      lcd.print("Mode= 2.5V  ");
      if (chargeLevel <= 490) {// if the charge level is below our limit switch on.
        digitalWrite(greenLed, HIGH);// turn on green led// turn on green led
        digitalWrite(yellowLed, LOW); // turn off yellow led //turn off yellowLed
        digitalWrite(charger, HIGH); // turn on charger circuit


      } else {
        lcd.print("                ");
        lcd.setCursor(0, 1);// set the cursor to  line two position 1

        lcd.print("Mode= 2.5V  ");

        digitalWrite(greenLed, LOW);// turn off green led
        digitalWrite(yellowLed, HIGH);// turn on yellow led// turn on yellow led
        digitalWrite(charger, LOW); // turn off charger
      }

    }
  }

  if (Mode == 2) {
    lcd.setCursor(0, 1);// set the cursor to  line two position 1
    lcd.print("Mode= 3.0V  ");
    if (chargeLevel <= 590) {
      digitalWrite(greenLed, HIGH);// turn on green led
      digitalWrite(yellowLed, LOW); // turn off yellow led
      digitalWrite(charger, HIGH); // turn on charger


    } else {
      lcd.print("                ");
      lcd.setCursor(0, 1);// set the cursor to  line two position 1

      lcd.print("Mode= 3.0V  ");
      digitalWrite(greenLed, LOW);// turn off green led
      digitalWrite(yellowLed, HIGH);// turn on yellow led
      digitalWrite(charger, LOW); // turn off charger
    }

  }
  if (Mode == 3) {
    lcd.setCursor(0, 1);// set the cursor to  line two position 1
    lcd.print("Mode= 4.0V  ");
    if (chargeLevel <= 775) {
      digitalWrite(greenLed, HIGH);// turn on green led
      digitalWrite(yellowLed, LOW); // turn off yellow led
      digitalWrite(charger, HIGH); // turn on charger


    } else {
      lcd.print("                ");
      lcd.setCursor(0, 1);// set the cursor to  line two position 1

      lcd.print("Mode= 4.0V  ");
      digitalWrite(greenLed, LOW);// turn off green led
      digitalWrite(yellowLed, HIGH);// turn on yellow led
      digitalWrite(charger, LOW); // turn off charger
    }

  }

  if (Mode == 4) {
    lcd.setCursor(0, 1);// set the cursor to  line two position 1
    lcd.print("Mode= 5.0V  ");
    if (chargeLevel <= 980) {
      digitalWrite(greenLed, HIGH);// turn on green led
      digitalWrite(yellowLed, LOW); // turn off yellow led
      digitalWrite(charger, HIGH); // turn on charger


    } else {
      lcd.print("                ");
      lcd.setCursor(0, 1);// set the cursor to  line two position 1

      lcd.print("Mode= 5.0V  ");
      digitalWrite(greenLed, LOW);// turn off green led
      digitalWrite(yellowLed, HIGH);// turn on yellow led
      digitalWrite(charger, LOW); // turn off charger
    }


  }
  if (Mode == 5) {// discharge mode.
    /* I am using a lamp connected to my capacitors as a visual way
    to see the charge being used up.
    The lamp is switched using an NPN transistor triggered by the
    Arduino via a 1k resistor to protect the arduino.
    */
    lcd.setCursor(0, 1);// set the cursor to  line two position 1
    lcd.print("Discharge   ");
    digitalWrite(greenLed, LOW);// turn off green led
    digitalWrite(yellowLed, LOW); // turn off yellow led
    digitalWrite(redLed, HIGH);// turn on red led
    digitalWrite(charger, LOW); // turn off charger
    digitalWrite(discharge, HIGH);// turn on red led


  }
  if (Mode == 6) {
    lcd.setCursor(0, 1);// set the cursor to  line two position 1
    lcd.print("                ");
    Mode = 0;
  }


  int sensorValue = analogRead(A0);
  // Convert the analog reading (which goes from 0 - 1023) to a voltage (0 - 5V):
  float voltage = sensorValue * (5.0 / 970.0);// set up our voltage divider
  //to print decimal to lcd
  /*
  Note
   The reason I am using the 970.0 part of the code is because this callibrates
  my voltage divider.  I used a multimeter and changed the variable until it
  the lcd reading was the same as the multimeter
  */

  lcd.print (voltage);//our decimal variable
  Serial.print("Level of charge on Capacitors =  ");// used for testing
  Serial.println(analogRead(sensePin));// used for testing
  delay(10);
  if (off == LOW)Mode = 0;//turn off the charger
}// End void loop


Can you please list the components required for this project as i cannot see the image properly ..!
it would be great if you do so…I am making this as my class project.
I will ask Jeremy to post the components. Best of luck on your project!