dfu-util: No DFU capable USB device available [Solved]
dfu-util: No DFU capable USB device available
Failed uploading: uploading error: exit status
Are you getting these “No DFU” and “exit status 74” error when trying to upload to your Arduino Nano ESP32?
Don’t fret! You didn’t do anything wrong, and your Arduino Nano ESP32 is fine!

It seems to be an issue cropping up on some folks’ setup and we’ll walk through a couple troubleshooting steps.
Want to build a ChatGPT terminal? Check out this project walk-through!
Why No DFU error?
According to the Arduino website the error:
dfu-util: No DFU capable USB device available
Failed uploading: uploading error: exit status
This error can happen if the IDE could not find the selected board on the port, or if a port is not selected.
You may also see a readout like this:
Opening DFU capable USB device...
Device ID 2341:0070
Device DFU version 0101
Claiming USB DFU Interface...
Setting Alternate Interface #0 ...
Determining device status...
DFU state(2) = dfuIDLE, status(0) = No error condition is present
DFU mode device DFU version 0101
Device returned transfer size 4096
Copying data from PC to DFU device
Download        [                         ]   0%            0 bytes
Download        [=                        ]   4%        12288 bytes
etc...
If you’re wondering, DFU stands for “Device Firmware Update”. It’s a mode some microcontrollers use that allows you to upload code over USB.
For me this No DFU error it was happening intermittently when trying to upload code (this was happening in both Arduino IDE 1 and 2).
Even though I had the Arduino Nano esp32 connected to my computer, the serial port would disappear, so I couldn’t even select it for uploading.
I would detach and reattach the board, and for just a moment I would see an additional serial port show up, but then it would disappear! If you are totally new to Arduino, I could see that being really confusing.
Here’s what I did to solve the problem…
Programming Electronics Academy members, learn about the Arduino IDE toolchain in the Familiarization section of the Arduino Course for Absolute Beginners.
Not a member yet? Sign up here.
How to fix the No DFU capable error
First things first, if you can see a serial port for your Arduino Nano ESP32 then maybe you had the wrong board and port selected.
To double check, go to Tools>Port and select the port that represents the Arduino Nano ESP32 (make sure it’s connected to your computer!)
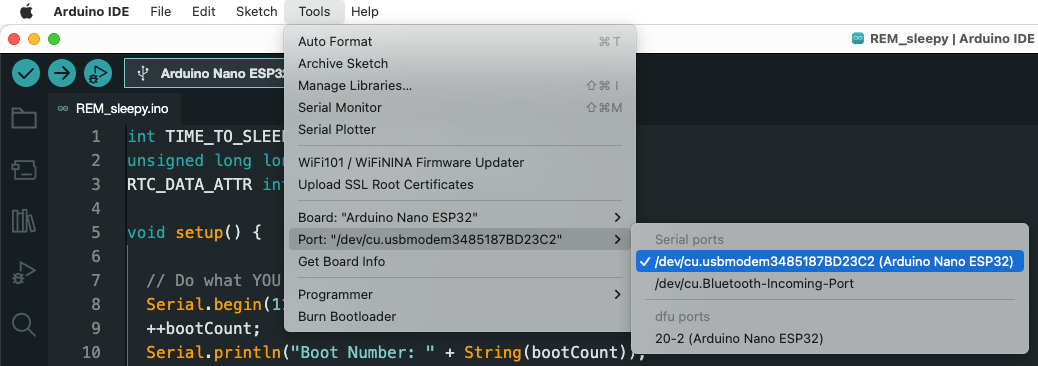
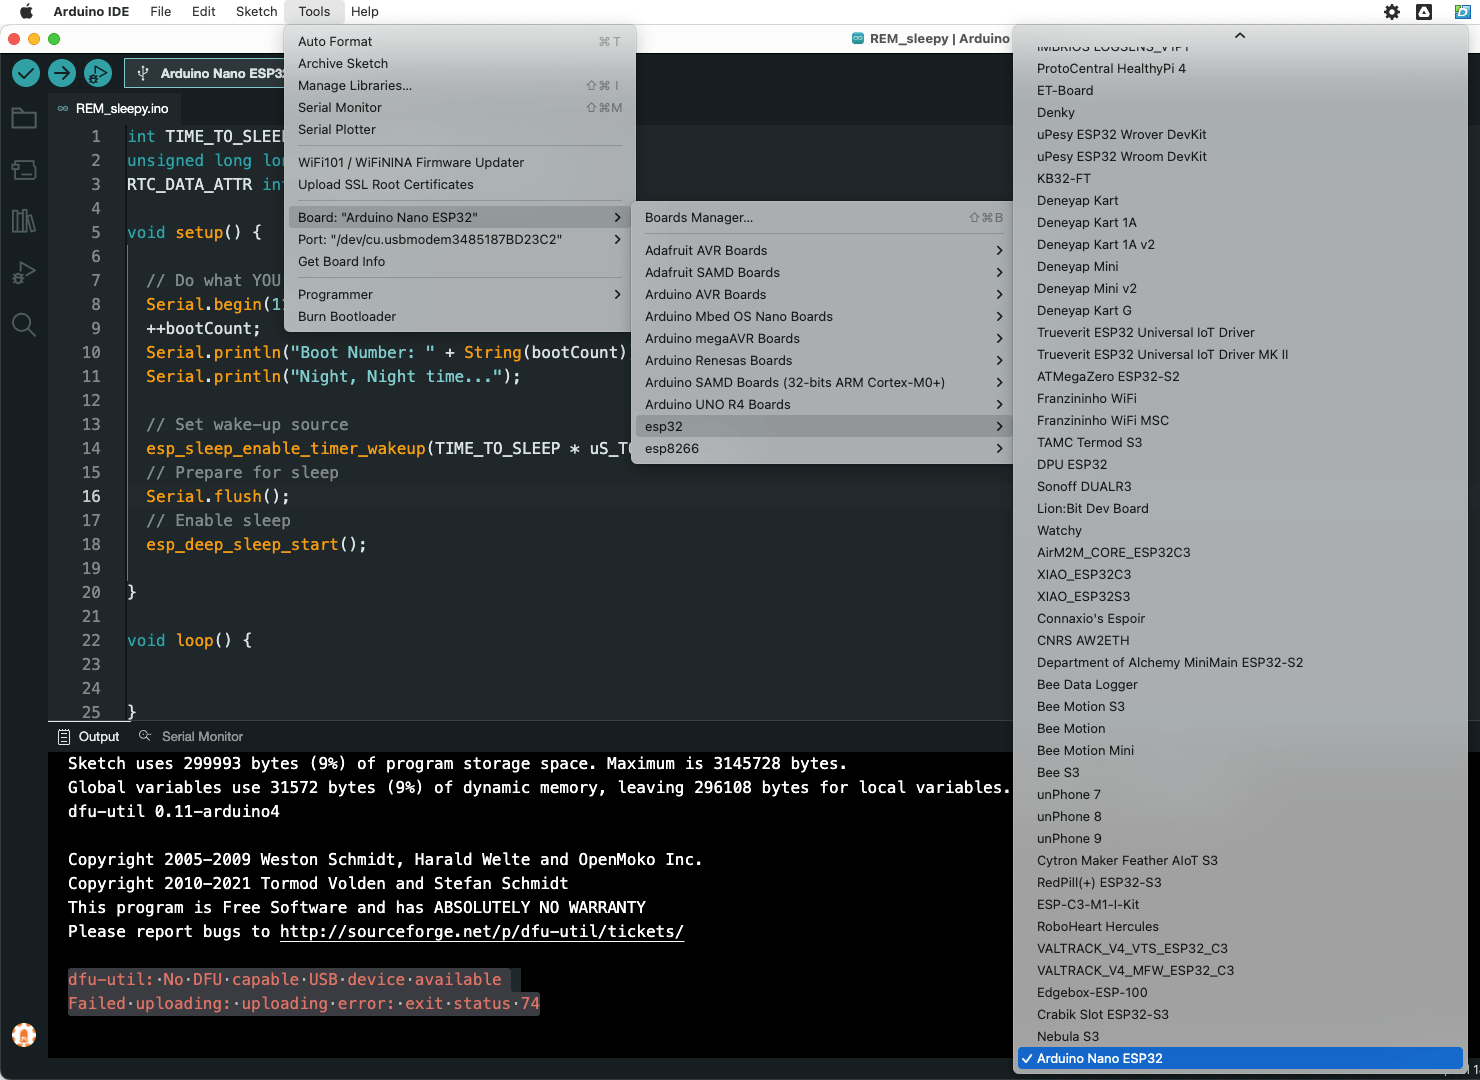
Then go to Tools>Board and select the Arduino Nano ESP32.
Now try to upload.
If you still get this No DFU error, or you can’t even see the Arduino Nano ESP32 port show up, then on to step two…
Put the Arduino Nano ESP32 into bootloader mode
The next troubleshooting step for ridding the No DFU error is to put your Arduino Nano ESP32 into bootloader mode so that it will wait around for new code to be uploaded (instead of running the currently uploaded sketch).
To put your Arduino Nano ESP32 into bootloader mode rapidly click the Reset button twice.
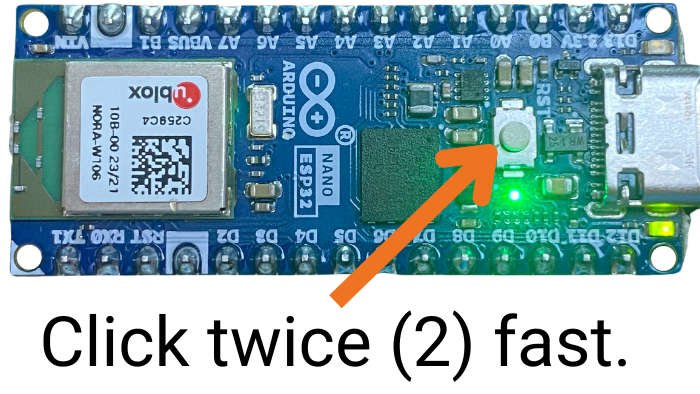
Now, (fingers crossed) you should see a serial port show up that represents your Arduino Nano ESP32.
But, you may not be out of hot water yet – so read on…
Programming Electronics Academy members, check out the Internet of Things (IoT) Course to start programming your own IoT devices.
Not a member yet? Sign up here.
Do No Select the 20-2 USB DFU port
Once the Arduino Nano ESP32 is in bootloader mode, you may be surprised to see two ports show up!
One may be labeled something like “20-2 USB DFU” – this is NOT the port you want to select. You want to select the other port that showed up.

Also, it is very possible that the board selection that the Arduino IDE auto-selected is incorrect. So make sure you go to Tools>Board and select the Arduino Nano ESP32.
Once you have the correct board and port selected, now try uploading your code again.
A quick note though…you may have to press the reset button (once) to see your new code run – so before you declare defeat, press that reset button and see if your new sketch has uploaded ok.
Still not seeing the port?
If you still don’t see a port show up – or it shows up and then disappears, try closing the Arduino IDE (if you have both IDEs (1 and 2) installed, make sure they are both closed!)
Now, with your Arduino Nano ESP32 still connected to your computer, open up the Arduino IDE again. (Also, for extra insurance, scratch a chicken foot across the surface of the board.)
Now check if the port is showing up. If you still see nothing, try putting the Arduino Nano ESP32 into bootloader mode again, as demonstrated above.
Return of the “No DFU” error
Hopefully, you have vanquished the “No DFU” and “exit status 74” errors, but I am afraid to report these errors tend to rear their heads more often than once (at least in my case).
From researching this topic, I know the Arduino team is working on making the experience more seamless, but until then, just keep some of the troubleshooting steps in your back pocket ready to go!
If you’re still not having any luck getting rid of this error, please post your issues below with as much detail as possible and we’ll do our best to help!
Do more than vanquish errors
Now that you’re able to upload code again, maybe it’s time to level up your programming game with a training program that will lay out in detail a process for understanding and using Arduino code so you can start building your projects with confidence. Check out the best Arduino training program here.


I uploaded the micropython firmware into the Arduino Nano ESP32. When I tried to use it again with Arduino IDE I got the “dfu-util: No DFU capable USB device available” and also “dfu-util -l” doesn’t list any device, although I can see the port /dev/ttyACM0 with the proper permissions. I tried to put it in bootloader mode but I didn’t notice any change. Any suggestions?
Hmmmm. Have you tried this process for resetting the bootloader?
https://support.arduino.cc/hc/en-us/articles/9810414060188-Reset-the-Arduino-bootloader-on-the-Nano-ESP32