VEML3328 Color Sensor for the ESP32 [Guide + Code]
- Wiring up your VEML3328
- Programming the ESP32 to use the VEML3328
- Configuring your VEML3328
- Viewing VEML3328 Data
- An Example Using Color Data
Color sensors are useful for color detection, ambient light monitoring, and color balancing. The VEML3328 color sensor is a high-accuracy RGBCIR (Red, Green, Blue, Clear, IR) sensor that can be interfaced with microcontrollers like the ESP32 to capture precise color information.
This tutorial will guide you through the process of wiring up the VEML3328 sensor to an ESP32 and programming it to read color values.
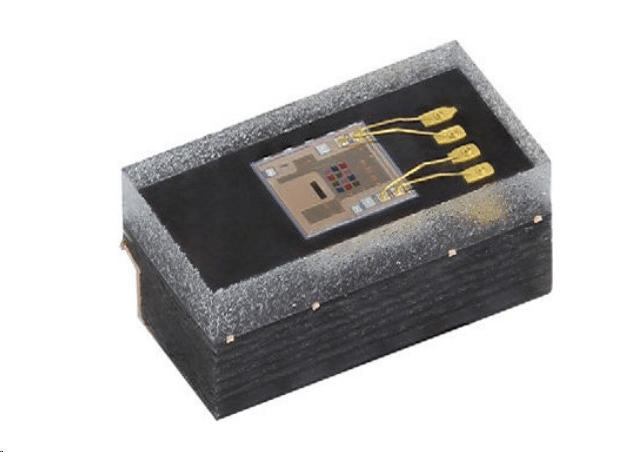
If you are viewing this tutorial, chances are the ESP32 board you’re working on has a built-in VEML3328 and you need help using it. But if not, you can also buy breakout boards such as the MikRoe-3997 breakout for the VEML3328 color sensor.
Wiring up your VEML3328
The VEML3328 communicates with the ESP32 through I2C, a microcontroller communication standard that uses 4 wires (two communication lines, power, and ground). The supply voltage Vdd should not exceed 3.6V, and the I2C lines should be pulled up to Vdd through two 2.2K resistors as shown in the diagram below:
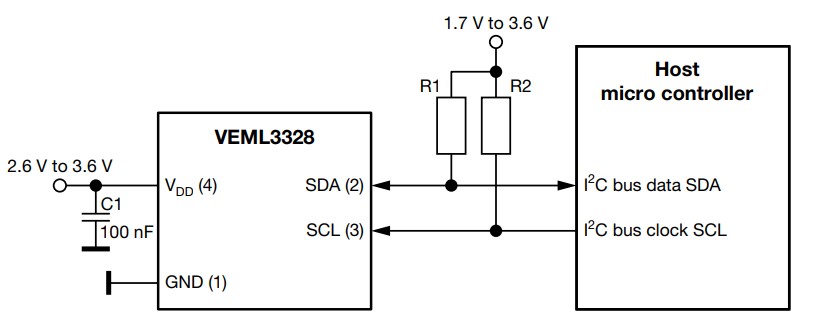
Here is a link to the VEML3328 data sheet for additional information.
Programming the ESP32 to use the VEML3328
We used an open source library which must be manually downloaded.
First, go to the VEML3328 library on Github and download its zip file here:
https://github.com/DevelopiumTech/VEML3328
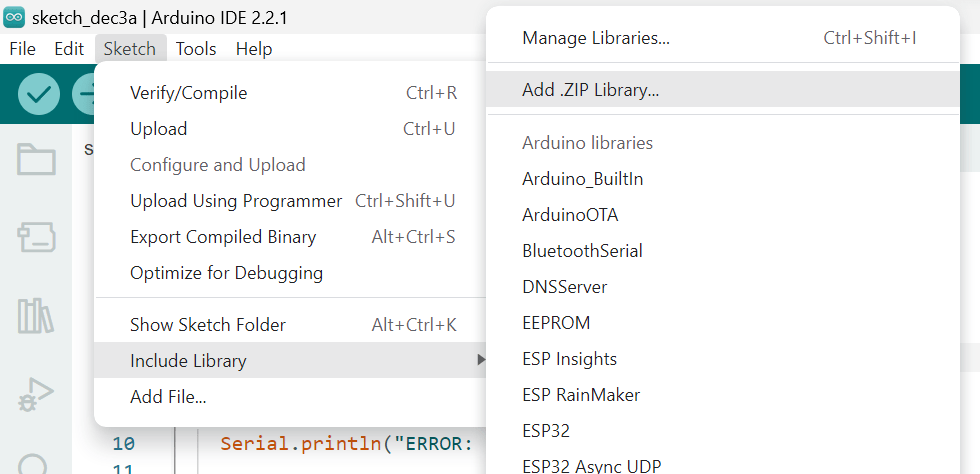
After downloading, within the the Arduino IDE go to:
Sketch => Include Library => Add .ZIP Library…
After downloading the VEML3328 library, open a new sketch and copy/paste in the below test code. After running your code to confirm it works, the following section we’ll go over how to configure and visualize the output data.
#include "VEML3328.h"

VEML3328 RGBCIR;//declare a VEML3328 sensor called RGBCIR

void setup() {

  Serial.begin(115200);

  if(!RGBCIR.begin()) {
    //check if the sensor is connected
    Serial.println("ERROR: couldn't detect the sensor");
    while(1){}

  }

  Serial.println("Vishay VEML3328 RGBCIR color sensor");
  RGBCIR.Enable();                    //enable the sensor channels
  RGBCIR.setGain(4);                  //set the amplification gain to 4 (0.5,1,2 can also be selected)
  RGBCIR.setSensitivity(high_sens);   //set the sensitivity mode (low_sens can also be selected)
  RGBCIR.setDG(4);                    //set the digital gain (1,2 can also be selected)
  RGBCIR.setIntegrationTime(IT_50MS); //set the sensor's integration time or the time it takes to take one measurement (IT_100MS, IT_200MS, IT_400MS can also be selected)
  delay(1000);

}

void loop() {

  // Use the arduino's serial plotter

  Serial.print("Blue:");
  Serial.print(RGBCIR.getBlue());   //read blue channel
  Serial.print(',');
  Serial.print("Red:");
  Serial.print(RGBCIR.getRed());    //read red channel
  Serial.print(',');
  Serial.print("Green:");
  Serial.print(RGBCIR.getGreen());  //read green channel
  Serial.print(',');
  Serial.print("Clear:");
  Serial.print(RGBCIR.getClear());  //read clear channel
  Serial.print(',');
  Serial.print("IR:");
  Serial.println(RGBCIR.getIR());   //read IR channel
  delay(100);
}
Configuring your VEML3328
The VEML3328 sensor allows for several configurations which are accessible through the command register. This library can access and edit these command register configuration bits through the following functions:
Initialization
//give the sensor a name, RGBCIR VEML3328 RGBCIR; //Look for the sensor in the I2C bus, returns 0 if sensor not found RGBCIR.begin(); //turn on the sensor channels (off by default) RGBCIR.Enable(); //turn off the sensor channels (off by default) RGBCIR.Disable();
Parameters Configurations
//sets the gain of the sensor, choose between 0.5,1,2,4 (1 default) RGBCIR.setGain(4); //toggle between two sensitivity modes; low_sens for low sensitivity and high_sens for high RGBCIR.setSensitivity(high_sens); //set the digital gain of the sensor, choose between 1,2,4, (1 default) RGBCIR.setDG(4); //set the integration time of the sensor, choose between IT_50MS, IT_100MS, IT_200MS, IT_400MS (in milliseconds) RGBCIR.setIntegrationTime(IT_50MS);
Reading the sensor’s color channels
Reading the sensor’s color channels //returns the blue channel’s reading from 0-65535 RGBCIR.getBlue()); //returns the green channel’s reading from 0-65535 RGBCIR.getGreen()); //returns the red channel’s reading from 0-65535 RGBCIR.getRed()); //returns the clear channel’s reading from 0-65535 RGBCIR.getClear()); //returns the IR channel’s reading from 0-65535 RGBCIR.getIR());
Note: there is some overlap in the color spectrum for this sensor. From the datasheet:

Viewing VEML3328 Data
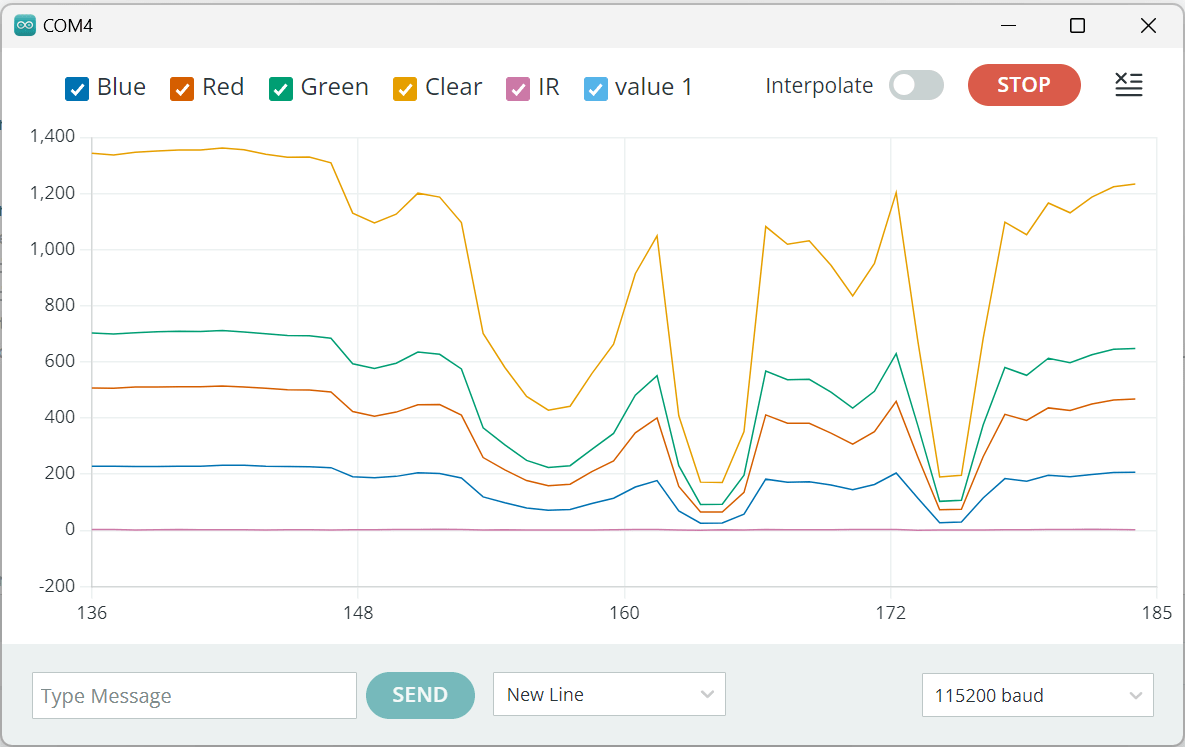
While running the above example code, open the Serial Monitor to see the readings from each color channel:

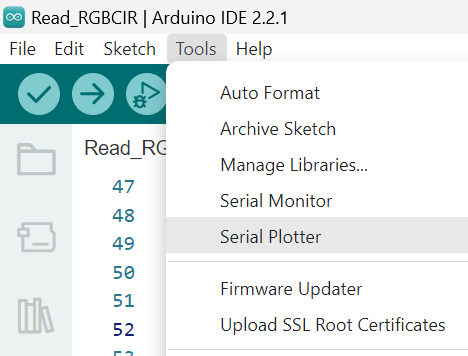
Use the serial plotter for a better viewing experience. The color of the line represents the channel. The serial plotter can be accessed within the Arduino IDE via:
Tools => Serial Plotter
The below chart is what I got in a low-light room while waving my hand over the color sensor:
An Example Using Color Data
Now that you can read in the color sensor data, let’s have an example of using that data. This below example looks at the light in the room and determines whether it’s more blueish, reddish, or greenish. Copy/paste this example and run it.
#include "VEML3328.h"
VEML3328 RGBCIR;//declare a VEML3328 sensor called RGBCIR
void setup() {
Serial.begin(115200);
if(!RGBCIR.begin()) {
//check if the sensor is connected
Serial.println("ERROR: couldn't detect the sensor");
while(1){}
}
Serial.println("Vishay VEML3328 RGBCIR color sensor");
RGBCIR.Enable(); //enable the sensor channels
RGBCIR.setGain(4); //set the amplification gain to 4 (0.5,1,2 can also be selected)
RGBCIR.setSensitivity(high_sens); //set the sensitivity mode (low_sens can also be selected)
RGBCIR.setDG(4); //set the digital gain (1,2 can also be selected)
RGBCIR.setIntegrationTime(IT_50MS); //set the sensor's integration time or the time it takes to take one measurement (IT_100MS, IT_200MS, IT_400MS can also be selected)
delay(1000);
}
void loop()
{
Serial.print("Blue:");
Serial.print(RGBCIR.getBlue()); //read blue channel
Serial.print(',');
Serial.print("Red:");
Serial.print(RGBCIR.getRed()); //read red channel
Serial.print(',');
Serial.print("Green:");
Serial.print(RGBCIR.getGreen()); //read green channel
Serial.print(',');
Serial.print("Clear:");
Serial.print(RGBCIR.getClear()); //read clear channel
Serial.print(',');
Serial.print("IR:");
Serial.println(RGBCIR.getIR()); //read IR channel
if(RGBCIR.getBlue()>RGBCIR.getGreen())
{
if(RGBCIR.getRed()>RGBCIR.getBlue())
Serial.println("light is reddish");
}
else if(RGBCIR.getRed()>RGBCIR.getGreen())
{
if(RGBCIR.getBlue()>RGBCIR.getRed())
Serial.println("light is bluish");
}
else
Serial.println("light is greenish");
delay(200);
}
The output you should see:

Where to Go from Here
So now you have an idea of how to use this color sensor, but the real fun is some action. Can you write a program that does something based on the color detected? Like move a servo, mix an RGB LED to match the color?


