Using an SD Card with the ESP32 [Guide + Code]
In this article, we will be discussing how to perform file reading and writing tasks using a micro SD card connected to an ESP32 using the Arduino IDE (Integrated Development Environment).
A micro SD card is a secure digital memory card that is used in many applications from cell phones to laptops to digital cameras for storing large amounts of data. It can also be used for storing data and other types of information for your ESP32.
- The hardware you’ll need
- Micro SD Card Reader Hardware Wiring
- Micro SD Card Reader SPI Connection Table
- ESP32 DevKit Pin Layout
- Test code for ESP32 with a Micro SD Card
- Micro SD Card Code Walkthrough
- Micro SD Card Test Sketch setup() function
- Micro SD Card Sketch loop() function
- Micro SD Card Test printDirectory() function
- Testing The ESP32 Micro SD Card Sketch
- Where To Go From Here
When a micro SD card reader is connected to your ESP32, it can be a great way to extend your ESP32 device’s memory capabilities. But not only that, it’s a great way to add new functionality to your ESP32 projects for things like data logging, device provisioning and device configuring.
At the end of this article, you’ll be able to connect a micro SD card reader to your ESP32 and read and write files to and from a micro SD card.
The hardware you’ll need
Let’s get started with creating an example project. You will need the following hardware for this project.
- ESP32 device
- Micro SD Card Reader
- Micro SD Card
- Breadboard, if desired.
- Jumper Wires.
A formatted micro SD card is required. FAT32 formatting is the preferred format for the micro SD card for this example. If you have an SD card reader on your laptop, you can format your micro SD card by selecting your SD card in a Windows file explorer window and then right clicking on your SD card. From there you can format your micro SD card like in the screenshot below.


Micro SD Card Reader Hardware Wiring
The micro SD card reader communicates with the ESP32 using the SPI ( Serial Peripheral Interface ) communications protocol. Once you have your ESP32 and your micro SD card reader you can connect the 2 devices together so they can talk to each other.
Micro SD Card Reader SPI Connection Table
Your ESP32 and micro SD card reader are typically connected by using the ESP32’s default SPI pin connections below:
| SD Card Reader | ESP32 |
|---|---|
| MISO | GPIO 19 |
| MOSI | GPIO 23 |
| CLK | GPIO 18 |
| GND | GND |
| CS | GPIO 5 |
| VCC | 3.3V ( or 5V ) |
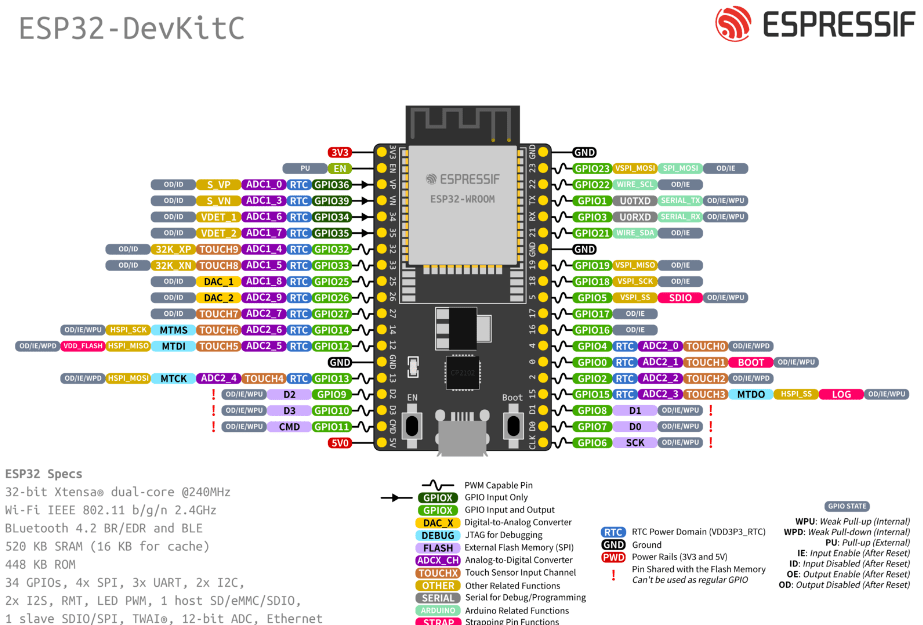
ESP32 DevKit Pin Layout
In order to make these connections, you will need to know the pin layout of your ESP32 device. You can find the ESP32 pin layout on Espressif’s website here: ESP32 Pin Layout.
You can also download our “Easy Reader” ESP32 pinout on our guides page.
In the layout below you can see where the default SPI pins ( MOSI, MISO, CS, CLK ) are physically located on the ESP32 device.
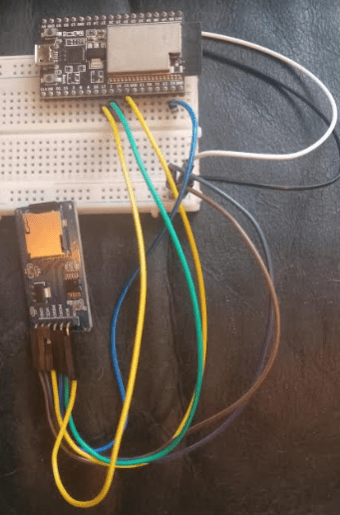
You can either connect these GPIO pins with jumper wires to the corresponding devices using a breadboard, if you have a breadboard. Or alternatively, you can connect the pins from the micro SD Card Reader directly to your ESP32’s GPIO pins. Either technique is acceptable for making the required connections between devices. An example is shown in the picture below.
One important note! Depending on your micro SD card reader and which ESP32 device you are using, you may need to wire your VCC on your SD card reader to 5V on your ESP32 device rather than 3.3V.
Test code for ESP32 with a Micro SD Card
The following sketch is an example of an ESP32 micro SD card test. I know it looks like a lot, but in the next section we’ll break it down for you!
//  SD Card Test Example Sketch
//
//  Programming Electronics Academy
//
// include file system library

#include "FS.h"

// include SD card library

#include "SD.h"

// include SPI library

#include "SPI.h"

// Define SD card connection

#define SD_MOSI     23
#define SD_MISO     19
#define SD_SCLK     18
#define SD_CS       5

File myFile;

// Setup

void setup()
{
  Serial.begin(115200);
  while (!Serial)
  {
    // Wait for serial port to connect. Needed for native USB port only
    ;
  }

  Serial.println("Setup start");
  SPI.begin(SD_SCLK, SD_MISO, SD_MOSI, SD_CS);
  if (!SD.begin(SD_CS))

  {

    Serial.println("SD Card MOUNT FAIL");

  }

  else

  {
    Serial.println("SD Card MOUNT SUCCESS");
    Serial.println("");
    uint32_t cardSize = SD.cardSize() / (1024 * 1024);
    String str = "SDCard Size: " + String(cardSize) + "MB";
    Serial.println(str);
    uint8_t cardType = SD.cardType();
    if(cardType == CARD_NONE)
    {
      Serial.println("No SD card attached");
    }
    Serial.print("SD Card Type: ");
    if(cardType == CARD_MMC)
    {
        Serial.println("MMC");
    }
    else if(cardType == CARD_SD)
    {
        Serial.println("SDSC");
    }
    else if(cardType == CARD_SDHC)
    {
        Serial.println("SDHC");
    }
    else
    {
        Serial.println("UNKNOWN");
    }
    myFile = SD.open("/");
    printDirectory(myFile, 0);
    myFile.close();
    Serial.println("");

    // open a new file and immediately close it:

    Serial.println("Creating helloworld.txt...");
    myFile = SD.open("/helloworld.txt", FILE_WRITE);

    // Check to see if the file exists:

    if (SD.exists("/helloworld.txt"))
    {
      Serial.println("helloworld.txt exists.");
    }
    else
    {
      Serial.println("helloworld.txt doesn't exist.");
    }

    // delete the file:
    Serial.println("Removing helloworld.txt...");
    SD.remove("/helloworld.txt");
    if (SD.exists("/helloworld.txt"))
    {
      Serial.println("helloworld.txt exists.");
    }
    else
    {
      Serial.println("helloworld.txt doesn't exist.");
    }
    myFile.close();
    Serial.println("");

    // Open a file. Note that only one file can be open at a time,
    // so you have to close this one before opening another.
    myFile = SD.open("/test.txt", FILE_WRITE);

    // if the file opened okay, write to it.
    if (myFile)
    {
      Serial.print("Writing to test.txt...");
      myFile.println("testing 1, 2, 3.");

    // close the file:
      myFile.close();
      Serial.println("done.");
    }
    else
    {

      // if the file didn't open, print an error.
      Serial.println("error opening test.txt");
    }

    // Re-open the file for reading.
    myFile = SD.open("/test.txt");
    if (myFile)

    {

      Serial.println("test.txt:");
      // Read from the file until there's nothing else in it.
      while (myFile.available())
      {
        Serial.write(myFile.read());
      }

     // Close the file.
      myFile.close();
    }
    else
    {

     // If the file didn't open, print an error.
      Serial.println("error opening test.txt");
    }
    myFile.close();
  }
  SD.end();
  SPI.end();
  Serial.println("INFO: Setup complete");
}

// loop
void loop()
{

   // Nothing to do here.
}

   // printDirectory
void printDirectory(File dir, int numTabs)
{
  while (true)
  {
    File entry =  dir.openNextFile();
    if (! entry)
    {

     // no more files
      break;
    }
    for (uint8_t i = 0; i < numTabs; i++)
    {
      Serial.print('t');
    }
    Serial.print(entry.name());
    if (entry.isDirectory())
    {
      Serial.println("/");
      printDirectory(entry, numTabs + 1);
    }
    else
    {

      // Files have sizes, directories do not.
      Serial.print("tt");
      Serial.println(entry.size(), DEC);
    }
    entry.close();
  }
}
Micro SD Card Code Walkthrough
At the top of the program we’ll include the FS ( file system ) library for file handling, the SD library for micro SD card functionality and the SPI ( serial peripheral interface ) library for communicating between the ESP32 and the micro SD card reader.
// include file system library
#include "FS.h"
// include SD card library
#include "SD.h"
// include SPI library
#include "SPI.h"
Micro SD Card Test Sketch setup() function
In the setup function, you’ll want to initialize a bunch of stuff!
Initialize serial communication with the serial monitor using a baud rate of 115200.
Serial.begin(115200);
Now we initialize the SPI communications driver using the begin() function. For your sketch, you will need to use the appropriate values of SCLK, MISO, MOSI, and CS for the SD card reader connected to your ESP32. The values below are the ESP32’s default SPI pin values.
#define SD_MOSI     23
#define SD_MISO     19
#define SD_SCLK     18
#define SD_CS       5

SPI.begin(SD_SCLK, SD_MISO, SD_MOSI, SD_CS);
Initialize the micro SD card reader using the begin() function. If no argument is passed to the begin function, the SPI will use the default chip select pin of GPIO 5.
if (!SD.begin(SD_CS))
  {
    Serial.println("SD Card MOUNT FAIL");
  }
Get the micro SD card size.
uint32_t cardSize = SD.cardSize() / (1024 * 1024);

    String str = "SDCard Size: " + String(cardSize) + "MB";
    Serial.println(str);
Display the micro SD card type in the serial monitor.
uint8_t cardType = SD.cardType();

    if(cardType == CARD_NONE)
    {
      Serial.println("No SD card attached");
    }
    Serial.print("SD Card Type: ");
    if(cardType == CARD_MMC)
    {
        Serial.println("MMC");
    }
    else if(cardType == CARD_SD)
    {
        Serial.println("SDSC");
    }
    else if(cardType == CARD_SDHC)
    {
        Serial.println("SDHC");
    }
    else
    {
        Serial.println("UNKNOWN");
    }
Now, call the printDirectory() function to list and display the contents of your micro SD card on the serial monitor.
myFile = SD.open("/");

    printDirectory(myFile, 0);
    myFile.close();
Next, let’s create a file named “helloworld.txt”.
After we create the file using the SD.open() function, with the FILE_WRITE parameter for creating a new file for writing, we then check to see if the file exists and display the results of that test.
If the file creation process worked for the “helloworld.txt” file, then we will delete the file from the micro SD card by using the SD.remove() function. And, again, we will check for the file’s existence to make sure the file has been successfully deleted.
// open a new file and immediately close it:

    Serial.println("Creating helloworld.txt...");
    myFile = SD.open("/helloworld.txt", FILE_WRITE);

    // Check to see if the file exists:
    if (SD.exists("/helloworld.txt"))
    {
      Serial.println("helloworld.txt exists.");
    }
    else
    {
      Serial.println("helloworld.txt doesn't exist.");
    }

    // delete the file:
    Serial.println("Removing helloworld.txt...");
    SD.remove("/helloworld.txt");
    if (SD.exists("/helloworld.txt"))
    {
      Serial.println("helloworld.txt exists.");
    }
    else
    {
      Serial.println("helloworld.txt doesn't exist.");
    }
    myFile.close();
Finally, we will create another new file this time named “test.txt”. After the file has been successfully opened, we will write a test string, “testing 1, 2, 3”, using the println() function to the new file.
Please note that each time you open a file using a file handle object, you must close the file before using that file handle again. This requirement is necessary because only one file can be open at a time with this file handle object!
// Open a file. Note that only one file can be open at a time,
    // so you have to close this one before opening another.

    myFile = SD.open("/test.txt", FILE_WRITE);

    // if the file opened okay, write to it.
    if (myFile)
    {
      Serial.print("Writing to test.txt...");
      myFile.println("testing 1, 2, 3.");

      // close the file:
      myFile.close();
      Serial.println("done.");
    }
    else
    {

      // if the file didn't open, print an error.
      Serial.println("error opening test.txt");

    }

    // Re-open the file for reading.
    myFile = SD.open("/test.txt");
    if (myFile)
    {
      Serial.println("test.txt:");

      // Read from the file until there's nothing else in it.
      while (myFile.available())
      {
        Serial.write(myFile.read());
      }
Micro SD Card Sketch loop() function
The entire SD card update occurs in the setup function. So, there is nothing to do in the Arduino main loop.
You can of course add all the code you want to the loop, but in this example it’s not needed.
Micro SD Card Test printDirectory() function
The printDirectory() function recursively prints the contents, files and folders of your micro SD card using the openNextFile() function.
// printDirectory
void printDirectory(File dir, int numTabs)
{
  while (true)
  {
    File entry =  dir.openNextFile();
    if (! entry)
    {

      // no more files
      break;
    }
    for (uint8_t i = 0; i < numTabs; i++)
    {
      Serial.print('t');
    }
    Serial.print(entry.name());
    if (entry.isDirectory())
    {
      Serial.println("/");
      printDirectory(entry, numTabs + 1);
    }
    else
    {

      // Files have sizes, directories do not.
      Serial.print("tt");
      Serial.println(entry.size(), DEC);
    }
    entry.close();
  }
}
Testing The ESP32 Micro SD Card Sketch
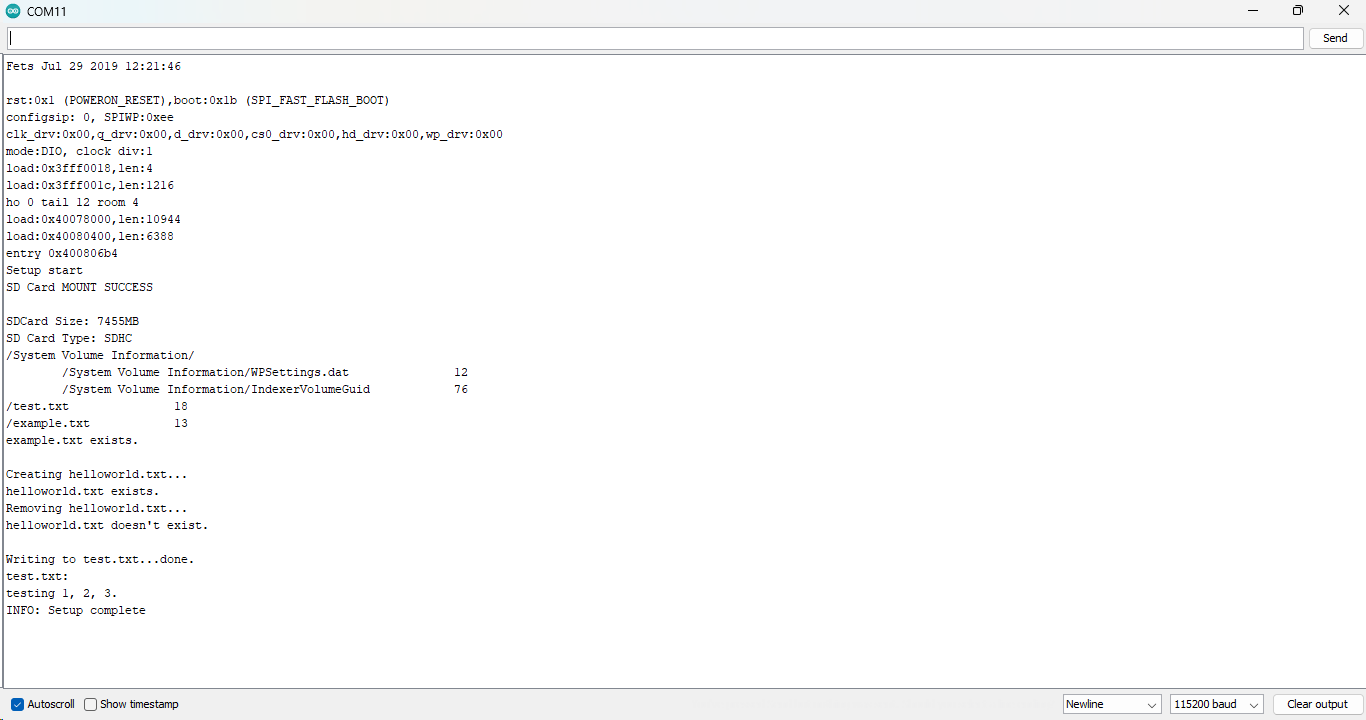
Once you have connected the ESP32 and micro SD card reader together, upload the above sketch to your ESP32 device. After the sketch has been uploaded to your ESP32, insert a micro SD card into your micro SD card reader with a file containing the following contents and press the reset ( RST ) button on your ESP32 device to restart your device.
You should see the contents of your micro SD card displayed on the serial monitor.
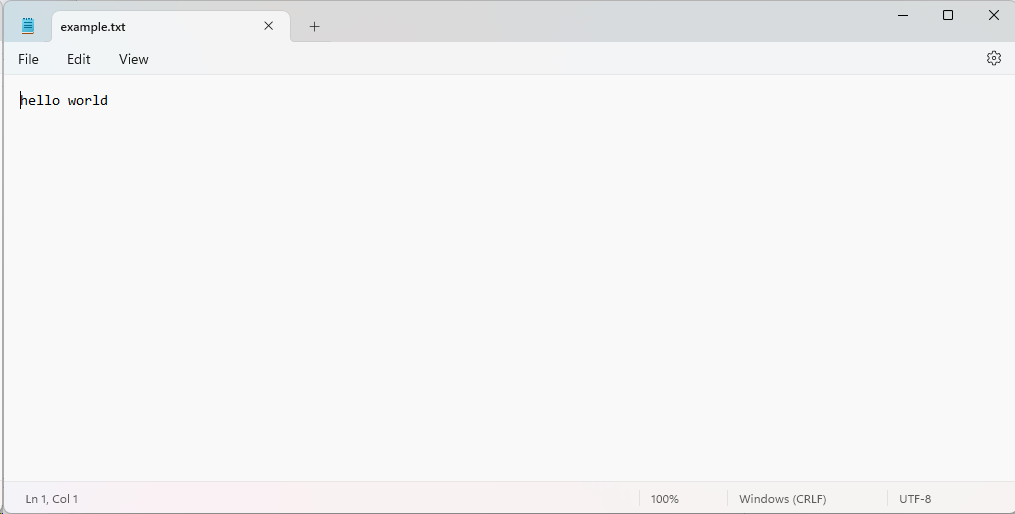
Once the setup function has completed running, you can remove your SD card from your ESP32’s SD card reader and place it in the SD card reader on your computer. You should then be able to view the contents of the “test.txt” file on you computer and see the following contents of the file:

And that is all there is to it. It is that easy to read and write files to and from a micro SD card using your ESP32 device and the Arduino IDE!
Where To Go From Here
Adding a micro SD card reader to your ESP32 device can add a lot of functionality to your ESP32 projects including data logging and device provisioning among other things.
For practice, try connecting a micro SD Card reader to your ESP32 device and create a sketch that reads and writes the value of a counter to a test file stored on a micro SD card. Then, increment the value of the counter after each iteration in your main loop.
For additional practice, try creating a sketch that reads the contents of a file on a micro SD card containing a WiFi SSID and Password and display those contents on the serial monitor.


Please sir I need help, I have a project already but I don’t know the exact point to put the SD card reader codes. Please help
Hi Bryan, If you look at the code right below the header:
“Test code for ESP32 with a Micro SD Card”
This is the complete sketch – is this working for you?