ESP32 BLE Beacon Scanner
- Test code for ESP32 BLE Beacon Scanner
- Code Walkthrough
- The Arduino setup() Function
- The Arduino loop() Function
- Testing The Arduino BLE Beacon Scanner Sketch
- Where To Go From Here
BLE Beacons and BLE Beacon Scanners are awesome technologies that unlock a whole new area of possibilities for the inexpensive and low power aspects of the ESP32! Combining Beacons and an ESP32 device with the Arduino IDE only makes these possibilities more exciting. So, let’s dive into what the ESP32 BLE Beacon Scanner technology is all about!
First let’s define some key concepts necessary for this article.
BLE stands for Bluetooth Low Energy. And, as the name implies, BLE is simply a power conserving version of the original Bluetooth technology. Bluetooth technology is a wireless communications technology used over short distances for personal area networks.
You are probably most familiar with BLE technology when you connect your smartwatch to your smartphone. Or, when you use a digital key to access your hotel room with your smartphone. BLE technology has become almost ubiquitous in our daily lives!
But there are also other uses for BLE. For example, using a BLE device as a Beacon. So, what is a Beacon then you might wonder?
In its most basic form, a Beacon is a hardware device that wirelessly broadcasts its identity to other devices nearby. You can think of a Beacon as an electronic lighthouse! Informing other nearby electronic devices of its location!
Now, for the purpose of this article, we will be focusing on BLE Beacons. BLE Beacons are also hardware devices wirelessly broadcasting their identity to other nearby devices. BLE Beacons broadcast a unique identifier (a UUID) for the device often along with other identifying characteristics.
You may not have already known this, but your smartphone is a BLE Beacon…. an electronic lighthouse to the world!
There are two main types of BLE Beacons being used today, iBeacons (primarily used with iPhone type devices) and Eddystone Beacons (primarily used with Android type devices). We discuss the details of iBeacon here.
This article is about scanning for BLE Beacons in general. The process flow for the example sketch below will be to…
- Create a Beacon scanner
- Run the Beacon scanner
- Periodically display the results of the Beacon scan in the serial monitor.
At the end of this article, you will be able to successfully create a BLE beacon scanner and scan for devices near your ESP32 device. Let’s go!
Test code for ESP32 BLE Beacon Scanner
The following is the entire example sketch of how to create and use a BLE Beacon Scanner with your ESP32.
In the sections below, we will walk through this code together step by step. But, if you want to see the final product right away, you can just upload this sketch to your ESP32 and try it out now!
//  BLE Beacon Scanner Example Sketch
//  Programming Electronics Academy

#include <BLEDevice.h>            // sets up BLE device constructs
#include <BLEUtils.h>             // various BLE utilities for processing BLE data
#include <BLEScan.h>              // contains BLE scanning functions
#include <BLEAdvertisedDevice.h>  // contains BLE device characteristic data

int scanTime = 30; //In seconds
BLEScan* pBLEScan;
class MyAdvertisedDeviceCallbacks: public BLEAdvertisedDeviceCallbacks

{

    void onResult(BLEAdvertisedDevice advertisedDevice)

    {

      String strName;
      strName = advertisedDevice.getName().c_str();
      if ( strName.length() > 0 )

      {

        Serial.printf("Name: %s n", advertisedDevice.getName().c_str());
        Serial.printf("Advertised Device: %s n", advertisedDevice.toString().c_str());

      }

    }

};

void setup() {
  Serial.begin(115200);
  Serial.println("Scanning...");
  BLEDevice::init("");
  pBLEScan = BLEDevice::getScan(); //create new scan
  pBLEScan->setAdvertisedDeviceCallbacks(new MyAdvertisedDeviceCallbacks());
  pBLEScan->setActiveScan(true); //active scan uses more power, but get results faster
  pBLEScan->setInterval(100);
  pBLEScan->setWindow(99);  // less or equal setInterval value

}

void loop() {

  // put your main code here, to run repeatedly:
  BLEScanResults * foundDevices = pBLEScan->start(scanTime, false);
  Serial.print("Devices found: ");
  Serial.println(foundDevices->getCount());
  Serial.println("Scan done!");
  pBLEScan->clearResults();   // delete results fromBLEScan buffer to release memory
  delay(5000);

}

Code Walkthrough
One of the great things about using the Arduino development environment is that there are so many awesome open source libraries available to use!
So, at the top of the program we’ll take advantage of some of these libraries by including the BLE libraries needed to scan for BLE Beacons.
Remember that anytime you see references to BLEDevice (or BLEUtils or BLEScan or BLEAdvertisedDevice), you will know when and where these libraries are being used throughout the code.
And, that’s just another reminder of what makes the Arduino platform so great….that we can take advantage of these libraries that have been shared by other developers!
#include <BLEDevice.h>            // sets up BLE device constructs
#include <BLEUtils.h>             // various BLE utilities for processing BLE data
#include <BLEScan.h>              // contains BLE scanning functions
#include <BLEAdvertisedDevice.h>  // contains BLE device characteristic data
Now, we can create an object that will do the BLE scanning for us. And, then we will define a callback function for that BLE scanning object.
A callback function is a function whose main purpose is to be executed when a specific event happens in another function. The callback function defined below will be passed in as a parameter to the BLE scanning object that was just previously defined.
This parameter will let the BLE scanning object know which function to call in the sketch every time a BLE scan completes. This callback functions main job is to display the names of BLE devices (often referred to as Advertised Devices) that were found during the BLE Beacon scan and are broadcasting their device names.
Important note: Many BLE devices do not routinely broadcast their names or sometimes they will only broadcast their names once a device has been paired with another BLE device.
int scanTime = 30; //In seconds
BLEScan* pBLEScan;

class MyAdvertisedDeviceCallbacks: public BLEAdvertisedDeviceCallbacks

{
    void onResult(BLEAdvertisedDevice advertisedDevice)
    {

      String strName;
      strName = advertisedDevice.getName().c_str();
      if ( strName.length() > 0 )
      {
        Serial.printf("Name: %s n", advertisedDevice.getName().c_str());
        Serial.printf("Advertised Device: %s n", advertisedDevice.toString().c_str());
      }

    }

};
The Arduino setup() Function
Once we have included our libraries and defined our callback function, we can move on to the setup() function. As you may already know, in the Arduino environment the first thing that runs on startup of the ESP32 is the setup() function.
The first thing we need to do in the setup() function, is to initialize the serial communication with the serial monitor using a baud rate of 115200.
Serial.begin(115200);
Now, create the new BLE scan device and set the BLE callback function to MyAdvertisedDeviceCallbacks for when a scan completes.
The BLE scan type is set to passive by default. So, we will set it to active in order to get more results faster. The scan interval is set to 100 milliseconds and the scan window is set to 99 milliseconds. The scan window value needs to be set to a number less than or equal to the scan interval value.
  BLEDevice::init("");
  pBLEScan = BLEDevice::getScan(); //create new scan
  pBLEScan->setAdvertisedDeviceCallbacks(new MyAdvertisedDeviceCallbacks());
  pBLEScan->setActiveScan(true); //active scan uses more power, but get results faster
  pBLEScan->setInterval(100);
  pBLEScan->setWindow(99);  // less or equal setInterval value
The Arduino loop() Function
In the Arduino main loop, execute the BLE Beacon Scan function using the 30 second scanTime variable to tell the scan function how long to search for BLE Beacons.
This scanTime variable is arbitrary and can be set to a value longer or shorter depending on what the specific applications needs are. For example, if a specific BLE device advertises itself every 3 – 4 seconds, then a shorter scanTime can be set to find that BLE device. In this example, a longer scanTime interval was set to find as many devices nearby as possible.
When the scan is complete or the 30 second timer expires in this example, the MyAdvertisedDeviceCallbacks() callback function will display the names of the BLE Beacons found during the scan in the serial monitor.
After a delay() of 5 seconds, the program repeats itself displaying the updated BLE Beacons in range of the ESP32 device with names every 5 seconds.
  // put your main code here, to run repeatedly:

  BLEScanResults * foundDevices = pBLEScan->start(scanTime, false);
  Serial.print("Devices found: ");
  Serial.println(foundDevices->getCount());
  Serial.println("Scan done!");
  pBLEScan->clearResults();   // delete results fromBLEScan buffer to release memory
  delay(5000);
Testing The Arduino BLE Beacon Scanner Sketch
Once you have connected an ESP32 to your computer, upload the whole sketch to your device. After the sketch has been uploaded to your ESP32, press the reset (RST) button on your ESP32 device and you should see the following displayed on the serial monitor.
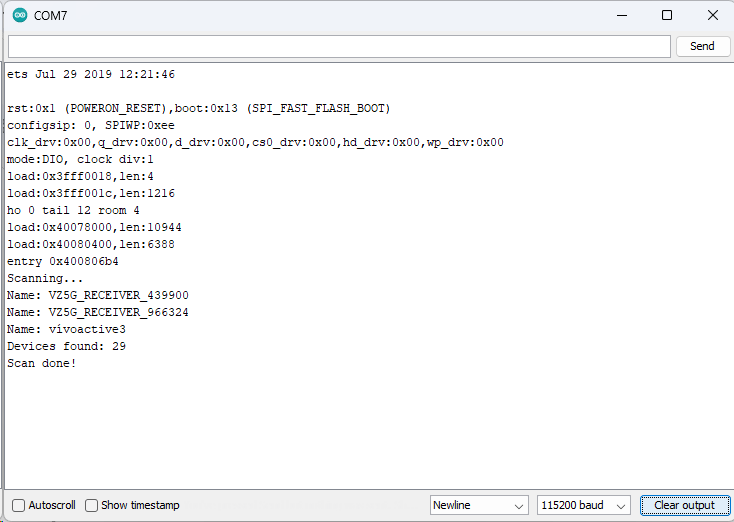
As you can see from the output, 29 BLE devices were found within range of this ESP32 device, but only 3 BLE devices were broadcasting their device names.
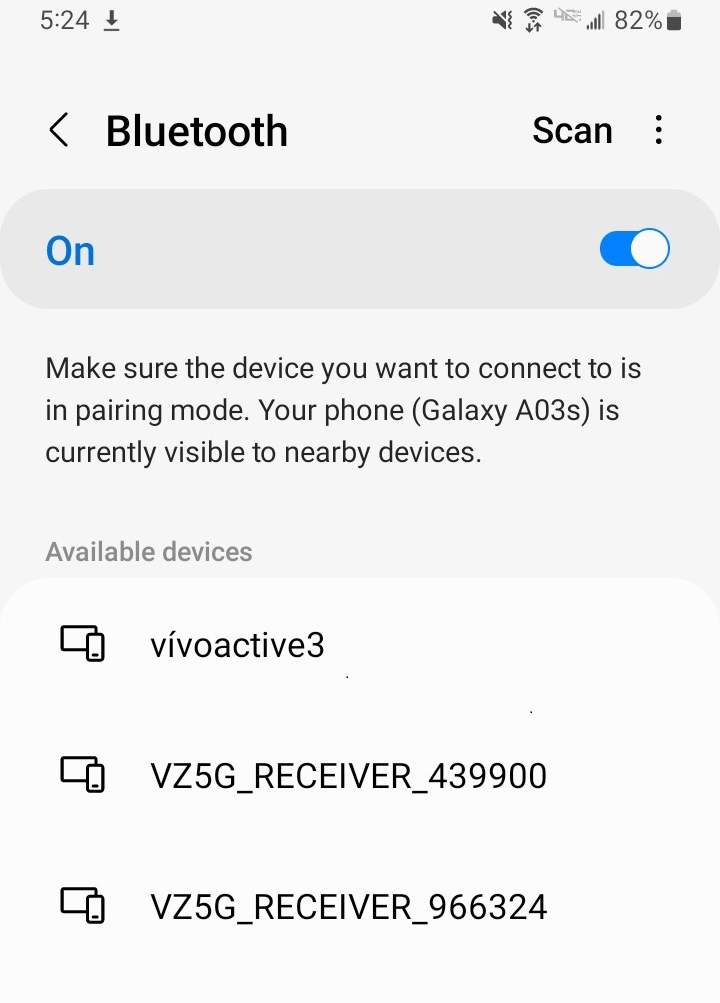
One quick and easy way to check the results of your work is to compare the results of the BLE Beacon Scan done by your ESP32 with the devices your smartphone has detected that are within range of itself. Below is a screenshot of the Bluetooth devices settings page on a smartphone sitting next to the ESP32 BLE Beacon Scanner and you can see the results are identical!
And that is all there is to it! It is that easy to scan for BLE Beacons with your ESP32 device and the Arduino IDE!
Where To Go From Here
Making a BLE Beacon Scanner with your ESP32 device can create a whole new realm of possibilities for your ESP32 projects. This functionality is especially useful when tracking devices, personnel or when using your ESP32 for locationing.
For practice, try changing your code to look for a specific BLE Beacon name and stop the scanning process when that BLE Beacon is found.


I skimmed read this article, Very good, really enjoyed it. Question: I missed the part on how to setup the hardware. Can you tell where it is?
Can I use a standard ESP32 board, not BLE? Thanks
Hi Bryan – great question!
There really is no hardware setup per say, all you need is an ESP32 dev board which are WiFI and BLE capable out of the box.
Buenos días, tengo una placa esp32c3 mini y tras revisar y corregir unos errores que me daba, no me sale respuesta alguna, los errores eran
” 49 | BLEScanResults foundDevices = pBLEScan->start(scanTime, false);
” | ~~~~~~~~~~~~~~~^~~~~~~~~~~~~~~~~
“exit status 1
“Compilation error: conversion from ‘BLEScanResults*’ to non-scalar type ‘BLEScanResults’ requested
lo corregi poniendo un * delante de founDevices y ahoa me sale el siguiente error
” 51 | Serial.println(foundDevices.getCount());
” | ^~~~~~~~
“exit status 1
“Compilation error: request for member ‘getCount’ in ‘foundDevices’, which is of pointer type ‘BLEScanResults*’ (maybe you meant to use ‘->’ ?)
una vez corregido según indica, ya no me sale ningún error, pero no tengo respuesta
Un saludo … Miguel
¡Hola Miguel! Bien, cuando dice que no recibe ninguna respuesta, ¿quiere decir que no ve ningún dispositivo BLE en el monitor serie?
Hello, sir I put scan time to 900ms. I am unable to scan every 900ms.
Are you getting an error? Is your scan window value equal or to less than 900ms?