How to use timestamps with ESP32 and micro SD card
[Guide + Code]
Do you need to add timestamps to files you are saving on an SD card using an ESP32?
In this article, we will demonstrate adding timestamps to files with an ESP32 connected to WiFi. We’ll also cover file reading and writing tasks using a micro SD card reader connected to an ESP32 using the Arduino IDE.
- The hardware you’ll need
- Test code for using timestamps with a Micro SD Card
- Code Walkthrough
- Example sketch setup() function
- Arduino’s loop() function: Epoch Time and Local Time
- logSDCard() function for writing data to a Micro SD Card
- ESP32 Micro SD Card Timestamp writeFile() function
- ESP32 Micro SD Card Timestamp appendFile() function
- Testing The SD Card Timestamp Sketch
- Where To Go From Here
Wait…what exactly is a timestamp?
Timestamps are dates and times in human readable form. Timestamps are useful when adding dates and times to data you are logging and for creating file names with dates and times in them.
The process flow for the example sketch below will be to…
- Connect to a WiFi network
- Get the current time from a web API
- Create a file on a micro SD card using a Unix style timestamp to name the file
- Write some data to the file (including a human readable timestamp)
At the end of this article, you’ll be able to successfully read and write data with accurate timestamps to a file using a micro SD card with your ESP32. Let’s go!
Quick note: If you want some extra practice writing and reading files with a micro SD card, make sure to check out this article.
The hardware you’ll need
- ESP32 device equipped with a micro SD Card Reader
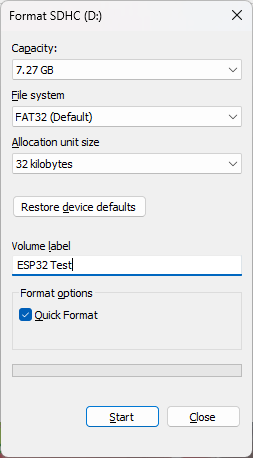
- A formatted micro SD card is also required. FAT32 formatting is the preferred format for the micro SD card for these updates. Here is am example Micro SD Card that has worked successfully for this task.
If you have an SD card reader on your laptop, you can format your micro SD card by selecting your SD card in a Windows file explorer window and then right clicking on your SD card. From there you can format your micro SD card like in the screenshot below.

Test code for using timestamps with a Micro SD Card
The following is the entire sketch for an example of how to access and use timestamps with your ESP32 and a micro SD card. In the sections below, we will walk through this code together step by step. But, if you want to see the final product right away, you can just upload this sketch to your ESP32 and try it out now!
//  SD Card Time Example Sketch
//
//  Programming Electronics Academy
//

#include "FS.h"    // include file system library
#include "SD.h"    // include SD card library
#include "SPI.h"   // include SPI library
#include <time.h>  // include time library
#include <WiFi.h>  // include wifi library

// Define SD card connection
#define SD_MOSI     15
#define SD_MISO     2
#define SD_SCLK     14
#define SD_CS       13
const char* ssid     = "your-ssid";
const char* password = "your-password";

// (utc+) TZ in hours
long timezone = 6;
byte daysavetime = 1;
struct tm tmstruct;
int readingID = 0;
int temp = 75;
float humidity = 50;
String dataMessage;
String sensor_time;
String filename;

// Setup
void setup()
{
  Serial.begin(115200);
  while (!Serial)
  {
    // Wait for serial port to connect. Needed for native USB port only
    ;
  }
  Serial.println("Setup start");
  // We start by connecting to a WiFi network
  Serial.println();
  Serial.println();
  Serial.print("Connecting to ");
  Serial.println(ssid);
  WiFi.begin(ssid, password);
  while (WiFi.status() != WL_CONNECTED)
  {
      delay(500);
      Serial.print(".");
  }
  Serial.println("WiFi connected");
  Serial.println("IP address: ");
  Serial.println(WiFi.localIP());
  Serial.println("Contacting Time Server");
  configTime(3600*timezone, daysavetime*3600, "time.nist.gov", "0.pool.ntp.org", "1.pool.ntp.org");
  delay(2000);
  tmstruct.tm_year = 0;
  getLocalTime(&tmstruct, 5000);
  Serial.printf("nNow is : %d-%02d-%02d %02d:%02d:%02dn",(tmstruct.tm_year)+1900,( tmstruct.tm_mon)+1, tmstruct.tm_mday,tmstruct.tm_hour , tmstruct.tm_min, tmstruct.tm_sec);
  Serial.println("");
  SPI.begin(SD_SCLK, SD_MISO, SD_MOSI, SD_CS);
  if (!SD.begin(SD_CS))
  {
    Serial.println("SD Card MOUNT FAIL");
  }
  else
  {
    Serial.println("SD Card MOUNT SUCCESS");
    Serial.println("");
    uint32_t cardSize = SD.cardSize() / (1024 * 1024);
    String str = "SDCard Size: " + String(cardSize) + "MB";
    Serial.println(str);
    uint8_t cardType = SD.cardType();
    if(cardType == CARD_NONE)
    {
      Serial.println("No SD card attached");
    }
    Serial.print("SD Card Type: ");
    if(cardType == CARD_MMC)
    {
        Serial.println("MMC");
    }
    else if(cardType == CARD_SD)
    {
        Serial.println("SDSC");
    }
    else if(cardType == CARD_SDHC)
    {
        Serial.println("SDHC");
    }
    else
    {
        Serial.println("UNKNOWN");
    }
  }
  Serial.println("INFO: Setup complete");
}

// loop
void loop()

{
  Serial.println("Storing sensor data...");
  tmstruct.tm_year = 0;
  char buffer[30];
  getLocalTime(&tmstruct, 5000);
  sprintf(buffer,"%d-%02d-%02d, %02d:%02d:%02d",(tmstruct.tm_year)+1900,( tmstruct.tm_mon)+1,
  tmstruct.tm_mday,tmstruct.tm_hour , tmstruct.tm_min, tmstruct.tm_sec);
  sensor_time = String(buffer);
  Serial.println(sensor_time);
  time_t now;
  time(&now);

  Serial.print("Epoch time: ");
  Serial.println(now);

  filename = "/" + String(now) + ".txt";

  Serial.print("filename: ");
  Serial.println(filename);

  // Increment readingID on every new reading
  readingID++;

  // generate dummy data = changing temp and humidity
  temp += random(3) - 1;   // -1, 0, +1
  temp = constrain(temp, -20, 100);
  humidity += (random(3) - 1) * 2.5;  // -2.5, 0, +2.5
  humidity = constrain(humidity, 0, 100);
  Serial.print("Temp and humidity: ");
  Serial.println(String(temp) + ", " + String(humidity));

  // If the data.txt file doesn't exist,
  // create a file on the SD card and write the data labels

  File file = SD.open(filename.c_str());
  if(!file)
  {
    Serial.println("File doesn't exist");
    Serial.println("Creating file...");
    writeFile(SD, filename.c_str(), "Reading ID, Date, Time, Temp, Humidity rn");
  }
  else
  {
    Serial.println("File already exists");
  }
  file.close();
  logSDCard();
  delay(5000);
}

// logSDCard
void logSDCard()

{
  dataMessage = String(readingID) + ", " + String(sensor_time) + ", " + String(temp) + ", " + String(humidity) + "rn";
  Serial.print("Save sensor data: ");
  Serial.println(dataMessage);
  appendFile(SD, filename.c_str(), dataMessage.c_str());
}

// writeFile
void writeFile(fs::FS &fs, const char * path, const char * message)

{

  Serial.printf("Writing file: %sn", path);
  File file = fs.open(path, FILE_WRITE);
  if(!file)
  {
    Serial.println("Failed to open file for writing");
    return;
  }
  if(file.print(message))
  {
    Serial.println("File written");
  }
  else
  {
    Serial.println("Write failed");
  }
  file.close();
}

// appendFile
void appendFile(fs::FS &fs, const char * path, const char * message)

{
  Serial.printf("Appending to file: %sn", path);
  File file = fs.open(path, FILE_APPEND);
  if(!file)
  {
    Serial.println("Failed to open file for appending");
    return;
  }
  if(file.print(message))
  {
    Serial.println("Message appended");
  }
  else
  {
    Serial.println("Append failed");
  }
  file.close();
}
Code Walkthrough
One of the great things about using the Arduino development environment is that there are so many awesome open source libraries available to use! So, at the top of the program we’ll take advantage of some of these libraries by including the FS ( file system ) library for file handling, the SD library for micro SD card functionality and the SPI ( serial peripheral interface ) library for communicating between the ESP32 and the micro SD card reader.
Also, in this example, we need to include the WiFi library for connecting to a WiFi network and the time library for manipulating time data.
Programming Electronics Academy members, learn how to choose, install, and use Arduino libraries in the Arduino Course for Absolute Beginners Code Libraries section.
Not a member yet? Sign up here.
So, remember that anytime you see references to FS or SD or WiFi, you will know when and where these libraries are being used throughout the code. And, that’s just another reminder of what makes the Arduino platform so great….that we can take advantage of these libraries that have been shared by other developers!
#include "FS.h"    // include file system library
#include "SD.h"    // include SD card library
#include "SPI.h"   // include SPI library
#include <time.h>  // include time library
#include <WiFi.h>  // include wifi library
Example sketch setup() function
Once we have included our libraries, we can move on to the setup() function. As you may already know, in the Arduino environment the first thing that runs on startup of the ESP32 is the setup() function. And, the first thing we need to do in the setup() function, is to initialize the serial communication with the serial monitor using a baud rate of 115200.
Serial.begin(115200);
After the serial data has been turned on, you can then connect to your WiFi network.
Important: Remember that before you upload your sketch to an ESP32, you will need to change these variables below at the beginning of your sketch to your WiFi authentication information.
const char* ssid     = "your-ssid";
const char* password = "your-password";
Now, connect to the WiFi network by using the WiFi.begin() function and passing in your SSID and password.
WiFi.begin(ssid, password);

  while (WiFi.status() != WL_CONNECTED)
  {
      delay(500);
      Serial.print(".");
  }
Once you are connected to the internet via your WiFi connection, you will need to connect to a time server to get the current date and time. To do this, let’s connect to an NTP ( Network Time Protocol ) server to get an accurate timestamp. The U.S. government provides a time server that employs this Internet Protocol and that can be used to accurately sync computer and device times for free.
The configTime() function gives us the ability to tell our device what time zone we are in and what time servers, and backup time servers if the primary server is busy, that we will be getting our time information from.
You may want to adjust the following variables to reflect your timezone and the correct daylight saving time. The time zone setting below is for the U.S. Central Time Zone. You can find a list of worldwide time zones here: List of Time Zones.
// (utc+) TZ in hours
long timezone = 6;

byte daysavetime = 1;
  Serial.println("Contacting Time Server");
  configTime(3600*timezone, daysavetime*3600, "time.nist.gov", "0.pool.ntp.org", "1.pool.ntp.org");
  delay(2000);
  tmstruct.tm_year = 0;
  getLocalTime(&tmstruct, 5000);

  Serial.printf("nNow is : %d-%02d-%02d %02d:%02d:%02dn",(tmstruct.tm_year)+1900,( tmstruct.tm_mon)+1, tmstruct.tm_mday,tmstruct.tm_hour , tmstruct.tm_min, tmstruct.tm_sec);
You then need to initialize the SPI communications with the SD card reader using the begin() function. For your sketch, you will need to use the appropriate values of SCLK, MISO, MOSI, and CS for the SD card reader connected to your ESP32.
SPI.begin(SD_SCLK, SD_MISO, SD_MOSI, SD_CS);
The micro SD card reader is initialized by using the begin() function. If no argument is passed to the begin function, the SPI will use the default chip select pin of GPIO5. In this example, the chip select pin of GPIO13 is being passed as an argument to the SD card reader begin() function.
if (!SD.begin(SD_CS))
  {
    Serial.println("SD Card MOUNT FAIL");
  }
Get the micro SD card size.
uint32_t cardSize = SD.cardSize() / (1024 * 1024);
    String str = "SDCard Size: " + String(cardSize) + "MB";
    Serial.println(str);
Display the micro SD card type in the serial monitor.
uint8_t cardType = SD.cardType();
    if(cardType == CARD_NONE)
    {
      Serial.println("No SD card attached");
    }
    Serial.print("SD Card Type: ");
    if(cardType == CARD_MMC)
    {
        Serial.println("MMC");
    }
    else if(cardType == CARD_SD)
    {
        Serial.println("SDSC");
    }
    else if(cardType == CARD_SDHC)
    {
        Serial.println("SDHC");
    }
    else
    {
        Serial.println("UNKNOWN");
    }
Arduino’s loop() function: Epoch Time and Local Time
In the Arduino main loop, we get the local time in both human readable form and we also get an epoch time for naming our files. We get the local time by using the getLocalTime() function and format that time using a call to the sprintf() function.
We get the epoch time for our filename by using the now() function. Epoch time is defined as the number of seconds that have elapsed since midnight on January 1st, 1970. It’s also frequently referred to as Unix time.
Once you have an epoch timestamp, you can then use this information to create unique filenames with it. And, then you can write data to that file with a human readable timestamp included in the data.
tmstruct.tm_year = 0;
  char buffer[30];
  getLocalTime(&tmstruct, 5000);
  sprintf(buffer,"%d-%02d-%02d, %02d:%02d:%02d",(tmstruct.tm_year)+1900,( tmstruct.tm_mon)+1, tmstruct.tm_mday,tmstruct.tm_hour , tmstruct.tm_min, tmstruct.tm_sec);

  sensor_time = String(buffer);
  Serial.println(sensor_time);

  time_t now;
  time(&now);

  Serial.print("Epoch time: ");
  Serial.println(now);

  filename = "/" + String(now) + ".txt";

  Serial.print("filename: ");
  Serial.println(filename);
Normally, you will have some specific sensor data ( temperature, humidity, etc ) or other objects that you will want to collect information from. But in the section below, we will create some dummy data that will represent some sensor data for testing our code. And we will write that dummy sensor data to a file.
// generate dummy data = changing temp and humidity

  temp += random(3) - 1;   // -1, 0, +1
  temp = constrain(temp, -20, 100);

  humidity += (random(3) - 1) * 2.5;  // -2.5, 0, +2.5
  humidity = constrain(humidity, 0, 100);

  Serial.print("Temp and humidity: ");
  Serial.println(String(temp) + ", " + String(humidity));
And next, we can create a file (if it doesn’t already exist) using the SD.open() function and the epoch timestamp we created above.
// If the data.txt file doesn't exist,
  // create a file on the SD card and write the data labels

  File file = SD.open(filename.c_str());
  if(!file)
  {
    Serial.println("File doesn't exist");
    Serial.println("Creating file...");
    writeFile(SD, filename.c_str(), "Reading ID, Date, Time, Temp, Humidity rn");
  }
  else
  {
    Serial.println("File already exists");
  }
  file.close();
  logSDCard();
Programming Electronics Academy members, check out the Familiarization section of the Arduino Course for Absolute Beginners to learn about all the stuff on an Arduino board.
Not a member yet? Sign up here.
Finally, use a delay of 5 seconds before the Arduino main loop is executed again. This delay is helpful when trying to watch the code execute using the serial monitor.
delay(5000);
logSDCard() function for writing data to a Micro SD Card
The logSDCard() function formats the data record with the dummy data that was created above and calls the appendFile() function to add the data to a file.
dataMessage = String(readingID) + ", " + String(sensor_time) + ", " + String(temp) + ", " + String(humidity) + "rn";
  Serial.print("Save sensor data: ");
  Serial.println(dataMessage);
  appendFile(SD, filename.c_str(), dataMessage.c_str());
ESP32 Micro SD Card Timestamp writeFile() function
The writeFile() function writes a line to our file using the file.print() function.
File file = fs.open(path, FILE_WRITE);
  if(!file)
  {
    Serial.println("Failed to open file for writing");
    return;
  }
  if(file.print(message))
  {
    Serial.println("File written");
  }
  else
  {
    Serial.println("Write failed");
  }
  file.close();
ESP32 Micro SD Card Timestamp appendFile() function
The appendFile() function opens the file for appending ( FILE_APPEND ) and then writes a record to our file using the file.print() function.
File file = fs.open(path, FILE_APPEND);
  if(!file)
  {
    Serial.println("Failed to open file for appending");
    return;
  }
  if(file.print(message))
  {
    Serial.println("Message appended");
  }
  else
  {
    Serial.println("Append failed");
  }
  file.close();
Testing The SD Card Timestamp Sketch
Once you have connected the ESP32 and micro SD card reader together, upload the above sketch to your ESP32 device. After the sketch has been uploaded to your ESP32, insert a micro SD card into your micro SD card reader and press the reset ( RST ) button on your ESP32 device to restart your device.
You should see the following displayed on the serial monitor.
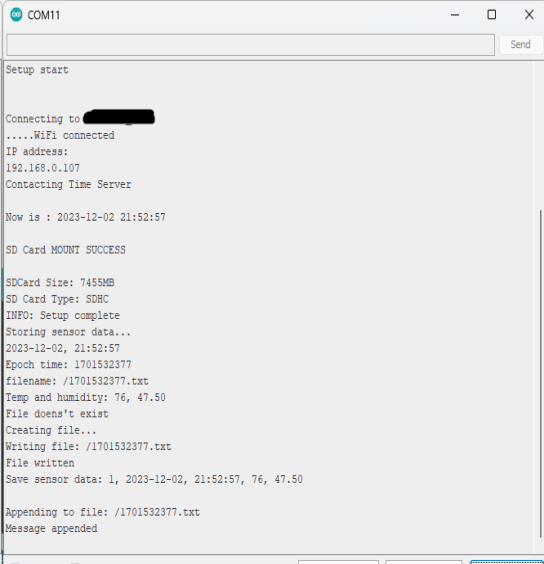
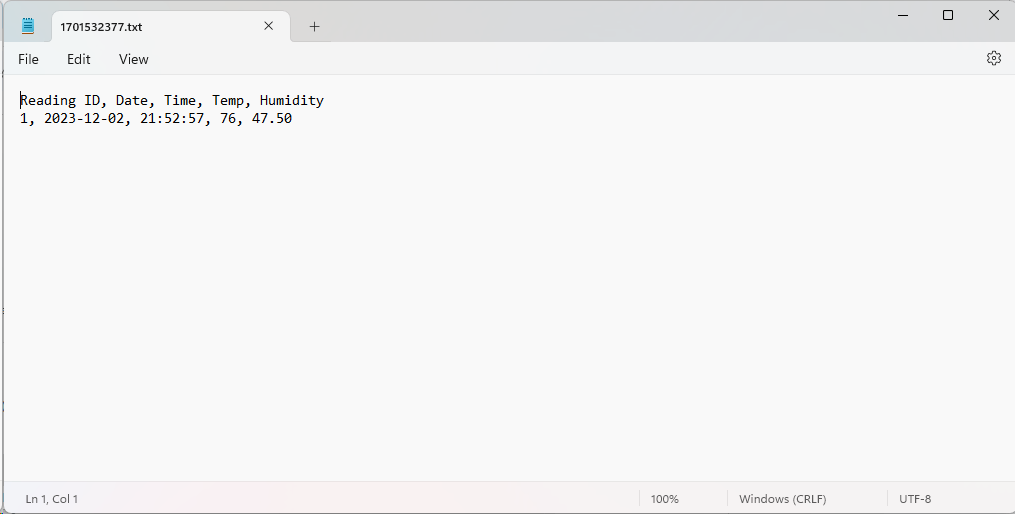
New files will continue to be created every 5 seconds until you disconnect power from your ESP32. After you disconnect power from your device, you can remove your SD card from your ESP32’s SD card reader and place it in the SD card reader on your computer. You should be able to see the contents of your micro SD card and the contents of your test files similar to the following screenshot.
You can note in the screenshot below that we have created a comma separated value ( CSV ) file with a header row that can be easily imported into a spreadsheet program or database. And, if we were saving real sensor data, we could then use many types of analytics tools to view and analyze the data.
And that is all there is to it! It is that easy to use timestamps with your ESP32 device and a micro SD card and the Arduino IDE!
Where To Go From Here
Using timestamps and files with a micro SD card reader and your ESP32 device can add a lot of functionality to your ESP32 projects. This functionality is especially useful when creating data logging projects like tracking temperatures or humidity readings or other readings from sensors connected to your ESP32.
For practice, try connecting a micro SD Card reader to your ESP32 device and create a sketch that appends the value of a counter, a timestamp and some dummy variables to the SAME file stored on a micro SD card.


