ESP32 and a Gravity Voice Control Sensor
- Why Offline Language Recognition?
- Wiring the Gravity Voice Recognition Sensor
- Upgrading the Speaker
- Installing The Gravity Library
- First Example Voice Recognition Program
- List of Starter Voice Commands
- Example Voice Controlled Servos
- Still need help?
Why Offline Language Recognition?
Language recognition in 2024 has come a long way from products you could buy back in the 90’s. The first dictation software I bought ran on a Windows 95 PC and would get at minimum 20% of all words wrong. I remember spending hours uselessly trying to calibrate it. The software would always write “I can speak spinach” because “Spanish” is apparently a vegetable.
I trashed the software and didn’t try voice recognition again for 15 years.
Then, in 2010 you could buy these voice recognition modules that were small and low power enough for miniature robots, and they could do about 10 one-word commands. They’d work 70% of the time in a quiet room, if you spoke very clearly, but much less reliably in noisy rooms with people talking. Hey, good enough! Interestingly, I would find myself angrily raising my voice whenever my robot didn’t listen to me – something that happened often. It was just a machine, right?
Programming Electronics Academy members, check out the Internet of Things (IoT) Course to start programming your own IoT devices.
Not a member yet? Sign up here.
Fast forward to 2024, with AI voice recognition being rather impressive (albeit still not perfect). Now you have many options for robot voice control. You could put a cellphone on your robot, link that to your ESP32, and it could run ChatGPT to perform rather complex tasks. However, that would require your robot to have an available wifi/cell connection, and software-wise it’s definitely NOT for beginners!
So for this tutorial, we’re going to use a small low power voice recognition module, one that’s offline and very beginner friendly. The ones available today are definitely way better than what I used back in 2010, with a vocabulary of many dozens of words – and can even do sounds like dog barks, cat meows, whistling, clicks, etc.
Think of all the things you can make with that capability!
Getting Started on Hardware
For this project, I chose to use the…
Gravity: Offline Language Learning Voice Recognition Sensor (Amazon)
Gravity: Offline Language Learning Voice Recognition Sensor (website)
It has a built-in microphone, and a speaker to verbally confirm commands back at you. I find it accurate about 90% of the time in a quiet room, and 70% of the time in a noisy room. The speaker is hard to hear in a noisy room, but it has the ability to upgrade to a louder external speaker (keep reading). I found it extremely user friendly, and got it working on my robot in no time.
Note: If you plan to have it operate in a room with moderate noise, definitely add an external speaker. I could barely hear it at all.
I encourage you to look at their tutorial for the Arduino, but it won’t be necessary for our following ESP32 projects.
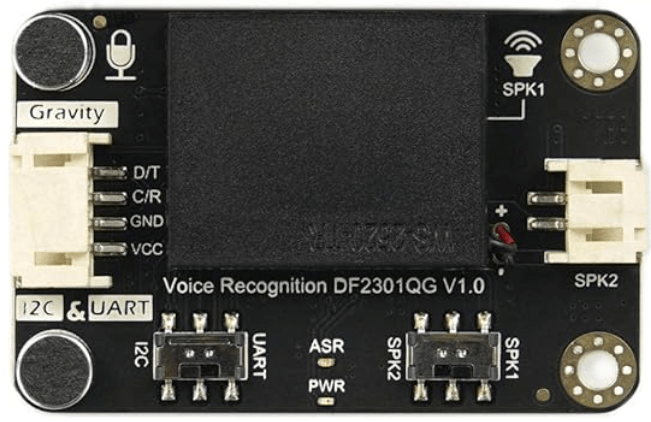
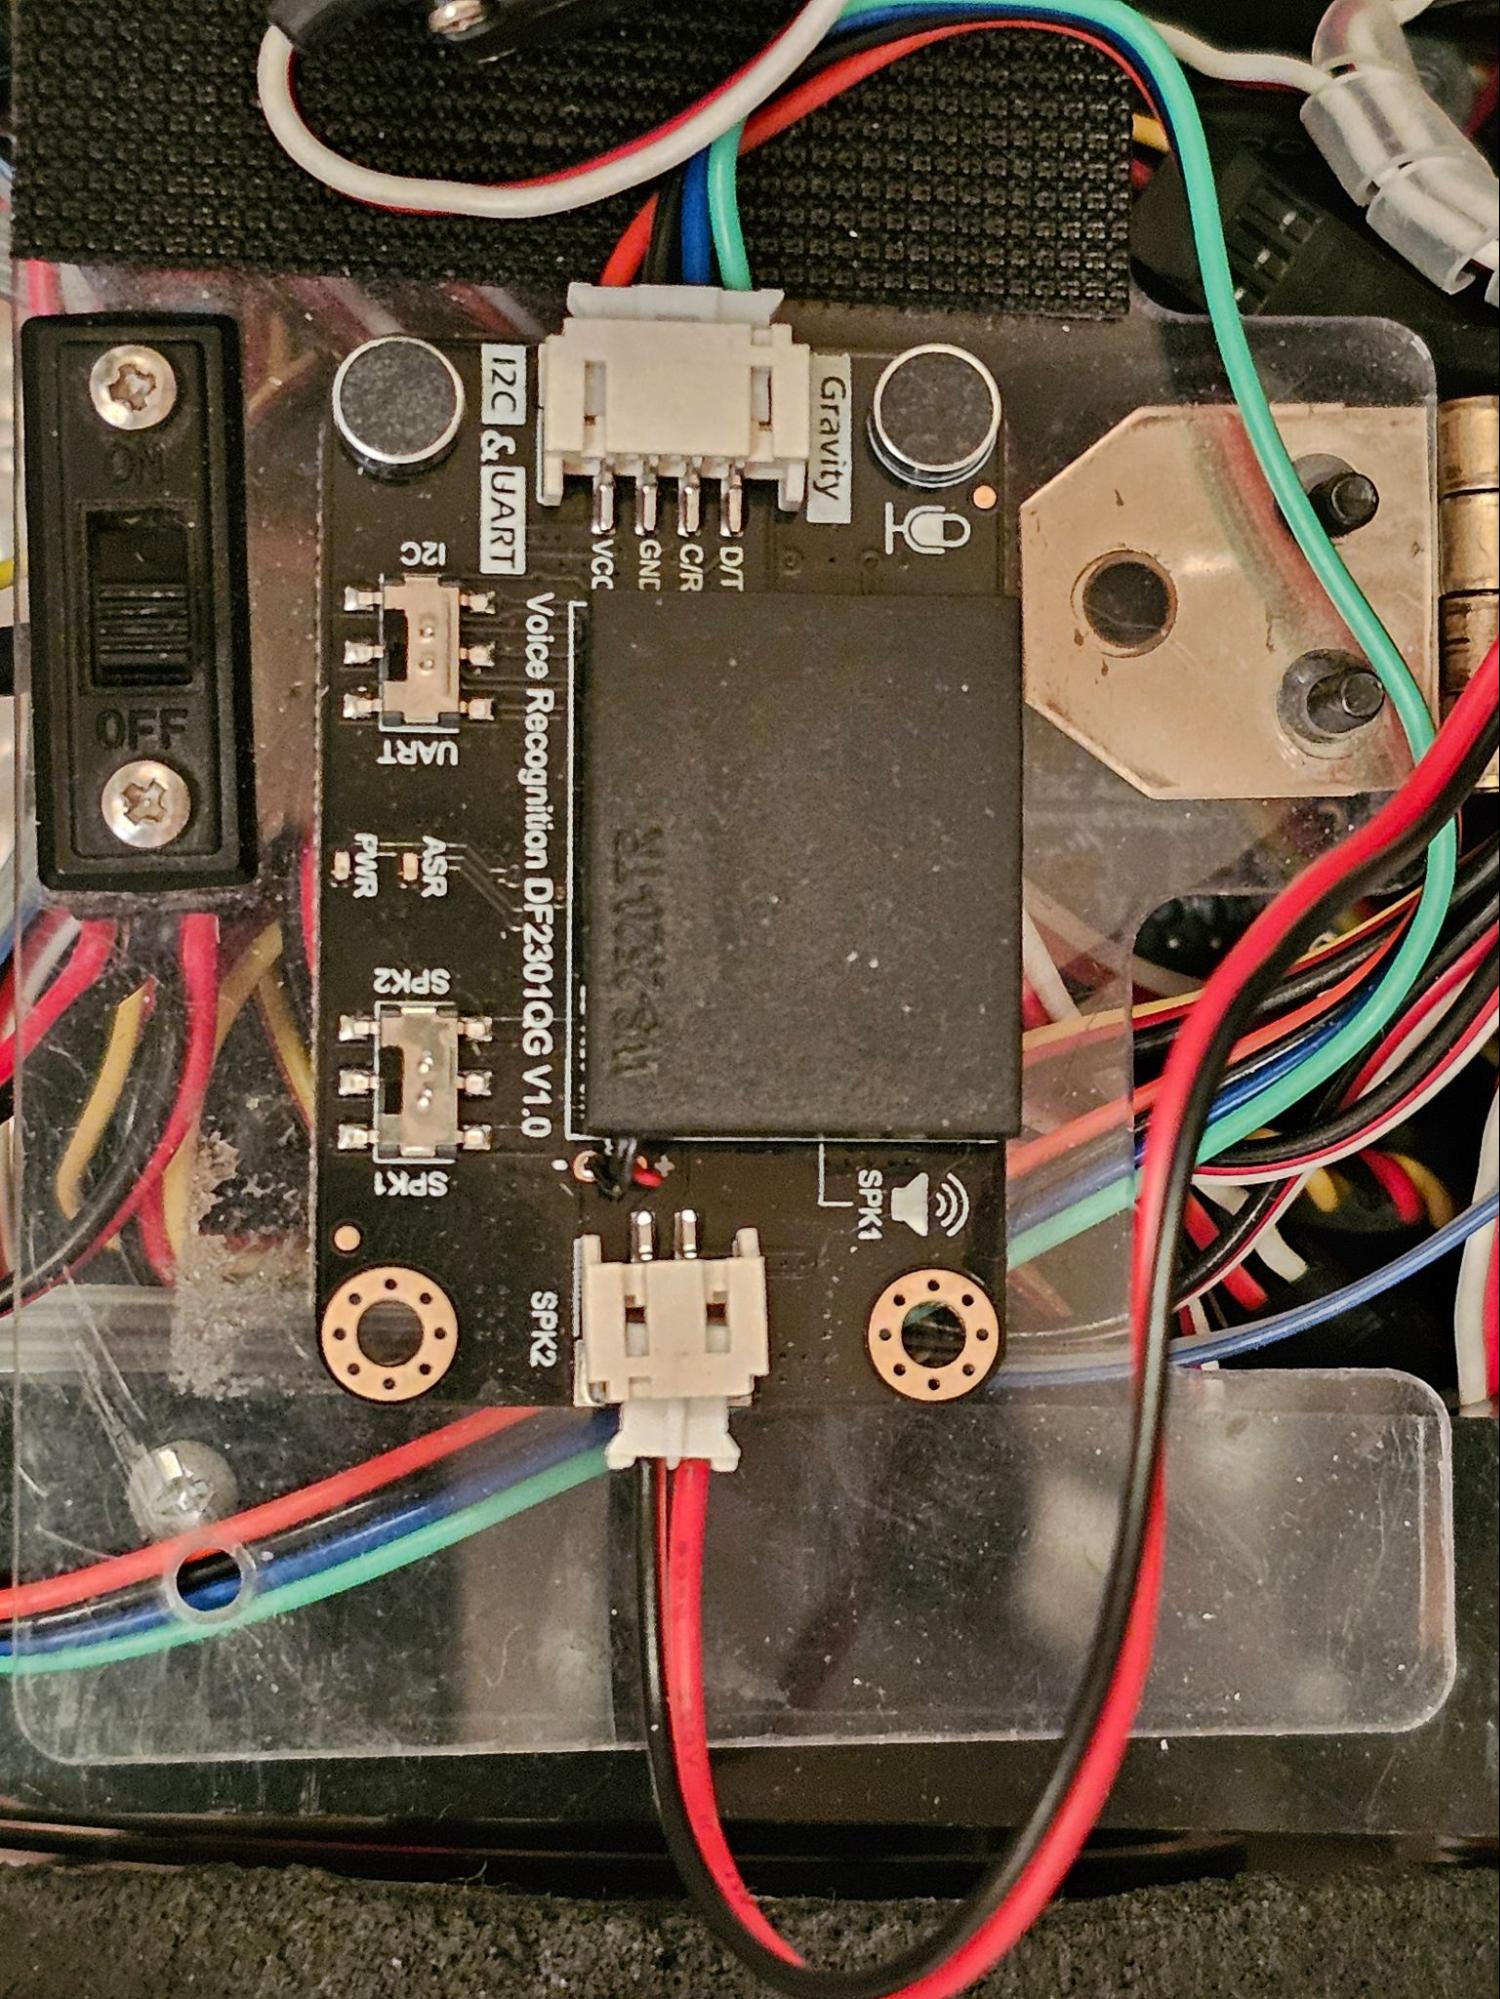
Wiring the Gravity Voice Recognition Sensor
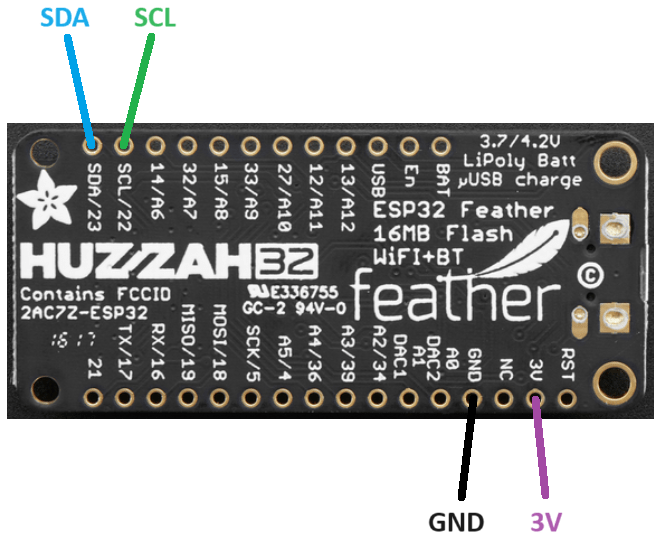
Wiring is straightforward. You got 4 wires going to your ESP32 – 3.3V and ground, plus two wires for I2C. Flip the switch to SPK1. Finished!
Note: I2C is pronounced ‘eye squared C.’ It’s actually I²C, but few people can find that little ² on their keyboard. I’m still wondering how I typed it, myself.
Note: The datasheet doesn’t have schematics or even list power requirements for the sensor, so I experimentally determined the power requirement using a power supply. It MUST be given 3.3V as it doesn’t have a built-in voltage regulator. It uses up to 325mA of current. As your ESP32 already uses 175mA (or more with WiFi), this means you cannot share the regulated 3.3V directly from your ESP32 for the Gravity sensor. The built in regulator on your ESP32 board likely cannot handle the 500mA total required. My solution was to use this step-down voltage regulator to power the Gravity sensor via the same 4.8V 2000mAh NiMH battery that powers my ESP32.
Wiring chart + diagram as follows:

| GND | Goes to (-) negative of your battery |
| SCL , C/R | Goes to SCL pin of ESP32. |
| SDA , D/T | Goes to SDA pin of ESP32. |
| VCC | Goes to 3.3V voltage regulator output from ESP32 board. |
Below is how to wire the ESP32. Be sure to give it appropriate power as per the manual for the ESP32 you choose to use.
Upgrading the Speaker
As I mentioned earlier, the speaker was difficult to hear in a noisy room. There are two ways to upgrade your speaker: a big speaker + amplifier (outside the scope of this tutorial), or a small/cheap passive speaker. I went with the latter route. Volume subjectively improved about +30%, while sound quality is far better. Definitely worth getting an external speaker.
I got this set of speakers from Amazon. An unrelated DFRobot tutorial suggests 4Ω 3W speakers. I tried both 8Ω (below left image speaker) and 4Ω (below right image speaker), and both subjectively performed the same. Use a bit of double-sided sticky tape or velcro tape to attach them to your project.
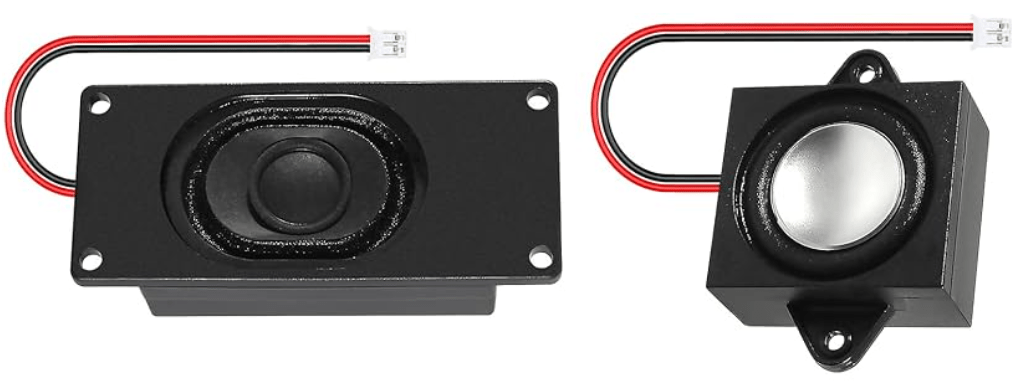
I then directly plugged it into the SPK2 port on the device. Flip the switch to SPK2.
Installing The Gravity Library
Now that you got your hardware wired up, let’s get onto the software side of things.
Load up your Arduino IDE, and go to:
Tools => Manage Libraries
and type in DFRobot_DF2301Q into search.
Download and install the library as below:

Note: check out the DFRobot Gravity Voice Recognition Library on Github for more info.
First Example Voice Recognition Program
Let’s try out the first built in example program that comes with the library. This will confirm your wiring and let you try it out, and then later we’ll do a more advanced example.
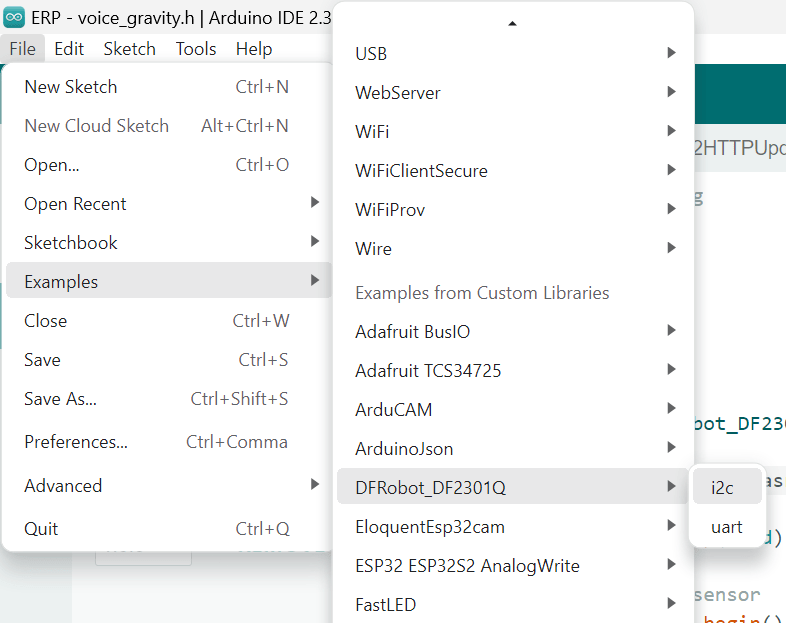
Go to:
File => Examples => DFRobot_DF2301Q => i2c
Their example program doesn’t really do anything so we’re going to make it better by controlling an LED.
At the very top of setup(), you’ll need to declare the I2C and LED pins. Add in these two lines:
Wire.begin(26, 27);

  pinMode(2,OUTPUT);
Change the pin numbers to match your setup. Next, look for this piece of code:
uint8_t CMDID = 0;

  CMDID = DF2301Q.getCMDID();

  if(0 != CMDID) {

    Serial.print("CMDID = ");

    Serial.println(CMDID);

  }

  delay(3000);
…and replace it with this:
uint8_t CMDID = DF2301Q.getCMDID();

  switch (CMDID) {

    case 103: //If the command is “Turn on the light”

      Serial.println("received'Turn on the light',command flag'103'");

          //change 13 to be your LED pin

digitalWrite(2, LOW);

      break;

    case 104: //If the command is “Turn off the light”

      Serial.println("received'Turn off the light',command flag'104'");

          //change 13 to be your LED pin

digitalWrite(2, HIGH);

      break;

    default:

      if (CMDID != 0) {

        Serial.print("nCMDID = ");  //Printing command ID

        Serial.print(CMDID);

      }

    }
In the above code, set the LED pin to the correct pin on your ESP32 setup.
Then, compile and run it on your ESP32.
Now, say the phrase, “Hello robot. Turn on the light…. Turn off the light”. These are pre-programmed into the Gravity device.
Below is a screenshot of what you should see in Serial in your Arduino IDE when running the demo.

Debugging Help
If you get this below message:
[E][Wire.cpp:499] requestFrom(): i2cWriteReadNonStop returned Error 263
Power cycle your ESP32 and the Gravity device, and it should go away. Also, check your wiring and the battery voltage. The error indicates a communication issue with the Gravity device.
Depending on your system design, you may temporarily get this error during startup while the power is still settling. It should go away on its own within a few seconds.
List of Starter Voice Commands
After running the same program from above, let’s configure your Gravity Voice Recognition device to recognize your unique voice commands.
Below is my quick reference list of the most important commands you’ll need to get started. Power up your unit and try out a few commands. After giving a verbal command, listen to what she says before continuing. It should all be self-explanatory.
See the DFROBOT tutorial for a full list of command words. 140+ commands available!
| command | description |
| Hello Robot | Default system wake word to get started. |
| Learning wake word | Change the wake word. |
| Learning command word | Teaches it a new command. |
| Re-learn | Replaces a command with another. |
| …Exit learning | Say this to exit learning. |
| I want to delete | Enters the delete function. |
| …Delete wake word | Erase the learned awakening words from the system. |
| …Delete command word | Removes a previously acquired command phrase. |
| ….Delete all | Deletes all commands and phrases from memory. |
| …Exit deleting | Exits the delete function |
Check out the demo video below for adding commands.
Example Voice Controlled Servos
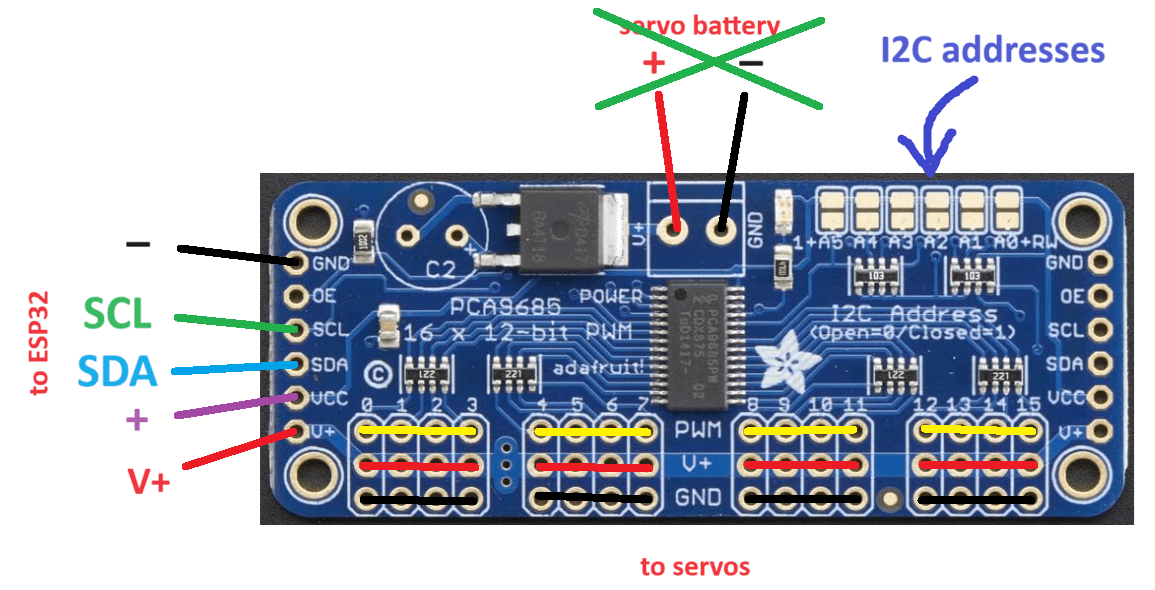
Now that you have all the individual parts working, let’s make it do something useful. This project will control just two servos using the external servo controller from our previous tutorial (link here).
If you have never used servos before, definitely check out that tutorial before continuing. If you wish to do something other than move servos, modify the servos.h file as you like (keep reading).
I am using pins #5 and #9 for the two servos (see servos.h below). Below is the wiring of the servo controller (from the servo tutorial) for reference.
Add in new voice commands
Go back to the previous step above (starter voice commands), delete all your previous commands, and add in these 6 new commands in this exact order:
Left Claw Open
Left Claw Close
Right Claw Open
Right Claw Closed
Claw Attack
System Off
The CMDID (command ID) will end up being 5 through 10. This is necessary to match your command to the ESP32 software. You can also change the CMDIDs in voice_gravity.h. Continue on to the next section for more info.
Software for your ESP32
Let’s program your ESP32.
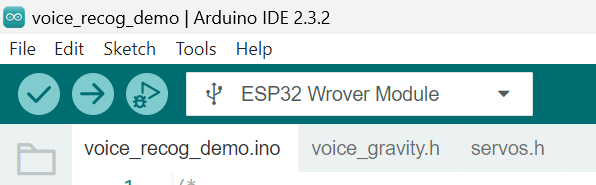
Create a new project in your Arduino IDE called voice_recog_demo.ino. Then create two header files, voice_gravity.h and servos.h.
Next, copy/paste the following code into each file.
voice_recog_demo.ino
/*
 * Code written by John Palmisano
 * July 2024
 * various online libraries additionally credited in header files
*/

#include <string>

//states to put the robot in to

uint8_t STATE=0;

#define left_claw_open    1

#define left_claw_close   2

#define right_claw_open   3

#define right_claw_close  4

#define claw_attack       5

#define system_OFF        6

#include "servos.h"//servo (action) code

#include "voice_gravity.h"//voice recognition code

void setup() {

  //small delay for proper power up

  delay(150);

  Serial.begin(115200);

  Serial.print("nStarting up...");

  Wire.begin(26, 27);

  servos_setup();

  delay(10);

  voice_setup();

  delay(10);

  servo_goto_init_pos();

  delay(500);

  Serial.print("nStartup Complete");

}

void loop() {

  voice_loop();//get voice command

  //make sure this can run at least every 20ms or so, or servos will get sluggish

  servo_loop();//do something

}
voice_gravity.h
/*

https://wiki.dfrobot.com/SKU_SEN0539-EN_Gravity_Voice_Recognition_Module_I2C_UART

*/

#include "DFRobot_DF2301Q.h"

DFRobot_DF2301Q_I2C asr;

void voice_setup(void)

  {

  // Init the sensor

  while (!(asr.begin())) {

    Serial.println("Communication with device failed, please check connection");

    delay(1000);

  }

  Serial.print("nvoice recognition initiated");

  /**

   * @brief Set voice volume

   * @param voc - Volume value(1~7)

   */

  asr.setVolume(7);

  /**

     @brief Set mute mode

     @param mode - Mute mode; set value 1: mute, 0: unmute

  */

  asr.setMuteMode(0);

  /**

     @brief Set wake-up duration

     @param wakeTime - Wake-up duration (0-255)

  */

  asr.setWakeTime(20);

  /**

     @brief Get wake-up duration

     @return The currently-set wake-up period

  */

  uint8_t wakeTime = 0;

  wakeTime = asr.getWakeTime();

  Serial.print("nwakeTime = ");

  Serial.println(wakeTime);

  // asr.playByCMDID(1);   // Wake-up command

  /**

     @brief Play the corresponding reply audio according to the ID

     @param CMDID - command word ID

  */

  //asr.playByCMDID(23);  // Command word ID

  }

void voice_loop(void)

  {

  uint8_t CMDID = asr.getCMDID();

  switch (CMDID) {

    //note:

    //case 0 to 4 is hard coded, can't be changed

    //change case # to match your CMDID

    case 5:

      STATE=right_claw_open;

      Serial.print(CMDID);

      Serial.print(" right claw openn");

      break;

    case 6:

      STATE=right_claw_close;

      Serial.print(CMDID);

      Serial.print(" right claw closedn");

      break;

    case 7:

      STATE=left_claw_open;

      Serial.print(CMDID);

      Serial.print(" left claw openn");

      break;

    case 8:

      STATE=left_claw_close;

      Serial.print(CMDID);

      Serial.print(" left claw closedn");

      break;

    case 9:

      STATE=claw_attack;

      Serial.print(CMDID);

      Serial.print(" claw attackn");

      break;

    case 10:

      STATE=system_OFF;

      Serial.print(CMDID);

      Serial.print(" all servos offn");

      break;

    default:

      if (CMDID != 0) {

        Serial.print("nCMDID = ");  //Printing command ID

        Serial.print(CMDID);

        Serial.print("n");

      }

    }

  }
servos.h
// get commands from:

// https://github.com/janelia-arduino/PCA9685/blob/master/src/PCA9685/PCA9685.cpp

// https://github.com/peterpolidoro/PCA9685/blob/master/src/PCA9685.h

#include <PCA9685.h>

PCA9685 pca9685;

const uint16_t servo_time =40;//time between servo angle changes

uint64_t  servo_last_time =0;//last time servo was changed

//servo channel

#define right_hand          9

#define left_hand           5

//current servo angle

uint8_t right_hand_pos    = 90;

uint8_t left_hand_pos     = 90;

//initialize routine

void servos_setup(void)

{

  pca9685.setupSingleDevice(Wire,0x40);

  pca9685.setToServoFrequency();

  servo_last_time=millis();

}

//scale a number from 0 - 180 to 800 - 2000

uint16_t angle_2_ms(uint8_t angle)

  {

  return 2000*angle/180+800;

  }

//turn everything off

void all_servos_off(void)

  {

  pca9685.setChannelServoPulseDuration(right_hand,0);

  pca9685.setChannelServoPulseDuration(left_hand,0);

  }

//command all servos at once

void servo_pulse_all(void)

  {

  pca9685.setChannelServoPulseDuration(right_hand,angle_2_ms(right_hand_pos));

  pca9685.setChannelServoPulseDuration(left_hand,angle_2_ms(left_hand_pos));

  }

//print servo positions to screen

void servo_print_all(void)

  {

  Serial.printf("ns: %u",right_hand_pos);

  Serial.printf("ns: %u",left_hand_pos);

  }

//command servos to go to some initial position

void servo_goto_init_pos(void)

  {

  pca9685.setChannelServoPulseDuration(right_hand,90);

  pca9685.setChannelServoPulseDuration(left_hand,90);

  }
Note that this code doesn’t command a servo directly to a specific
position. It will smoothly transition the servo over time – much better!
See our servo tutorial for more information.
void servo_loop()

  {

  if(STATE==system_OFF)

    all_servos_off();

  else if(millis()-servo_last_time > servo_time) //change angle slowly using a timer

    {

    if(STATE==right_claw_open)

      {

      if(right_hand_pos<130)

        right_hand_pos++;

      }

    if(STATE==right_claw_close)

      {

      if(right_hand_pos>50)

        right_hand_pos--;

      }

    if(STATE==left_claw_open)

      {

      if(left_hand_pos>50)

        left_hand_pos--;

      }

    if(STATE==left_claw_close)

      {

      if(left_hand_pos<130)

        left_hand_pos++;

      }

    if(STATE==claw_attack)

      {

      right_hand_pos++;

      left_hand_pos++;

      if(right_hand_pos>130)

        right_hand_pos=40;

      if(left_hand_pos>130)

        left_hand_pos=40;

      delay(1);

      }

    servo_pulse_all();

    }

  }
Compile and upload it to your ESP32. Power cycle your setup. Then say, “Hello Robot… right claw open…” etc. Try each of the commands. You should see the following output as below:
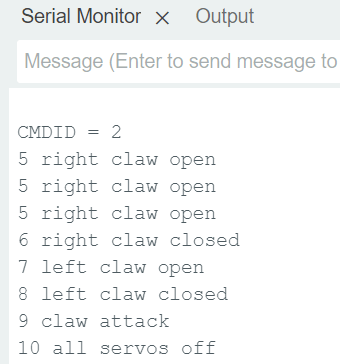
Note: As I mentioned at the beginning of this tutorial, the Gravity voice recognition system isn’t perfect. When I tested this code, for multiple times in a row, stating “right claw closed” was misunderstood as “right claw open”. If this becomes a problem for you, choose commands that sound nothing like each other. I also found pronouncing “closed” as “ka…low…sed” worked much better. Perhaps it struggles with consonant clusters?
Voice Controlled Servos Demo
Two wiggling servos didn’t sound like an exciting demo, so I put the above code (without modification) onto an old robot of mine.
Each claw consists of a single servo and its servo horn screwed into some plastic (see below image).

The below video should be self-explanatory.
Still need help?
If you want to voice control something other than servos and need a tutorial to get you started, write in to us and maybe we’ll expand this tutorial with your suggestion. =)


That is the coolest! Mahalo for sharing!
Thanks Christiane!
Hello,
i need help please.
I want to hook up the Gravity offline voice learning module to play saved subghz files from an esp-32 2432s208 (cheap yellow display) that is running Bruce firmware.
Thank you for the help with coding 😅