How to update ESP32 firmware using web OTA [Guide + Code]
In this article, we will be discussing a common method for updating ESP32 firmware referred to as over-the-air (OTA) web updates. OTA web updating is the process of updating an ESP32’s firmware wirelessly.
- ESP32 OTA Firmware Web Update Process
- ESP32 OTA Web Update Sketch
- ESP32 OTA Web Update Code Walkthrough
- The Arduino setup() Function
- The Arduino loop() Function
- Testing The Arduino OTA Web Update Sketch
- Testing The Arduino OTA Web Update Process
- Creating a binary firmware file (.bin file)
- The Final OTA web update test!
- Where To Go From Here
One of the great things about working with the ESP32 in the Arduino IDE environment is the ability to rapidly create prototypes and then apply frequent updates to a device. As modern technology constantly evolves, our devices’ need to evolve too.
In order to add new features to our device or fix bugs in the firmware, we need to be able to update our devices firmware from time to time.
Firmware is the software that is programmed into a microcontroller like the ESP32 to execute a set of instructions.
If your ESP32 device has access to a wireless internet connection, then OTA web updates may be the right solution for you! If your ESP32 does not have internet access for running OTA web updates and your ESP32 device has access to a micro SD card reader, then micro SD card based updates can be an effective and reliable method for updating an ESP32 device’s firmware.
By the end of this article, you should be able to successfully update your ESP32 device’s firmware using OTA technology. Once you have this understanding, then you can determine which method for updating an ESP32 device’s firmware will work best for you and your specific projects in the future.
ESP32 OTA Firmware Web Update Process
In this ESP32 OTA web update, we will be updating the firmware that is currently running on an ESP32 with new firmware that has been saved on your computer.
The update process is straightforward and looks like this….

First, we will create a binary file of our firmware using the Arduino IDE. The creation of this binary file will be described further down in the article.
Then, we will connect to our ESP32 device through a WiFi connection and upload this new binary file to the ESP32.
While the OTA web update is occurring, we will be reporting the update progress on a webpage from where we start the OTA web update.
Finally, once the firmware update process is complete, we will restart our device.

ESP32 OTA Web Update Sketch
The following sketch is an example of an ESP32 OTA firmware web update. The example sketch below was tested using Arduino IDE Version: 1.8.19 along with ESP IDF version: 5.0.
//  OTA Web Updater Example Sketch
//
//  Programming Electronics Academy
//

#include <Update.h>       // include Update library
#include <WiFi.h>         // include WiFi library
#include <WebServer.h>    // include WebServer library
#include <ESPmDNS.h>      // include DNS library

const char* host = "esp32";

// Put your WiFi credentials here....
const char* ssid     = "your-ssid";
const char* password = "your-password";

// Create a WebServer instance on port 80
WebServer server(80);

// Login page
const char* loginIndex =
 "<form name='loginForm'>"
    "<table width='20%' bgcolor='A09F9F' align='center'>"
        "<tr>"
            "<td colspan=2>"
                "<center><font size=4><b>ESP32 Login Page</b></font></center>"
                "<br>"
            "</td>"
            "<br>"
            "<br>"
        "</tr>"
        "<tr>"
             "<td>Username:</td>"
             "<td><input type='text' size=25 name='userid'><br></td>"
        "</tr>"
        "<br>"
        "<br>"
        "<tr>"
            "<td>Password:</td>"
            "<td><input type='Password' size=25 name='pwd'><br></td>"
            "<br>"
            "<br>"
        "</tr>"
        "<tr>"
            "<td><input type='submit' onclick='check(this.form)' value='Login'></td>"
        "</tr>"
    "</table>"
"</form>"
"<script>"
    "function check(form)"
    "{"
    "if(form.userid.value=='lucky' && form.pwd.value=='dog') /*Update userid and password here, if desired*/ "
    "{"
    "window.open('/serverIndex')"
    "}"
    "else"
    "{"
    " alert('Error Password or Username')/*displays error message*/"
    "}"
    "}"

"</script>";
// Server Index Page
const char* serverIndex =
"<script src='https://ajax.googleapis.com/ajax/libs/jquery/3.2.1/jquery.min.js'></script>"
"<form method='POST' action='#' enctype='multipart/form-data' id='upload_form'>"
   "<input type='file' name='update'>"
        "<input type='submit' value='Update'>"
    "</form>"
 "<div id='prg'>progress: 0%</div>"

 "<script>"
  "$('form').submit(function(e){"
  "e.preventDefault();"
  "var form = $('#upload_form')[0];"
  "var data = new FormData(form);"
  " $.ajax({"
  "url: '/update',"
  "type: 'POST',"
  "data: data,"
  "contentType: false,"
  "processData:false,"
  "xhr: function() {"
  "var xhr = new window.XMLHttpRequest();"
  "xhr.upload.addEventListener('progress', function(evt) {"
  "if (evt.lengthComputable) {"
  "var per = evt.loaded / evt.total;"
  "$('#prg').html('progress: ' + Math.round(per*100) + '%');"
  "}"
  "}, false);"
  "return xhr;"
  "},"

  "success:function(d, s) {"
  "console.log('success!')"

 "},"

 "error: function (a, b, c) {"

 "}"
 "});"
 "});"

 "</script>";

// setup function
void setup(void)
{

  Serial.begin(115200);

  // Connect to WiFi network
  WiFi.begin(ssid, password);

  Serial.println("");

  // Wait for WiFi connection
  while (WiFi.status() != WL_CONNECTED)
  {
    delay(500);
    Serial.print(".");
  }

  Serial.println("");
  Serial.print("Connected to ");
  Serial.println(ssid);
  Serial.print("IP address: ");
  Serial.println(WiFi.localIP());

  /*use mdns for host name resolution*/
  if (!MDNS.begin(host))
  { // http://esp32.local

    Serial.println("Error setting up MDNS responder!");
    while (1)
    {
      delay(1000);
    }
  }

  Serial.println("mDNS responder started");
  /* handle root (“/”) URL with login page stored in loginIndex */
  server.on("/", HTTP_GET, []() {

    server.sendHeader("Connection", "close");
    server.send(200, "text/html", loginIndex);

  });

  /*return index page which is stored in serverIndex */
  server.on("/serverIndex", HTTP_GET, []() {
    server.sendHeader("Connection", "close");
    server.send(200, "text/html", serverIndex);
  });

  /*handling uploading firmware file */
  server.on("/update", HTTP_POST, []() {
    server.sendHeader("Connection", "close");
    server.send(200, "text/plain", (Update.hasError()) ? "FAIL" : "OK");
    ESP.restart();

  }, []() {

    HTTPUpload& upload = server.upload();
    if (upload.status == UPLOAD_FILE_START) {
      Serial.printf("Update: %sn", upload.filename.c_str());
      if (!Update.begin(UPDATE_SIZE_UNKNOWN)) { //start with max available size
        Update.printError(Serial);
      }
    } else if (upload.status == UPLOAD_FILE_WRITE) {
      /* flashing firmware to ESP*/
      if (Update.write(upload.buf, upload.currentSize) != upload.currentSize) {
        Update.printError(Serial);
      }

    } else if (upload.status == UPLOAD_FILE_END) {

      if (Update.end(true)) { //true to set the size to the current progress
        Serial.printf("Update Success: %unRebooting...n", upload.totalSize);

      } else {
        Update.printError(Serial);
      }

    }

  });

  // start the web server
  server.begin();

}

void loop(void)

{

  server.handleClient();
  delay(1);

}
ESP32 OTA Web Update Code Walkthrough
Let’s take a walk through the example sketch. At the top of the program, we’ll take advantage of some of the Arduino libraries shared by other developers! We include the WiFi library to handle WiFi connectivity. The Update library for performing the actual firmware update. The WebServer library for delivering our update web pages. And, the ESPmDNS library for resolving DNS / host names.
#include <Update.h>       // include Update library
#include <WiFi.h>         // include WiFi library
#include <WebServer.h>    // include WebServer library
#include <ESPmDNS.h>      // include DNS library
Remember that anytime you see references to WiFi, update, WebServer,etc., throughout the code, then you will know when and where these libraries are being used in the code.
The WiFi credentials are defined next.
const char* ssid     = "your-ssid";
const char* password = "your-password";
Important: Remember that before you upload your sketch to an ESP32, you will need to change the above variables at the beginning of your sketch to match your WiFi authentication information.
Next, initialize an instance of the WebServer class on port 80. The WebServer will handle incoming HTTP requests and serve up the web pages for the OTA web update. This line allows the ESP32 to act as a web server.
// Create a WebServer instance on port 80
WebServer server(80);
Then, let’s define two character arrays or strings in the sketch to be used by our web server. Adding different languages (JavaScript code and HTML) to our sketch in addition to the C++, can be a bit confusing. But, just remember that the 2 strings we define below will not run directly on the ESP32. They are strings that will be passed to the web server that was previously created. And, the web server will render the web pages we want by running this code (HTML and JavaScript) when we navigate to our OTA web update pages from a web browser!
The first string (loginIndex) will contain the HTML for a login web page. It includes a form for entering a username (“lucky”) and password (“dog”). Additionally, it also includes JavaScript code for checking the login credentials and then redirecting to the serverIndex page upon successful login.
The second string (serverIndex) will contain the HTML for the update web page. It provides an HTML form to upload files and includes JavaScript code for handling the file upload and displaying the upload progress.
const char* loginIndex = ….
const char* serverIndex = ….
As an option, you may want to clean up the example sketch a little bit by including the two strings above (that are necessary for the web server) in one or two separate header (.h) files. If you choose this option, you may want to review how to use tabs in the Arduino IDE.
The Arduino setup() Function
Once we have included our libraries and set up our WiFi credentials and web server HTML pages, we can move on to the Arduino setup() function. As you may already know, in the Arduino environment the first thing that runs on startup of the ESP32 is the setup() function. And, the first thing we need to do in the setup() function, is to initialize the serial communication with the serial monitor using a baud rate of 115200.
Serial.begin(115200);
After the serial data has been turned on, then connect to the WiFi network by using the WiFi.begin() function and passing in your SSID and Password as variables to the WiFi.begin() function.
  // Connect to WiFi network

  WiFi.begin(ssid, password);
  Serial.println("");

  // Wait for WiFi connection
  while (WiFi.status() != WL_CONNECTED)

  {

    delay(500);
    Serial.print(".");

  }

  Serial.println("");
  Serial.print("Connected to ");
  Serial.println(ssid);
  Serial.print("IP address: ");
  Serial.println(WiFi.localIP());
After making a connection to the Wi-Fi network, the MDNS.begin() function is used to set up the Multicast DNS service with the designated hostname. The global variable “host” holds the hostname of the ESP32 device. “host” is initialized to “esp32” in this example sketch.
This MDNS.begin() function allows you to use a hostname in your web browser instead of an IP address when you access the ESP32 from your computer. For example, if the device’s IP address is “192.168.0.105”, you can access it using “http://esp32.local/” in a web browser.
  /*use mdns for host name resolution*/
  if (!MDNS.begin(host))

  { // http://esp32.local
    Serial.println("Error setting up MDNS responder!");
    while (1)

    {

      delay(1000);

    }

  }

  Serial.println("mDNS responder started");
Next, the HTTP handler functions are set up for handling the allowed HTTP requests to the ESP32 web server using the server.on() function.
  /* handle root (“/”) URL with login page stored in loginIndex */

  server.on("/", HTTP_GET, []() {
    server.sendHeader("Connection", "close");
    server.send(200, "text/html", loginIndex);

  });

   /*return index page which is stored in serverIndex */
  server.on("/serverIndex", HTTP_GET, []() {
    server.sendHeader("Connection", "close");
    server.send(200, "text/html", serverIndex);

  });

  /*handling uploading firmware file */
  server.on("/update", HTTP_POST, []() {

    server.sendHeader("Connection", "close");
    server.send(200, "text/plain", (Update.hasError()) ? "FAIL" : "OK");
    ESP.restart();

  }, []() {

    HTTPUpload& upload = server.upload();
    if (upload.status == UPLOAD_FILE_START) {
      Serial.printf("Update: %sn", upload.filename.c_str());
      if (!Update.begin(UPDATE_SIZE_UNKNOWN)) { //start with max available size
        Update.printError(Serial);

      }

    } else if (upload.status == UPLOAD_FILE_WRITE) {

      /* flashing firmware to ESP*/
      if (Update.write(upload.buf, upload.currentSize) != upload.currentSize) {
        Update.printError(Serial);

      }

    } else if (upload.status == UPLOAD_FILE_END) {
      if (Update.end(true)) { //true to set the size to the current progress
        Serial.printf("Update Success: %unRebooting...n", upload.totalSize);

      } else {

        Update.printError(Serial);

      }

    }

  });
As shown above, there are 3 possible ways to access the ESP32’s web server in this example sketch:
- The root path “/” serves the loginIndex page.
- The “/serverIndex” path serves the serverIndex page.
- The “/update” path handles firmware updates via POST requests.
Finally, with the server.begin() function, the web server is initialized. This initialization prepares the web server to listen for incoming client requests and handle them effectively.
  // start the web server

  server.begin();
The Arduino loop() Function
In the Arduino main loop, the server.handleClient() function is called to handle live incoming client requests. After a delay() of 1 second, the program repeats itself listening for web server requests.
  server.handleClient();
  delay(1);
Testing The Arduino OTA Web Update Sketch
Once you have connected an ESP32 to your computer, upload the above sketch to your device. After the sketch has been uploaded to your ESP32, press the reset (RST) button on your ESP32 device and you should see something similar displayed on the serial monitor.
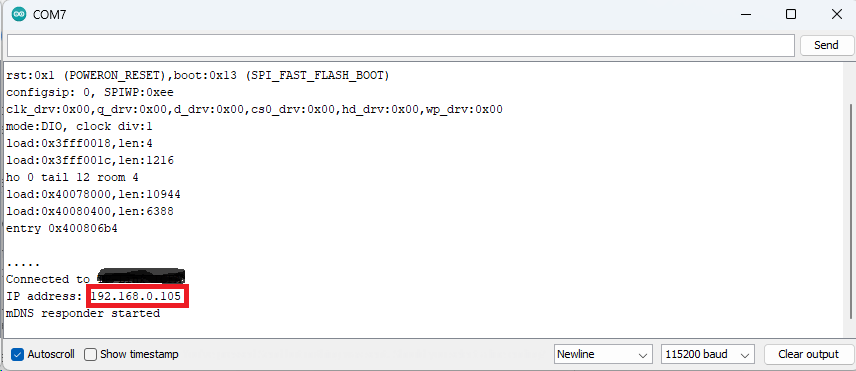
If everything worked fine, the serial monitor will display the dynamic IP address the ESP32 received from your router. In this example, the IP address is outlined in red in the graphic above and this is the IP address of your ESP32 on your network.
Now, you can access your ESP32 device over-the-air (wirelessly) using a web browser on your computer connected to your local network.
To access your ESP32, launch a web browser on your computer and navigate to the IP address for your device that was shown in your serial monitor.
For example, if the ESP32’s IP address is “192.168.0.105”, you can either access it by navigating to “http://192.168.0.105/” or by navigating to “http://esp32/” (if that doesn’t work, try “http://esp32.local/”) in a web browser. The web server running on the ESP32 should display the login page requesting the login information.
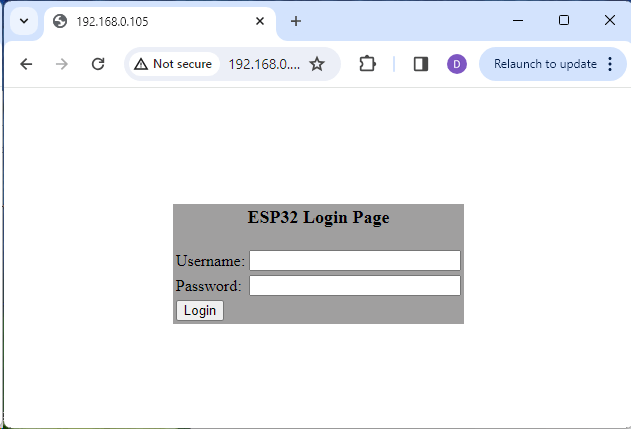
Enter the following for Username and Password:
Username: lucky
Password: dog
If you want to change the Username and Password, edit the following line of code in your sketch:
"if(form.userid.value=='lucky' && form.pwd.value=='dog') /*Update userid and password here, if desired*/ ”
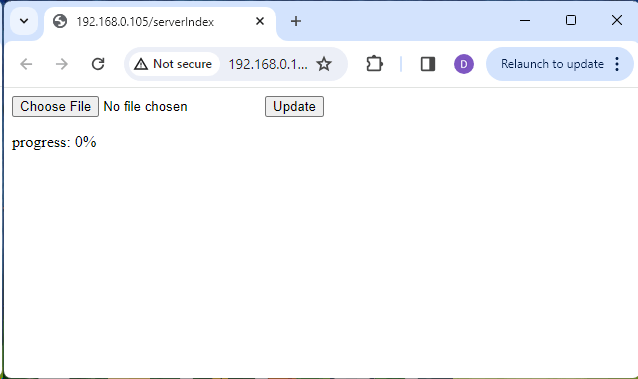
After logging in, you’ll be redirected to the “serverIndex” page. This page allows you to upload new sketches to your ESP32 over-the-air.
Testing The Arduino OTA Web Update Process
As an example, let’s now modify our OTA Web Updater example sketch above with a simple led blinking routine.
After defining the host, ssid, and password, add the following lines:
// Put your WiFi credentials here....

const char* ssid     = "your-ssid";
const char* password = "your-password";

//variables for blinking an LED with Millis
const int led = 2;                  // ESP32 Pin to which onboard LED is connected
unsigned long previousMillis = 0;   // will store last time LED was updated
const long interval = 1000;         // interval at which to blink (milliseconds)
int ledState = LOW;                 // ledState used to set the LED
After setting up the serial monitor in the setup() function, add the following line:
  Serial.begin(115200);
  pinMode(led,  OUTPUT);
Finally, after the delay(1) statement in the main loop(), add the following:
 delay(1);

  // blink LED

  unsigned long currentMillis = millis();
  if (currentMillis - previousMillis >= interval)

  {

    // save the last time you blinked the LED
    previousMillis = currentMillis;

    // if the LED is off turn it on and vice-versa:
    ledState = not(ledState);

    // set the LED with the ledState of the variable:
    digitalWrite(led,  ledState);

  }
Reminder: You must include the OTA web update code in your software every time to be able to update new firmware again using this process!
Here is the entire updated example sketch with the LED blinking code for testing already applied!
//  OTA Web Updater Example Sketch
//
//  Programming Electronics Academy
//

#include <Update.h>       // include Update library
#include <WiFi.h>         // include WiFi library
#include <WebServer.h>    // include WebServer library
#include <ESPmDNS.h>      // include DNS library

const char* host = "esp32";

// Put your WiFi credentials here....
const char* ssid     = "your-ssid";
const char* password = "your-password";

//variables for blinking an LED with Millis
const int led = 2;                  // ESP32 Pin to which onboard LED is connected
unsigned long previousMillis = 0;   // will store last time LED was updated
const long interval = 1000;         // interval at which to blink (milliseconds)
int ledState = LOW;                 // ledState used to set the LED

// Create a WebServer instance on port 80
WebServer server(80);

// Login page
const char* loginIndex =
 "<form name='loginForm'>"
    "<table width='20%' bgcolor='A09F9F' align='center'>"
        "<tr>"
            "<td colspan=2>"
                "<center><font size=4><b>ESP32 Login Page</b></font></center>"
                "<br>"
            "</td>"
            "<br>"
            "<br>"
        "</tr>"
        "<tr>"

             "<td>Username:</td>"
             "<td><input type='text' size=25 name='userid'><br></td>"

        "</tr>"
        "<br>"
        "<br>"
        "<tr>"
            "<td>Password:</td>"
            "<td><input type='Password' size=25 name='pwd'><br></td>"
            "<br>"
            "<br>"
        "</tr>"
        "<tr>"
            "<td><input type='submit' onclick='check(this.form)' value='Login'></td>"
        "</tr>"
    "</table>"
"</form>"

"<script>"
    "function check(form)"
    "{"
    "if(form.userid.value=='lucky' && form.pwd.value=='dog') /*Update userid and password here, if desired*/ "
    "{"
    "window.open('/serverIndex')"
    "}"
    "else"
    "{"
    " alert('Error Password or Username') /*displays error message*/"
    "}"
    "}"

"</script>";
// Server Index Page
const char* serverIndex =
"<script src='https://ajax.googleapis.com/ajax/libs/jquery/3.2.1/jquery.min.js'></script>"
"<form method='POST' action='#' enctype='multipart/form-data' id='upload_form'>"

   "<input type='file' name='update'>"
        "<input type='submit' value='Update'>"
    "</form>"

 "<div id='prg'>progress: 0%</div>"
 "<script>"

  "$('form').submit(function(e){"
  "e.preventDefault();"
  "var form = $('#upload_form')[0];"
  "var data = new FormData(form);"
  " $.ajax({"
  "url: '/update',"
  "type: 'POST',"
  "data: data,"
  "contentType: false,"
  "processData:false,"
  "xhr: function() {"
  "var xhr = new window.XMLHttpRequest();"
  "xhr.upload.addEventListener('progress', function(evt) {"
  "if (evt.lengthComputable) {"
  "var per = evt.loaded / evt.total;"
  "$('#prg').html('progress: ' + Math.round(per*100) + '%');"
  "}"
  "}, false);"

  "return xhr;"

  "},"

  "success:function(d, s) {"
  "console.log('success!')"

 "},"

 "error: function (a, b, c) {"

 "}"

 "});"

 "});"

 "</script>";

// setup function
void setup(void)
{

  Serial.begin(115200);
  pinMode(led,  OUTPUT);

  // Connect to WiFi network
  WiFi.begin(ssid, password);

  Serial.println("");

  // Wait for WiFi connection
  while (WiFi.status() != WL_CONNECTED)
  {
    delay(500);
    Serial.print(".");
  }

  Serial.println("");
  Serial.print("Connected to ");
  Serial.println(ssid);
  Serial.print("IP address: ");
  Serial.println(WiFi.localIP());

  /*use mdns for host name resolution*/
  if (!MDNS.begin(host))
  { // http://esp32.local
    Serial.println("Error setting up MDNS responder!");
    while (1)
    {
      delay(1000);
    }

  }

  Serial.println("mDNS responder started");
  /*return index page which is stored in serverIndex */
  server.on("/", HTTP_GET, []() {

    server.sendHeader("Connection", "close");
    server.send(200, "text/html", loginIndex);

  });

  server.on("/serverIndex", HTTP_GET, []() {
    server.sendHeader("Connection", "close");
    server.send(200, "text/html", serverIndex);

  });

  /*handling uploading firmware file */
  server.on("/update", HTTP_POST, []() {
    server.sendHeader("Connection", "close");
    server.send(200, "text/plain", (Update.hasError()) ? "FAIL" : "OK");
    ESP.restart();

  }, []() {

    HTTPUpload& upload = server.upload();
    if (upload.status == UPLOAD_FILE_START) {
      Serial.printf("Update: %sn", upload.filename.c_str());
      if (!Update.begin(UPDATE_SIZE_UNKNOWN)) { //start with max available size
        Update.printError(Serial);
      }

    } else if (upload.status == UPLOAD_FILE_WRITE) {

      /* flashing firmware to ESP*/
      if (Update.write(upload.buf, upload.currentSize) != upload.currentSize) {
        Update.printError(Serial);
      }

    } else if (upload.status == UPLOAD_FILE_END) {

      if (Update.end(true)) { //true to set the size to the current progress
        Serial.printf("Update Success: %unRebooting...n", upload.totalSize);

      } else {
        Update.printError(Serial);

      }

    }

  });

  // start the web server
  server.begin();

}
void loop(void)
{

  server.handleClient();
  delay(1);

  // blink LED
  unsigned long currentMillis = millis();

  if (currentMillis - previousMillis >= interval)

  {

    // save the last time you blinked the LED
    previousMillis = currentMillis;

    // if the LED is off turn it on and vice-versa:
    ledState = not(ledState);

    // set the LED with the ledState of the variable:
    digitalWrite(led,  ledState);

  }

}
Creating a binary firmware file (.bin file)
After the above change has been made to your example sketch and you have saved the changes, you can then create a firmware binary file (.bin) for the updated sketch.
A binary file is a computer file (non text file) that can be read and executed by your ESP32’s operating system from the device’s memory.
To make a binary file of the sketch in your Arduino IDE, from the main menu, select Sketch -> Export compiled Binary.
This will create the firmware binary for your update.
You can find where your new firmware binary is located by doing the following: in your Arduino IDE, from the main menu, select Sketch -> Show Sketch Folder. If you are running the Arduino IDE in a Microsoft Windows environment, your binary file (.bin) will be named the same as your sketch but with “.esp32.bin” added to the end of the file name. This .bin file is the binary file you will want to upload to your ESP32 for testing the OTA web update process.
The Final OTA web update test!
We made it to the final test! Let’s test out this update process in practice.
With your ESP32 on and running the original OTA web update sketch, open your web browser on your computer and navigate to your ESP32’s IP address (for example, “http://192.168.0.105/”) or by navigating to “http://esp32/”. Depending on how your DNS (domain name service) is set up on your computer, you can also navigate to “http://esp32.local/”
The web server running on the ESP32 should display the login page requesting the login information.
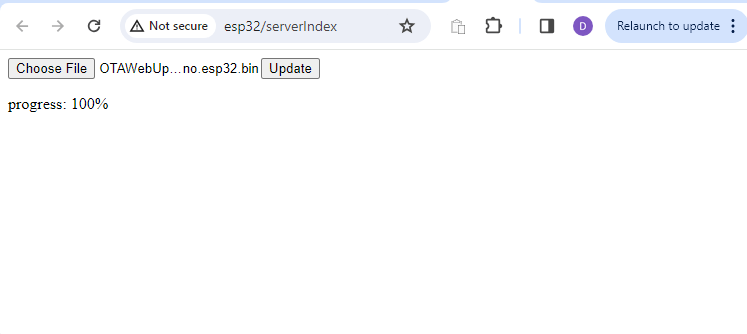
Once you have logged in to your ESP32’s web server, you can begin the upload of your new firmware binary (the .bin file that was just created) by selecting the binary file created above using the “Choose File” button and then by clicking on the “Update” button.
After the firmware update is complete, the progress percentage will be 100% and the update firmware will restart your device.
The LED on your ESP32 will start blinking! Congratulations you have successfully updated your ESP32 by OTA Web Update!

And that is all there is to it. It is that easy to update your firmware on your ESP32 device using the OTA web update process!
One final note: A good way to test the success of the OTA web update process is to disconnect your ESP32 from your computer’s USB power and power your ESP32 using a battery to fully test the over-the-air concept.
Where To Go From Here
Over-the-air based firmware updates for ESP32 devices can be an effective and reliable solution for modifying a device’s firmware.
For practice, try to create your own ESP32 firmware upload sketch that displays “Hello World” on the serial monitor after your update is successfully completed and your device has been restarted. Or maybe you will want to try your skills by modifying the HTML code in the sketch to make the background a different color (check the hint code below to do that):
<table width='20%' bgcolor='A09F9F' align='center'>


