How to setup an OpenAI Developer Account
Folks – the future is here – now is the time to get an OpenAI Developer account.
This is an exciting time as AI tools are hitting the market. It’s like when I got my first email address and did my first internet search – the rocket is just taking off.
If you’re like me, you don’t want sit back and just use these tools, you want to build with them – I’m guessing it’s just the kind of person you are. So let’s go.

In this lesson you will:
- Set up an OpenAI Developer Account
- Get your Private Key
- Test an API call with Postman
You are going to hit the ground running! You’ll set up an OpenAI Developer account, get your private key for using the API, and then test the API using a tool called Postman. Let’s go!
Let’s get some Jargon out of the way
Before we dive in, I want to cover some jargon terms to make sure we’re both on the same page. Skim this list to make sure you have at least a vague understanding of the following.
API – Application Programming Interface. An API is the software that a web platform can use to share its services. For example, google maps has a map api. You can pay Google to get access to its maps API, and then your website can pull data from that service. An example of a public API, would be the InSight Mars Weather API provided by Nasa.
API Endpoint – An API endpoint is the URL (web address) you will send to and receive from when using the API.
HTTP – Hypertext Transfer Protocol. HTTP is the method that is used to get information from one place to another on the web. If you’ve ever used a web browser, then you’ve used this protocol. An HTTP Request is how we’ll ask for information from an API. An HTTP Request is composed of Headers and an optional Body. Sounds complicated, but this is just text organized and separated in a specific way.
Private Key – A private key (or secret key) is like a password that you can use to access an API. The service that provides the API will generate this private key and assign it to you.
Model – A model refers to a software algorithm that has been designed for some specific use case. OpenAI has developed several AI algorithms that I will refer to as models. ChatGPT for example, is a Large Language Model, or LLM. When we request information from the OpenAI API, we will specify which model we want to use.
JSON – JavaScript Object Notation. JSON is a way of organizing data so that it can be easily packaged and parsed. It is composed of key-value pairs, for example { “name” : “Jamal” }, where name is the key and Jamal is the value. JSON is one of the most common ways of sending and receiving data online. Side Note: JSON really has nothing to do with JavaScript, so don’t think it’s a programming language or anything like that.
French Fries – French fries are slices of potato fried in some type of oil. Oh man, they’re good!
Setup an OpenAI Developer Account
The first step is to go over to OpenAI.com, and go to their developer site.
It’s likely the website layout will have changed a bit by the time you read this, but what we’re looking for is the place to sign up as a developer.

You’ll go through the typical account setup for a web service – nothing too special here.
Once you have officially logged in as a developer, now you’ll want to generate a secret API key to use. As the name implies, you’ll want to keep this key private, and make sure not to accidentally post it on the web.
If you click on your username, you should see some account options, and there you should see something like API Keys, this is where you want to go.
Once there, just click the “Create New Secret Key” button to generate your key. You’ll want to save this somewhere.
OpenAI Developer Account API Usage Cost
When you first sign up as an OpenAI developer, you’ll get a “grant” of free credits to use – how much is hard to say as it changes a lot. Also, the credits may expire after a certain period, so make sure to keep an eye on that as well. After you have used up your free credits you’ll be prompted to add a credit card to keep an active account and then you’ll be charged for how much you use the API on a monthly basis.
To get details of the cost you can look at the billing section in the account view.
How much that costs depends on several factors including, which API version you use and how much you use it, and how many words the model is creating (called tokens), and how many words you are sending it.
Just to give you an idea, as I was developing this project I was using the GPT 3.5 – turbo model everyday for about 3 weeks straight and my cost for the month was 0.07 cents. Your mileage may vary, but keeping track of your use is simple under the usage section in the account view.
If you’ve followed along so far, then you’ve just yourself up with an OpenAI Developer account (nice job), but the fun is just starting.
…Lets’s take this API for a spin!
Testing the API with Postman
Now that we have an API key we can go ahead and test the API.
To do this, we will be using a tool called Postman.

You’ll sign up for Postman just like any other web service (we’ll only be using the free services). They do have a desktop app you can download, but for this demo we’ll be using the web version.
When you log on, there is a lot going on! Super intimidating, and makes me want to close my browser and hide in the closet, but let’s tread on.
What we are going to do is make an HTTP POST Request. Basically, we’re going to send some information to the OpenAI API, and see what we get back.
To make a POST request you need to know:
- Where to make the request (API Endpoint URL)
- What to put in our Request headers
- What to put in our our Request body
To get all this information, we can go again to the OpenAI API documentation.
The API endpoint for the chat model is:
Now we need to know what to put in the HTTP Request header and body.
The Request Headers are how we will let the API know who we are and also let it know how our Request body will be formatted. The header keys are standardized, for example Content-Type and Authorization.
All we want is the minimum Request header information for now.
It looks like the following are the minimum:
| HTTP HEADERS | |
|---|---|
| Key | Value |
| Content-Type: | application/json |
| Authorization: | Bearer $OPENAI_API_KEY |
Finally, we need to figure out what data to send to the model to get a response.
The body will be formatted in JSON, and the minimum we can send is which model, and a messages array.
{
  "model": "gpt-3.5-turbo",
  "messages": [{"role": "user", "content": "Hello!"}]
}
As will be discussed later, every time you send a POST request to the API, you need to include ALL the messages you have had with the agent thus far for the model to respond with the context of those previous messages. So let’s see if we can pull this all together…
Testing Your OpenAI Developer Account Private Key
So now, armed with this information, we’ll move it over to the appropriate places in Postman.
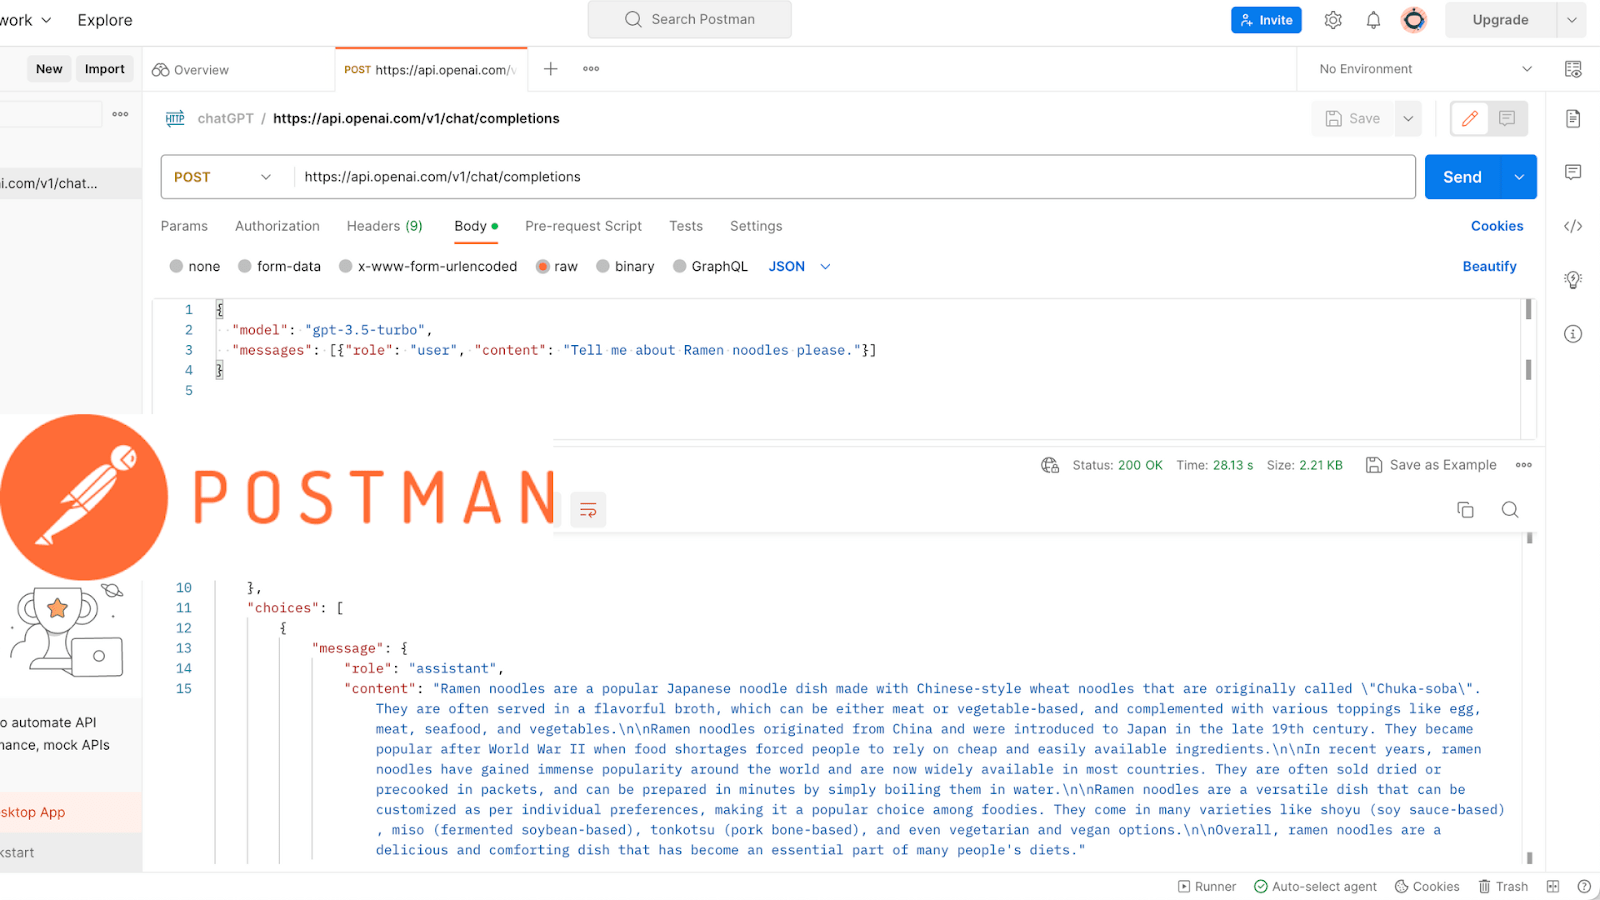
We’ll select POST request and paste in the API endpoint URL.
Well select Headers and enter the key value pairs, making sure to put in our API secret key.
And then we’ll select Body, and click raw, and then paste in the minimum JSON package to send. If you’d like, you can change the content to something more interesting – just make sure to keep all the JSON formatting the same.
Finally we press Send.
At the bottom of the Postman interface you should see the response generated from the model. Congratulations – you’re an official AI Developer!
Review
In this lesson you got yourself set up with an OpenAI Developer account, you generated your secret API key, you used Postman to make an API call to the most advanced AI model in the world. Job well done!
Just for clarity’s sake, let’s hit all those steps one by one 😉
- Sign up as a developer at the OpenAI developer website
- Generate a secret key
- Sign up for a free account with Postman
- Get the following key information from OpenAI documentation
- API Endpoint URL
- Request headers
- Request body format
- Perform a test POST request using the information collected from the previous step
- Contemplate the future of humanity
I hope you’re excited for everything that is to come! We’ll be automating this API call using Arduino code, displaying results to an OLED, and all on a super cheap wireless microcontroller development board – it’s gonna be fun 🙂
Challenges
- Try some more API calls to chatGPT using Postman.
- (Stretch Goal) Sign up to use a public NASA API, and see if you can make a call using Postman
Documentation to review:
Here is some key documentation to read through. In my humble opinion, it is very well written.


