How to use SPIFFS for an ESP32 File System [Beginner Guide + Code]
Everything you’ve ever wanted to know (and don’t want to know) about ESP32 SPIFFS.
This is an extremely long and in-depth article covering SPIFFS when using an ESP32 (if you’re learning SPIFFs, you’ll want to bookmark this page). Here is a quick guide to help you jump around:
- What is SPIFFS?
- What happened to EEPROM?
- SPIFFS vs FAT
- Setting up SPIFFS with the Arduino IDE
- Example Code, Reading, Writing, etc.
- Formatting SPIFFS
- Checking Free Space, File Attributes
- Example Code: Data Logging
- Debugging SPIFFS
- Optimizing SPIFFS
- SPIFFS FAQ
- SPIFFS Functions
What is SPIFFS, and what does it do?
SPIFFS (Serial Peripheral Interface Flash File System) is memory management for your ESP32. More specifically, it’s memory storage that doesn’t erase after powering off your ESP32. You can use it for data logging, saving access codes, storing files, and remembering user-entered settings. SPIFFS is optimized for use in scenarios where frequent read and write operations are needed.
What can I do with SPIFFS?
In IoT and embedded projects, you often need to store configuration settings, firmware updates, web server files, and sensor data logs, among other things. SPIFFS is ideal for this purpose as it allows you to organize and access data efficiently.
Projects That Use SPIFFS:
- IoT Devices: Devices like smart thermostats, weather stations, and home automation controllers often use SPIFFS to store configuration data and sensor readings.
- Web Servers: SPIFFS allows you to serve web pages, images, and other resources directly from the microcontroller, creating web applications without needing external storage. Projects with graphical user interfaces (GUIs) or control panels accessible via a web browser can store their web assets in SPIFFS.
- Firmware Updates: SPIFFS can store firmware updates for remote deployment. This allows for over-the-air (OTA) updates, enabling you to remotely update device firmware without physical access.
- Data Logging and Storage: SPIFFS can be used for data logging purposes. If your project involves collecting and storing sensor data, event logs, or other time-series data, SPIFFS provides an efficient way to save this information.
- Environmental Monitoring: Weather stations and environmental monitoring systems can log data such as temperature, humidity, and air quality to SPIFFS.
- Industrial Automation: Systems that log machine data, production statistics, or process variables.
- Home Automation: Projects that record events and sensor data in smart homes or buildings.
- Configurable Devices: Devices where users can customize settings, such as Wi-Fi credentials or device preferences.
- User Profiles: Systems that store user profiles or preferences.
What happened to EEPROM?
If you’ve been around the microcontroller scene for a few years, you’re probably familiar with EEPROM (Electrically Erasable Programmable Read-Only Memory). As far as the ESP32 is concerned, SPIFFS is the superior more modern version of EEPROM. It’s more spiffy.
Note, the ESP32 code base for EEPROM is now deprecated and should no longer be used. From the codebase:
“EEPROM is deprecated. For new applications on ESP32, use Preferences. EEPROM is provided for backwards compatibility with existing Arduino applications. EEPROM is implemented using a single blob within NVS, so it is a container within a container. As such, it is not going to be a high performance storage method. Preferences will directly use nvs, and store each entry as a single object therein.”
Given EEPROM obsolescence, what other options are there for persistent data storage?

What is Preferences?
It’s yet another storage system! By default, only 20 kb of space is reserved for Preferences, so it’s best for only storing variables. Use SPIFFS for storing lots of data and files. SPIFFS has 1.5 MB of reserved space by default (and can be much higher). Preferences is out of scope for this tutorial, but if interested click the links to check out Preferences and some examples.
Why does the ESP32 use SPIFFS and not EEPROM?
| SPIFFS vs. EEPROM | |
|---|---|
| Storage Capacity: | SPIFFS offers more storage space than EEPROM. The ESP32 has a larger amount of flash memory, making SPIFFS a more practical choice for applications that require more extensive data storage. |
| File System Structure: | SPIFFS organizes data in a file system structure, making it easier to manage and access files, whereas EEPROM provides a linear block of memory that requires manual management. |
| Performance: | SPIFFS is optimized for random read and write operations, which are common in file system use cases, whereas EEPROM is more suited for infrequent read and write operations |
| Wear Leveling: | SPIFFS includes wear-leveling mechanisms that help evenly distribute write cycles across the flash memory, prolonging the lifetime of the storage. EEPROM does not have built-in wear leveling. |
| Ease of Use: | SPIFFS provides file management capabilities, making it easier to organize and access data. EEPROM requires manual memory management. |
Hopefully you’re convinced that SPIFFS is a better option in most cases than EEPROM, but what about FAT? Didn’t Weird Al have a killer single called FAT?
What is the difference between SPIFFS and FAT?
SPIFFS (Serial Peripheral Interface Flash File System) and FAT (File Allocation Table) are both file systems, but they are designed for different types of storage media and use cases. Here’s a comparison of SPIFFS vs. FAT:
| SPIFFS | FAT | |
|---|---|---|
| Storage Media | SPIFFS is primarily designed for use with flash memory, which is common in embedded systems like microcontrollers and IoT devices. It is optimized for use with NOR flash memory, which is commonly found in these devices. | FAT file systems (e.g., FAT16, FAT32) were originally designed for use with magnetic hard drives and later adapted for use with various storage media, including SD cards, USB drives, and hard drives. |
| File System Structure | SPIFFS organizes data in a flat file structure, similar to a traditional file system such as NTFS on Windows or ext4 on Linux, but more compact and succinct for the more limited needs of embedded systems. It uses blocks and pages to manage data, and it includes a file index to keep track of file locations. | FAT file systems use a hierarchical directory structure. They have a File Allocation Table that keeps track of cluster allocations and file locations. This hierarchical structure allows for more organized data storage with directories and subdirectories. |
| File Size Limit | SPIFFS does not have a strict file size limit, but it has practical limitations based on the available flash memory. Larger files can be stored if sufficient space is available. | FAT16 has a maximum file size of 2GB, while FAT32 can handle larger files, typically up to 4GB. However, FAT file systems may have cluster size limitations that affect file storage efficiency. |
Flash memory has a finite number of write and erase cycles before individual memory cells can no longer reliably hold data. These cycles are typically in the range of thousands to tens of thousands, depending on the type of flash memory (e.g., SLC, MLC, TLC). Wear leveling algorithms ensure that write and erase operations are distributed as evenly as possible across all available memory cells.
| SPIFFS | FAT | |
|---|---|---|
| Wear Leveling | SPIFFS includes wear-leveling mechanisms to prolong the lifespan of the flash memory. This is especially important for data that is frequently updated or overwritten, such as log files or configuration data. | FAT file systems do not have built-in wear leveling. If used on flash-based storage, frequent write operations can wear out specific memory regions more quickly. |
For the ESP32, you can expect a few thousand to tens of thousands of write cycles per memory cell. While this may seem limited compared to other storage media, such as SSDs, it’s important to note that for most applications, the lifespan of the flash memory will likely exceed the lifespan of the device itself.
| SPIFFS | FAT | |
|---|---|---|
| Access Speed | SPIFFS is optimized for efficient random read and write operations, making it suitable for applications where fast access to data is required. | FAT file systems were originally designed for mechanical hard drives, so they are not as efficient as SPIFFS for random access operations. They perform better with sequential access. |
| Use Cases | SPIFFS is well-suited for embedded systems, IoT devices, and applications where flash memory is the primary storage medium. It's commonly used for storing configuration files, web server content, firmware updates, and sensor data logs. | FAT file systems are commonly used in external storage media like SD cards and USB drives. They are well-suited for general-purpose data storage and file exchange between devices. |
Now that you know all about SPIFFS, let’s set up SPIFFS for your ESP32 project. (spoiler: you’re probably already allocating space for spiffs!)
Configuring ESP32 Board Settings
First, you need to choose a partition scheme. The partition scheme specifies how the flash memory is divided among various components, such as the program code, SPIFFS, OTA, and more.
The default partition scheme used in the Arduino IDE is divided into several sections:
- app (Application Code): Your main program code, including the setup() and loop() functions.
- spiffs (SPIFFS): This section is allocated for SPIFFS, the file system used for storing data files.
- OTA (Over-the-Air): Allows you to update firmware wirelessly.
Note: While out of scope for this tutorial, you can create custom partition schemes to allocate flash memory space according to your unique project requirements. Custom partition schemes can be defined in a CSV (Comma-Separated Values) file that specifies the size and offset of each partition. Fortunately, you’ll likely never need to do this!
Selecting a Partition Scheme:
In the Arduino IDE, go to “Tools” -> “Partition Scheme.”

Select the most appropriate partition scheme based on your project’s requirements. If you’ve defined a custom partition scheme, it should appear in this list. If you aren’t sure which to use, just guess. You’ll get a compile error if APP is too small compared to your program size.
Note: the specific settings you choose will depend on your memory requirements, the specific ESP32 chip version you’re using, and other hardware limitations. In this particular example image above I had a very large program, limited need for SPIFFS, and required OTA.
Now that your scheme is allocated, let’s get onto writing your code.
Example Code, Reading, Writing, etc.
Download the following .ino file, set your partition to Default, compile, and upload to your ESP32. It will perform a range of operations in SPIFFS that you can test. Included are examples for reading, writing, deleting, listing files/directories, and error handling.
#include "FS.h"
#include "SPIFFS.h"

/* You only need to format SPIFFS the first time you run a
   test or else use the SPIFFS plugin to create a partition
   https://github.com/me-no-dev/arduino-esp32fs-plugin */
#define FORMAT_SPIFFS_IF_FAILED true

void listDir(fs::FS &fs, const char * dirname, uint8_t levels){
    Serial.printf("Listing directory: %s\r\n", dirname);

    File root = fs.open(dirname);
    if(!root){
        Serial.println("- failed to open directory");
        return;
    }
    if(!root.isDirectory()){
        Serial.println(" - not a directory");
        return;
    }

    File file = root.openNextFile();
    while(file){
        if(file.isDirectory()){
            Serial.print("  DIR : ");
            Serial.println(file.name());
            if(levels){
                listDir(fs, file.name(), levels -1);
            }
        } else {
            Serial.print("  FILE: ");
            Serial.print(file.name());
            Serial.print("\tSIZE: ");
            Serial.println(file.size());
        }
        file = root.openNextFile();
    }
}

void readFile(fs::FS &fs, const char * path){
    Serial.printf("Reading file: %s\r\n", path);

    File file = fs.open(path);
    if(!file || file.isDirectory()){
        Serial.println("- failed to open file for reading");
        return;
    }

    Serial.println("- read from file:");
    while(file.available()){
        Serial.write(file.read());
    }
    file.close();
}

void writeFile(fs::FS &fs, const char * path, const char * message){
    Serial.printf("Writing file: %s\r\n", path);

    File file = fs.open(path, FILE_WRITE);
    if(!file){
        Serial.println("- failed to open file for writing");
        return;
    }
    if(file.print(message)){
        Serial.println("- file written");
    } else {
        Serial.println("- write failed");
    }
    file.close();
}

void appendFile(fs::FS &fs, const char * path, const char * message){
    Serial.printf("Appending to file: %s\r\n", path);

    File file = fs.open(path, FILE_APPEND);
    if(!file){
        Serial.println("- failed to open file for appending");
        return;
    }
    if(file.print(message)){
        Serial.println("- message appended");
    } else {
        Serial.println("- append failed");
    }
    file.close();
}

void renameFile(fs::FS &fs, const char * path1, const char * path2){
    Serial.printf("Renaming file %s to %s\r\n", path1, path2);
    if (fs.rename(path1, path2)) {
        Serial.println("- file renamed");
    } else {
        Serial.println("- rename failed");
    }
}

void deleteFile(fs::FS &fs, const char * path){
    Serial.printf("Deleting file: %s\r\n", path);
    if(fs.remove(path)){
        Serial.println("- file deleted");
    } else {
        Serial.println("- delete failed");
    }
}

void testFileIO(fs::FS &fs, const char * path){
    Serial.printf("Testing file I/O with %s\r\n", path);

    static uint8_t buf[512];
    size_t len = 0;
    File file = fs.open(path, FILE_WRITE);
    if(!file){
        Serial.println("- failed to open file for writing");
        return;
    }

    size_t i;
    Serial.print("- writing" );
    uint32_t start = millis();
    for(i=0; i<2048; i++){
        if ((i & 0x001F) == 0x001F){
          Serial.print(".");
        }
        file.write(buf, 512);
    }
    Serial.println("");
    uint32_t end = millis() - start;
    Serial.printf(" - %u bytes written in %u ms\r\n", 2048 * 512, end);
    file.close();

    file = fs.open(path);
    start = millis();
    end = start;
    i = 0;
    if(file && !file.isDirectory()){
        len = file.size();
        size_t flen = len;
        start = millis();
        Serial.print("- reading" );
        while(len){
            size_t toRead = len;
            if(toRead > 512){
                toRead = 512;
            }
            file.read(buf, toRead);
            if ((i++ & 0x001F) == 0x001F){
              Serial.print(".");
            }
            len -= toRead;
        }
        Serial.println("");
        end = millis() - start;
        Serial.printf("- %u bytes read in %u ms\r\n", flen, end);
        file.close();
    } else {
        Serial.println("- failed to open file for reading");
    }
}

void setup(){
    Serial.begin(115200);
    if(!SPIFFS.begin(FORMAT_SPIFFS_IF_FAILED)){
        Serial.println("SPIFFS Mount Failed");
        return;
    }

    listDir(SPIFFS, "/", 0);
    writeFile(SPIFFS, "/hello.txt", "Hello ");
    appendFile(SPIFFS, "/hello.txt", "World!\r\n");
    readFile(SPIFFS, "/hello.txt");
    renameFile(SPIFFS, "/hello.txt", "/foo.txt");
    readFile(SPIFFS, "/foo.txt");
    deleteFile(SPIFFS, "/foo.txt");
    testFileIO(SPIFFS, "/test.txt");
    deleteFile(SPIFFS, "/test.txt");
    Serial.println( "Test complete" );
}

void loop(){
}
The following image is the expected output. The error, “E (120) SPIFFS: mount failed, -10025 ” should only happen the first time you run it, as there was no previous SPIFFS on your ESP32 setup to write to.

Formatting SPIFFS
In the above example file, the ESP32 looks for SPIFFS that was previously set up. If not found (first time running the program), the ESP32 will initialize SPIFFS for you.
 if(!SPIFFS.begin(FORMAT_SPIFFS_IF_FAILED)){
        Serial.println("SPIFFS Mount Failed");
        return;
    }
If you wish to erase all information stored in SPIFFS, simply re-format it.
// Erase SPIFFS
  Serial.println("Erasing SPIFFS...");
  if (SPIFFS.format()) {
    Serial.println("SPIFFS erased successfully.");
  } else {
    Serial.println("Error erasing SPIFFS.");
  }
Checking Free Space in SPIFFS
Your program should always check for available space. For example with log files, you’ll want to verify there is enough memory to append to file, and if not, delete older logs.
 FSInfo fs_info;
  SPIFFS.info(fs_info);

  Serial.println("SPIFFS Info:");
  Serial.printf("Total Bytes: %u\n", fs_info.totalBytes);
  Serial.printf("Used Bytes: %u\n", fs_info.usedBytes);
  Serial.printf("Free Bytes: %u\n", fs_info.totalBytes - fs_info.usedBytes);
Checking File Attributes (timestamps, permissions, etc.)
The following example code allows you to inspect and display essential attributes of a specific file stored in the SPIFFS of an ESP32 microcontroller. It checks the file’s existence, retrieves its timestamp, permissions, and size, and then presents this information in the Serial Monitor.
Important!!! First, use the code in the previous section (Example Code, Reading, Writing, etc.) to create a file, test.txt, and put some data into it. Then, run the below code:
#include "SPIFFS.h"
#include <FS.h>
#include <sys/stat.h> //for accessing file info and file-related operations

void setup() {
  Serial.begin(115200);

  if (!SPIFFS.begin(true)) {
    Serial.println("Error initializing SPIFFS");
    return;
  }

  // Specify the file to check
  const char* filePath = "/test.txt";

  // Check if the file exists
  if (!SPIFFS.exists(filePath)) {
    Serial.println("File does not exist.");
    return;
  }

  // Use the stat function to retrieve file attributes
  File file = SPIFFS.open(filePath, "r");
  struct stat fileStat;

  if (fstat(file, &fileStat) == -1) {
    Serial.println("Error getting file attributes.");
    file.close();
    return;
  }

  // Extract file attributes
  time_t fileTimestamp = fileStat.st_mtime;
  int filePermissions = fileStat.st_mode;
  size_t fileSize = file.size();

  // Close the file
  file.close();

  // Display file attributes
  Serial.print("File Timestamp: ");
  Serial.println(fileTimestamp);

  Serial.print("File Permissions (in octal): ");
  Serial.println(filePermissions, 8);

  Serial.print("File Size: ");
  Serial.println(fileSize);
}

void loop() {
  // Your code here (if any)
}
The below image is the example output. It’s reading your file test.txt, demonstrating that SPIFFS often (but not always) survives even after overwriting the previous program.

Now that you’ve allocated space for SPIFFS, and can read/write/append to files, let’s move onto a practical example you can use for your project.
Example Code: Data Logging
Download this example file for logging sensor data to SPIFFS. This will save data from your sensor on pin 34 into the log over time, along with a timestamp in milliseconds. To view the log, type “S” into the Arduino IDE message box and hit enter.
#include <SPIFFS.h>
#include <FS.h>

const int analogPin = 34;
const char* logFileName = "/sensor_log.txt";

void setup() {
  Serial.begin(115200);

  if (SPIFFS.begin(true)) {
    Serial.println("SPIFFS mounted successfully.");
  } else {
    Serial.println("SPIFFS mount failed. Check your filesystem.");
  }
}

void loop() {
  // Read sensor data from analog pin 34
  int sensorData = analogRead(analogPin);

  // Open the log file in append mode
  File logFile = SPIFFS.open(logFileName, "a");

  if (logFile) {
    // Append the sensor data and a timestamp to the log file
    logFile.print(millis());
    logFile.print(": ");
    logFile.print(sensorData);
    logFile.println(); // Start a new line
    logFile.close();
  } else {
    Serial.println("Failed to open log file for writing.");
  }

  delay(1000); // Log data every 1 second

  if (Serial.available() > 0) {
    char command = Serial.read();
    if (command == 'S') {
      // If 'S' is received via serial, output the entire log file
      readLogFile();
    }
  }
}

void readLogFile() {
  File logFile = SPIFFS.open(logFileName, "r");
  if (logFile) {
    Serial.println("Log file contents:");
    while (logFile.available()) {
      Serial.write(logFile.read());
    }
    logFile.close();
  } else {
    Serial.println("Failed to open log file for reading.");
  }
}
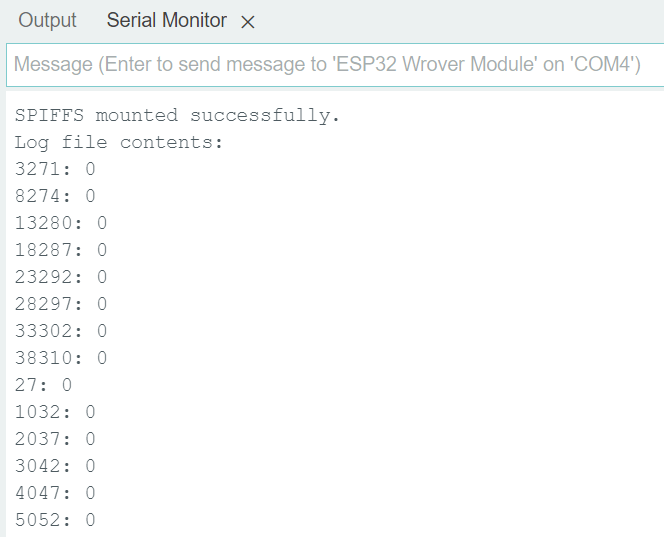
The above code should generate the following output response. My pin 34 wasn’t connected to anything, so it only returned 0. But if you connect it to a sensor, you’ll be logging sensor values!
Now that you have running code, you’ll eventually run into errors or other problems. Perhaps you already have? The following section will help you with debugging SPIFFS.
Debugging SPIFFS Usage
If you are having any unusual issues with SPIFFS when running the above examples, try these two quick fixes.
Step 1: Try SPIFFS.format()
The first step in debugging SPIFFS errors is to try the SPIFFS.format() function. This function is a useful tool for clearing the SPIFFS file system and starting fresh. Here’s how to use it in your Arduino sketch:
#include "FS.h"
#include "SPIFFS.h"
void setup() {
Serial.begin(115200);
  // Initialize SPIFFS
  if (!SPIFFS.begin(true)) {
    Serial.println("SPIFFS initialization failed");
    return;
  }
  // Try formatting SPIFFS
  if (SPIFFS.format()) {
    Serial.println("SPIFFS formatted successfully");
  } else {
    Serial.println("Failed to format SPIFFS");
  }
}
Step 2: Erase All Flash Using the Arduino IDE
If you still face SPIFFS errors after formatting, another option is to erase the entire flash memory of your ESP32 using the Arduino IDE. This process will wipe the entire flash memory, including SPIFFS, but it can be helpful if you are experiencing (or suspect) flash memory corruption.
Here’s how to erase the flash memory:
- Open your Arduino IDE.
- Connect your ESP32 board to your computer.
- Go to “Tools” -> “Erase All Flash Before Sketch Upload” and check “Enabled.”
- Upload a new sketch.
- It’ll take a minute, so wait for the process to complete. Once it’s done, your ESP32’s flash memory is clean.

Now that you’re getting the hang of using SPIFFS, let’s delve into best practices for the more advanced users. If you already feel overwhelmed, you can stop here for now.
Optimizing SPIFFS Usage with Fragmentation and Garbage Collection
In the ESP32’s SPIFFS, fragmentation and garbage collection are managed internally by the file system. You don’t need to call specific functions to directly manage these processes – SPIFFS handles these operations automatically in the background. The file system keeps track of flash memory state and performs garbage collection as needed.
Strategies for Minimizing SPIFFS Write Cycles
Beyond wear leveling already implemented by SPIFFS, here are additional strategies to minimize write cycles:
| Cache Data: | Keep frequently updated data in RAM and only write it to SPIFFS when necessary. This reduces the frequency of write operations. |
| Batched Writes: | If you need to write data, consider batching multiple small writes into a single larger write. This reduces the overhead associated with individual write operations. |
| Use Log Files: | Instead of modifying files directly, append data to log files. Periodically consolidate log files into more permanent records. This reduces random write operations. |
| Read-Modify-Write: | When updating small portions of a file, consider using a read-modify-write approach. Read the entire file into memory, modify the necessary portion, and then write the whole file back. |
| Data Compression: | Compress data before writing it to SPIFFS. This reduces the amount of data written, which, in turn, reduces write cycles. |
| Optimize Data Structures: | Use data structures that minimize writes. For example, using a circular buffer can reduce the number of write cycles compared to dynamic data structures. |
| Use Read-Only Data: | Store data that doesn't change in a read-only format. This data can be stored in a separate read-only section of the flash memory, reducing write operations. |
| Avoid Frequent File Deletions: | Frequent file deletions can lead to fragmentation and unnecessary wear on the flash memory. Try to avoid creating and deleting files frequently. |
| Batch File Operations: | When you need to perform multiple operations on a file, batch them into a single operation rather than performing individual read and write operations. |
| Use an External SD Card: | If possible, use an external SD card for data that changes frequently, leaving the internal flash memory for less volatile data. |
Programming Electronics Academy members, check out the Internet of Things (IoT) Course to start programming your own IoT devices.
Not a member yet? Sign up here.
Additional Resources
https://docs.espressif.com/projects/esp-idf/en/latest/esp32/api-reference/storage/spiffs.html
SPIFFS FAQ
Do we instantiate an FS object?
The FS object represents the SPIFFS file system and provides methods for various file operations (opening, reading, writing, deleting, etc.). Calling SPIFFS.begin() initializes the file system, and if successful, you can use methods like open(), read(), write(), and remove() to manage files in the SPIFFS file system.
What libraries need to be included to use SPIFFS?
Only SPIFFS.h is required, but there are other includes that may be needed for additional functionality. For example:
#include "SPIFFS.h" //required

#include "FS.h" //provides a common file system interface that can be used with different file systems, not just SPIFFS

#include <sys/stat.h> //for statistics on files

#include “SPI.h” //if accessing SPIFFS via the SPI interface; will configure the SPI settings for flash memory.
What is the path? Is that the file name?
The ESP32 does not support subfolders or hierarchical directory structures in the same way traditional file systems on desktop computers do. SPIFFS follows a simpler “flat file” structure, where files are stored directly in the root directory, without the concept of subfolders or nested directories.
In SPIFFS, you organize files by using unique file names, and you can include a file path as part of the filename to mimic a directory-like structure. However, SPIFFS does not natively support true subfolders or directories.
For example, you could name a file like “folder1/file1.txt” to simulate a file within a folder, but this is merely a naming convention, and there is no underlying hierarchical structure.
Here’s an example of how you can declare a file in a SPIFFS “subfolder.”
// Create a file in a "folder" (simulated subfolder)
File file = SPIFFS.open("/folder1/file1.txt", "w");
Are there restrictions on what can be the file name?
SPIFFS allows you to use alphanumeric characters (letters and numbers), hyphens, underscores, and periods in file names. These characters are considered safe and compatible with SPIFFS.
File names in SPIFFS are case-sensitive. This means that “MyFile.txt” and “myfile.txt” are treated as two different files.
While SPIFFS does not have a specific list of reserved file names like some other file systems, it’s generally a good practice to avoid using special names or characters that may have specific meanings in your application. For example, using file names like “config” or “settings” for critical system files could lead to confusion.
SPIFFS has limitations on the maximum length of file names. The exact limit can depend on the version of SPIFFS and configuration settings, but it’s typically around 32-64 characters.
What types of files can I write? Are they only .txt files?
You can use any and all file types, including your own custom types. However, it is up to you to properly encode and decode any filetypes in your software.
SPIFFS Functions
SPIFFS.begin()
The SPIFFS.begin() function is your gateway to the SPI Flash File System (SPIFFS) on the ESP32. This function initializes and mounts the SPIFFS filesystem, making it accessible for reading and writing operations.
The below code example has it inserted into the setup() function – you only need to run it once.
#include <FS.h>
#include <SPIFFS.h>

void setup()
  {
  Serial.begin(115200);

  if (SPIFFS.begin()) {
Serial.println("SPIFFS mounted successfully");
  } else {
Serial.println("SPIFFS mount failed");
  }
}
...
Note: SPIFFS.begin(true) will format the file system (if it’s not already formatted), while SPIFFS.begin() assumes that the file system is already formatted and mounts it as-is.
Formatting will erase all data/files/folders currently stored on the ESP32. However, if it was already previously formatted, then running SPIFFS.begin(true) will not erase old files.
To erase all files, use SPIFFS.format();. Users report that SPIFFs can sometimes have errors during brown-outs, and that setting it to true could clear out any SPIFFs mounting errors during bootup.
SPIFFS.open()
Now that SPIFFS has been mounted, the next step to using SPIFFS is to open a file. You must use the precursor SPIFFS.open() function before reading or writing to any file.
The following code example creates a file, opens it, and then verifies it was created.
...

//declare a file (once) and then open it
File file = SPIFFS.open("/example.txt", "w");

if (!file) {
    Serial.println("Failed to open file for writing");
} else {
    Serial.println("File opened for writing");
}
...
SPIFFS.openNextFile()
The SPIFFS.openNextFile() function is for when you’re dealing with multiple files in a directory. This function is especially useful when you need to list and process multiple files efficiently. It helps you iterate through the files in a specific folder, allowing you to access and manipulate each file one by one.
A quick code example:
...
File file = root.openNextFile();

while (file) {
    Serial.println("File: " + String(file.name()));
    file = root.openNextFile();
}
...
Here’s how it works:
The SPIFFS.openNextFile() function is called to open the next file in the directory. It returns a File object, which represents the file that you can read from or write to.
On each successive call to SPIFFS.openNextFile(), it will open the next file in the directory, following the order in which the files were stored. Use a while() loop in combination with SPIFFS.openNextFile() to process all files in the directory.
It starts with the first file and then moves to the next one until there are no more files to open, then the loop will exit.
The filenames themselves do not play a role in determining the order of selection. It’s not alphabetical! If you need to access files based on timestamps or other criteria, you must sort the files after opening them.
Read to the end of this tutorial for a full example demonstrating the power of SPIFFS.openNextFile().
SPIFFS.exists()
The SPIFFS.exists() function checks whether a file exists or not, and returns an error if not. The below example code creates a file, then checks whether it and a second file exist.
#include <FS.h>
#include <SPIFFS.h>

// Commenting out this line should get checkIfDirectory() to print "is not a directory"
#define makeDir

void setup() {
  Serial.begin(115200);

  if (SPIFFS.begin(true)) {
    Serial.println("SPIFFS mounted successfully");

#ifdef makeDir
    File file = SPIFFS.open("/myfolder", "w");
#endif

    // Check if a specific path exists
    checkIfDirectory("/myfolder");
    checkIfDirectory("/myfolder2");

  } else {
    Serial.println("SPIFFS mount failed");
  }
}

void loop() {
  // Nothing to do here
}

void checkIfDirectory(const char *path) {

  if (SPIFFS.exists(path)) {
    Serial.println(String(path) + " is a directory");
  } else {
    Serial.println(String(path) + " is not a directory");
  }
}
The output you receive after running the above code should be:

SPIFFS.print() and SPIFFS.write()
Both SPIFFS.write() and SPIFFS.print() are functions used for writing data to a file, but they are used in slightly different ways.
SPIFFS.print()
This function is best used for writing human-readable data to a file, such as strings or formatted text. It handles various data types and formats, making it suitable for writing strings, numbers, and other types of data without the need for explicit conversion.
file.print("Are you using AI? Or is AI using you?");
SPIFFS.write()
This function is used for writing raw binary data to a file. It is more versatile when dealing with non-textual data like images, audio, sensor logs, or serialized binary data. It expects a pointer to the data buffer and the size of the data to be written.
uint8_t data[] = { 0x01, 0x02, 0x03, 0x04 };
file.write(data, sizeof(data));
Key Differences Between Write() and Print()
SPIFFS.print() is more high-level and convenient for writing text-based data, handling different data types without explicit conversion. If you’re dealing with strings, formatted text, or easily interpretable data, SPIFFS.print() is often more straightforward.
SPIFFS.write() is more versatile for handling raw data, giving you direct control over the content to be written. If you’re working with binary data or need to minimize file sizes, SPIFFS.write() is the preferred choice.
The following code example demonstrates how to use both write() and print().
#include <FS.h>
#include <SPIFFS.h>

void setup() {
  Serial.begin(115200);

  if (SPIFFS.begin()) {
    Serial.println("SPIFFS mounted successfully");

    // Create and write binary data to one file
    writeBinaryDataToFile("/binaryFile.bin");

    // Write a sentence to another file using SPIFFS.print()
    writeFileWithPrint("/textFile.txt", "Data for text file.");

    // Read and print the contents of both files
    readAndPrintFiles();
  } else {
    Serial.println("SPIFFS mount failed");
  }
}

void loop() {
  // Nothing to do here
}

void writeBinaryDataToFile(const char *path) {
  Serial.print("Creating file with binary data: ");
  Serial.println(String(path));

  File file = SPIFFS.open(path, "w");
  if (file) {
    uint8_t binaryData[] = {0x01, 0x02, 0x03, 0x04};
    file.write(binaryData, sizeof(binaryData));
    file.close();
    Serial.println("Binary file created and written successfully");
  } else {
    Serial.println("Failed to create binary file");
  }
}

void writeFileWithPrint(const char *path, const char *content) {
  Serial.print("Creating file with SPIFFS.print(): ");
  Serial.println(String(path));

  File file = SPIFFS.open(path, "w");
  if (file) {
    file.print(content);
    file.close();
    Serial.println("Text file created and written successfully");
  } else {
    Serial.println("Failed to create text file");
  }
}

void readAndPrintFiles() {
  Serial.println("Reading and printing files:");

  // Read and print the contents of binaryFile.bin
  readFile("/binaryFile.bin");

  // Read and print the contents of textFile.txt
  readFile("/textFile.txt");
}

void readFile(const char *path) {
  File file = SPIFFS.open(path, "r");
  if (file) {
    Serial.print("File: " + String(path) + ", Content: ");

    // Check if the file is binary or text based on the file extension
    if (String(path).endsWith(".bin")) {

      // Read and print binary data
      while (file.available()) {
        Serial.print(file.read(), HEX);
        Serial.print(" ");
      }
    } else {
      // Read and print text data
      Serial.print(file.readString());
    }

    Serial.println();
    file.close();
  } else {
    Serial.println("Failed to open file for reading: " + String(path));
  }
}
The below output should appear after successfully running the above example program.

SPIFFS.rename()
The SPIFFS.rename() function allows you to change the name of a file or directory in the SPIFFS filesystem. The following code example should be self-explanatory:
...
if (SPIFFS.rename("/oldfile.txt", "/newfile.txt")) {
Serial.println("File renamed successfully");
} else {
Serial.println("File rename failed");
}
...
SPIFFS.close()
Always close your files after performing operations on them. Properly closing an open file is vital to ensure that changes are saved and resources are released. The SPIFFS.close() function allows you to safely close an open file. This step is crucial in avoiding data loss and ensuring that the filesystem is in a consistent state. Forgetting to close a file can result in a whole range of bugs and other problems, especially when working with multiple files!
...
File file = SPIFFS.open("/example.txt", "r");

if (file) {
   file.close();
   Serial.println("File closed");
}
...
SPIFFS.size()
To work effectively with files, you often need to know their file sizes. The SPIFFS.size()function provides the size of a file, enabling you to manage and process files based on their data size. This information is especially valuable when handling large datasets and making sure you never exceed total memory.
...
File file = SPIFFS.open("/example.txt", "r");

if (file) {
   Serial.println("File size: " + String(file.size()) + " bytes");
   file.close();
}
...
SPIFFS.read()
The SPIFFS.read() function allows you to retrieve the contents of a file. The below examples demonstrate two different ways to read and print out a file’s contents, depending on the format the data was saved in.
...

File file = SPIFFS.open("/example.txt", "r");

//read out binary data
while (file.available()) {
       Serial.print(file.read(), HEX);
       Serial.print(" ");
}
file.close();

file = SPIFFS.open("/example.txt", "r");

//read text data
Serial.print(file.readString());
file.close();
...
Now that we know how to create files, read files, write to files, and list files, let’s do one big example putting it all together.
Listing files stored in SPIFFS
Sometimes you are working with many files and need to have an available list to work with. To list files stored in SPIFFS, use SPIFFS.open(dir).
Here’s an example of how to list files in a directory. The below program creates multiple files, writes to them, and then lists them adjacent to their file size.
#include <FS.h>
#include <SPIFFS.h>

void setup() {
  Serial.begin(115200);

  if (SPIFFS.begin()) {
    Serial.println("SPIFFS mounted successfully");

    // Create and write data to three different files
    createAndWriteFiles();

    // List files in the root directory
    listFiles("/");
  } else {
    Serial.println("SPIFFS mount failed");
  }
}

void loop() {
  // Nothing to do here
}

void createAndWriteFiles() {
  writeFile("/file1.txt", "File 1 in the house");
  writeFile("/file2.txt", "File 2 holds cabbages?!");
  writeFile("/file3.txt", "Content for file 3 is the biggest of them all!");
}

void writeFile(const char *path, const char *content) {
  Serial.print("Creating file: ");
  Serial.println(String(path));

  File file = SPIFFS.open(path, "w");
  if (file) {
    file.print(content);
    file.close();
    Serial.println("File created and written successfully");
  } else {
    Serial.println("Failed to create file");
  }
}

void listFiles(const char *dir) {
  Serial.print("Listing files in directory: ");
  Serial.println(String(dir));

  File root = SPIFFS.open(dir);
  if (!root) {
    Serial.println("Failed to open directory");
    return;
  }

  File file = root.openNextFile();
  while (file) {
    Serial.println("File: " + String(file.name()) + ", Size: " + file.size());
    file = root.openNextFile();
  }
}
In the above example, our listFiles() function takes a directory path as an argument and prints file name and size for each file in that directory.
You should get the below result after running the above code.

Dealing with “old” files
You may have noticed the additional file, myfile.txt, which wasn’t included in the above example. This file was previously created using different code, but has persisted in the file system memory despite the new firmware.
Sometimes this is a feature, such as when updating firmware to the latest version. You still want all the previously saved settings files to be there. But, often it can be a curse, because you’ve moved on to a future project but memory is being wasted storing old unused files.
Note: sometimes when overwriting old firmware with larger firmware, old files may get overwritten. Updating firmware always carries a risk of erasing old stored files on the ESP32, especially when changing SPIFFS allocation sizes.
If any file is unwanted, you have three options that we explained previously:
- You can reformat the memory via software to completely erase all old data, as explained.
- Or, you can wipe the memory using the Arduino IDE
- Or lastly, you can individually delete specific files using code.
Deleting files stored in SPIFFS
Deleting files in SPIFFS is very straightforward using the SPIFFS.remove() function.
The below example deletes the file, error checks to confirm the task completed appropriately, and otherwise explains any reason for task failure. It should be self-explanatory.
#include <FS.h>
#include <SPIFFS.h>

void setup() {
  Serial.begin(115200);

  if (SPIFFS.begin()) {
    Serial.println("SPIFFS mounted successfully");

    // Check if the file exists before attempting to delete
    if (SPIFFS.exists("/myfile.txt")) {
      // Delete the file
      if (SPIFFS.remove("/myfile.txt")) {
        Serial.println("File deleted successfully");
      } else {
        Serial.println("Failed to delete file");
      }
    } else {
      Serial.println("File does not exist");
    }
  } else {
    Serial.println("SPIFFS mount failed");
  }
}

void loop() {
  // Nothing to do here
}


Excellent article.
It explained and showed by example how the system actually works. I’m new to the ESP32 world and search for information as I stumble along. I kept seeing example code that had a ‘data’ directory inside the Arduino IDE environment inside a project folder where the ino file is normally stored. That ‘data’ directory was supposed to hold index.html and style.css files.
I was under the impression that the IDE was magically going to write those files to the SPIFFS during the compile process with ‘data’ as the signal to do so. When I ran my code that included a web server that relied on those two files, they weren’t there. I literally spent hours searching for how SPIFFS actually worked and found my answer here.
Thank You.
Thanks so much Bill! Glad it helped!
Fan-tas-tic article! 10/10
Very well explained. Thanks !
Thank you! So glad it helped!
My spiffs doesn’t mount as all. Nothing gets printed on the serial monitor at all whether mounting has been successful or not. Could you help?