Get started with ESP32 touch buttons [Code and Wiring Diagram Included]
ESP32 based boards have built-in “touch buttons”. Touch buttons work without any mechanical switch so they never wear out and there isn’t another component to buy! Touch buttons use “capacitance” to detect when something like a finger gets close to or touches a specific ESP32 pin or anything connected to the pin.
The Arduino touchRead() function can read this capacitance and determine when a GPIO pin is touched.
In this lesson you’ll learn exactly how to use these ESP32 touch buttons with some straightforward Arduino code.
Capacitive Touch What?
This is going to be a practical approach to using ESP32 touch buttons, but I think a little context is good for the soul…
Capacitance is the ability of an electrical component to store electricity in the form of charge.
The environment affects a component’s capacitance as well as anything interfering, crossing, or coming in contact with the electrical “field” around the component. It’s this modulation of capacitance that allows the ESP32 to use some of its pins as capacitive touch buttons.
A touch button detects minute changes in the capacitance of the GPIO pin such as when a finger draws near to or touches the pin.
Touch buttons can actually work through other objects such as a thin protective cover or waterproof enclosure! These attributes make touch buttons suitable for unique applications such as waterproof user interfaces, hidden buttons, and in-expensive PCB keypads with no moving parts (less stuff to break 😀).
Apple Uses Capacitive Touch…and You Can Too!
The most ubiquitous application of the capacitive touch button (which is used by most of the population of the world!) is for smartphone touch screens.
Smartphones use invisible wires and pads to create a matrix of capacitance touch buttons. This matrix is used to detect where a person has touched on a screen as well as how hard they pressed.
Touch-sensitive GPIOs don’t just register an “on/off” or “touched/not-touched” value, they read a range depending on how the capacitance changes over time. This is how a smartphone can determine something like “pressure” when touched.
ESP32 touch button enabled pins
The ESP32 family has a number of GPIO pins that are touch capable. Depending on your ESP32 development board, you may or may not have access to all of these capacitive touch pins, see the “generic” WROOM pinout below:
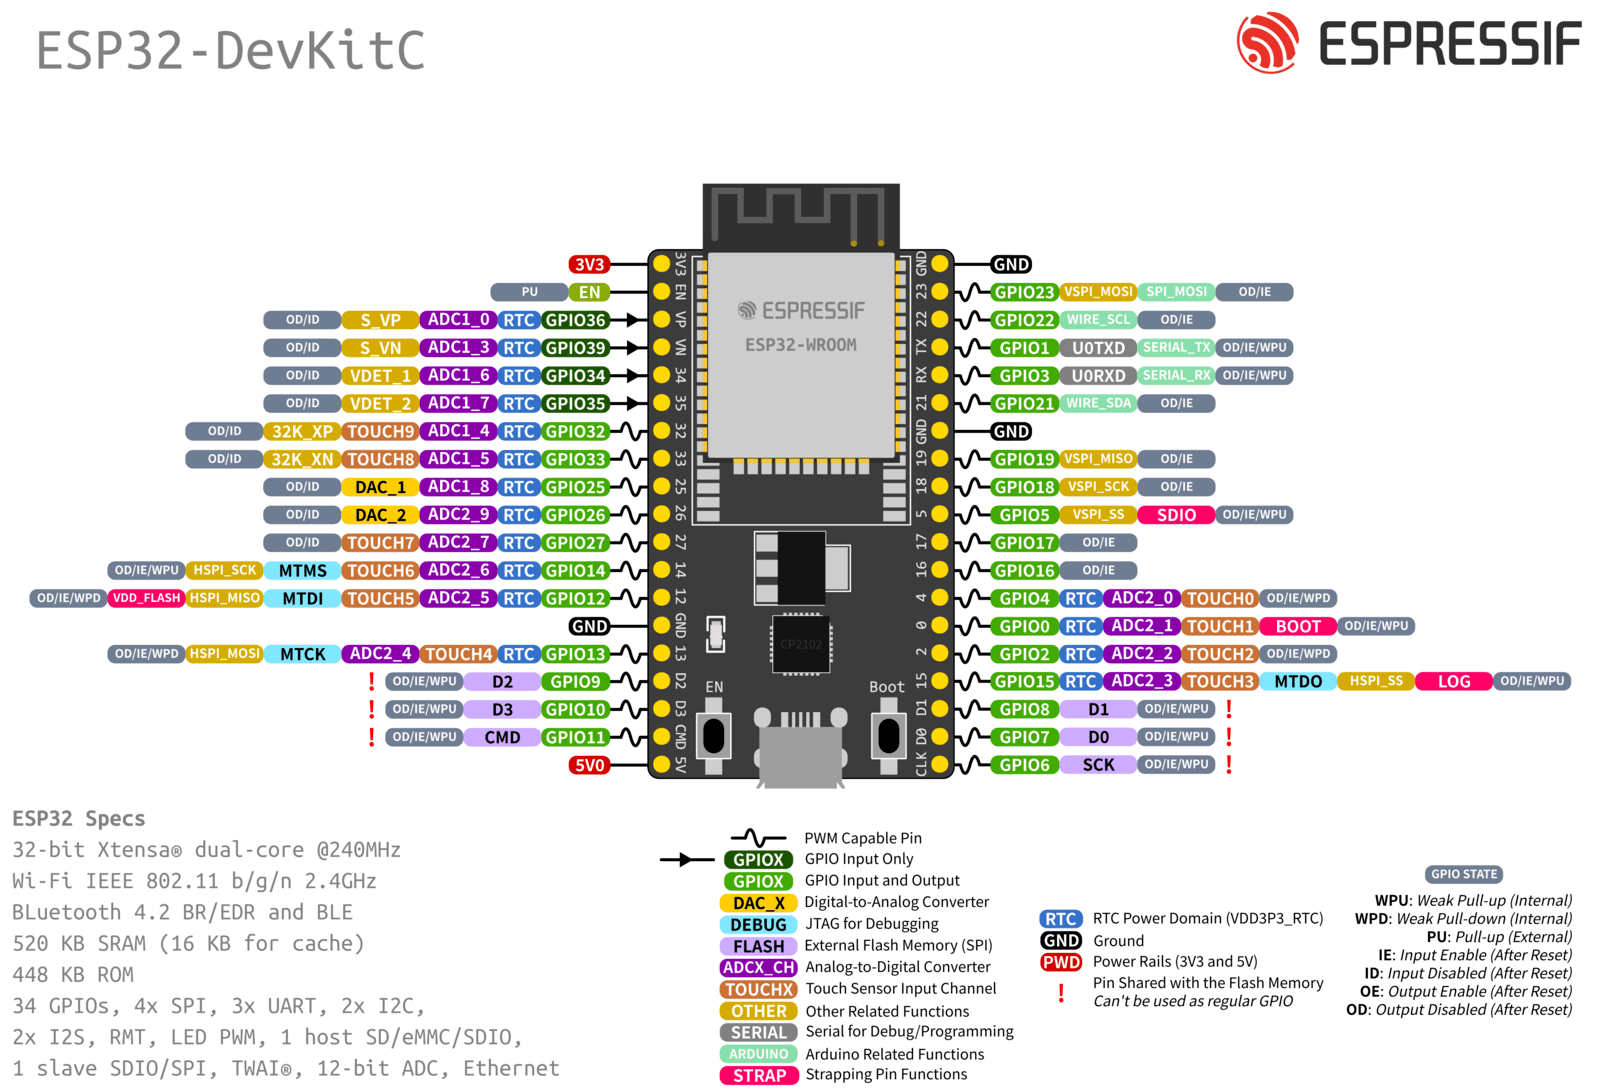
Touch enabled pins are highlighted in orange on the ESP32-DevKitC.
The Arduino Nano ESP32 (which is referenced in this article) uses the NORA-W106 module for the ESP32 processor. The NORA Module has the following touch button capabilities:
| Arduino Nano ESP32 Touch Capable pins | |
|---|---|
| NORA-W106 Module pin # | Arduino Nano ESP32 Pin # |
| GPIO14 | A7 |
| GPIO13 | A6 |
| GPIO4 | A3 |
| GPIO9 | D6 |
| GPIO1 | A0 |
| GPIO7 | D4 |
| GPIO6 | D3 |
| GPIO12 | A5 |
| GPIO11 | A4 |
| GPIO10 | D7 |
| GPIO2 | A1 |
| GPIO8 | D5 |
| GPIO5 | D2 |
| GPIO3 | A2 |
See the Nano ESP32 cheat sheet here. You can find a similar pinout diagram to your specific module if you aren’t using the Arduino Nano ESP32 or a generic WROOM module.
ESP32 Touch Button Arduino Functions
The Arduino built-in library code gives access to the touch button functionality via the built-in function touchRead().
touchRead(TOUCH_PIN); //TOUCH_PIN is a standard Arduino PIN# such as A2, D2, D3 . . .
The touchRead() function takes a single argument which accepts a GPIO pin number. This argument is the PIN that the touch value/capacitance will be read from.
There are two steps needed to read a value from a touch button:
First, you need to tell the processor you want to use the pin as in input:
pinMode(TOUCH_PIN, GPIO_MODE_INPUT); //put this inside the setup() function
Then, you use the touchRead() function to read the “touch value”:
//read the current touch value of the TOUCH_PIN
  touch_value_t touchValue = touchRead(TOUCH_PIN); //put this inside the loop() function
The touchRead() function returns an unsigned integer (touch_value_t), which is a fancy way to say a value between 0 and some really large number about 4 billion.
On the Arduino Nano ESP32 the touchRead() function returns a large number to indicate a touch and a small number to indicate a release. This seems to differ from the other Arduino documentation, so this may be an Arduino oversight but keep this in mind when using other boards and code, you may need to adjust the touch threshold or the compare value accordingly.
How do I make “Touch Buttons” work?
For this example you’ll want:
- An ESP32 development board (I’m using an Arduino ESP32 Nano)
- A solderless breadboard (optional, but handy)
- A single jumper wire (optional, but handy)
First plug in your ESP32 development board to your computer and open the Arduino IDE.
Select the “Arduino Nano ESP32” from the Arduino IDE dropdown list, or another board if you aren’t using the Nano ESP32.
At this point if you haven’t used an ESP32 board before, the IDE will ask you to download and install the files and drivers needed to continue, go ahead and do so if you haven’t already. Here are instructions for getting setup for non Arduino ESP boards.
You can also plug in your board with a wire attached to a GPIO pin for testing as shown here:

Once the IDE is ready, add a “jumper cable” with a bare/stripped end to your development board to test the touch functionality. Now let’s jump into the code!
Code for ESP32 Capacitive Touch Button
The analog pin A2 is a good choice (shown in the image above). It is good practice to use a variable for pin numbers instead of hard coding them into your program. This allows you to change pins without having to edit multiple lines of code later, something like this:
const uint8_t TOUCH_PIN = A2; //put this outside any functions, it is a global variable
Then the “TOUCH_PIN” variable can be used instead of “A2” anywhere in the code. After this you need to set the pin mode of the TOUCH_PIN as GPIO_MODE_INPUT. This is what tells the ESP32 to enable this GPIO pin as a capacitive touch pin.
pinMode(TOUCH_PIN, GPIO_MODE_INPUT); //put this inside the setup() function
Once that is done the only thing left is to read the touch button value, something like this (put the follow code inside the loop() function):
//use a variable threshold for the touch input, adjust this as needed to get the sensitivity required for your project
touch_value_t threshold = 100000;

//read the current touch value of the TOUCH_PIN
touch_value_t touchValue = touchRead(TOUCH_PIN);

//check if touchValue is greater than the threshold
if(touchValue >= threshold){

  //turn on the Green LED when a touch is detected
  digitalWrite(LED_GREEN, LOW);

}else{

  //turn off the Green LED when a touch is NOT detected.
  digitalWrite(LED_GREEN, HIGH);
}
That’s it! with the code above the green LED will turn on when the touch button is pressed and turn off when it is released. You can add more setup and if statements as needed for more buttons. The code above uses a single threshold to turn an LED on and off. It could be modified to toggle other LEDs or send the touch over WiFi or BLE to interact with the Internet or a smartphone.
Here is a simplified sketch that reports the “touchValue” to the serial monitor:
//use a const for the TOUCH_PIN so we can change the pin as needed without having to update multiple locations in code
const uint8_t TOUCH_PIN = A2; //A2 corresponds to the A2 pin on the board, Analog Pin 2

//everything inside the setup() function runs once at the start of the program
void setup() {

  //enable input mode for the TOUCH_PIN
  pinMode(TOUCH_PIN, GPIO_MODE_INPUT);

  //enable the serial port at 115200 speed (baud rate)
  Serial.begin(115200);

  //spit out a start message so we know things are working.
  Serial.println("ESP32 Capacative Touch");
}

//everything in the loop() function happens in order over and over as fast as possible
void loop() {

  //read the current touch value of the TOUCH_PIN
  touch_value_t touchValue = touchRead(TOUCH_PIN);

  //debug the touchValue on the serial port
  Serial.println(touchValue);

  //wait 1 seconds before we loop so we don't flood the serial port
  delay(1000);

  //loop() again...
}
Using Interrupts with Capacitive Touch Buttons
Using the loop() function to get the “touchValue” via touchRead() works for most applications. However, if you are doing a lot of other things in the loop() it can get confusing and often very hard to orchestrate the timing between different parts of code.
Enter “interrupts”…
Interrupts allow the processor to pause what it is doing when an event occurs, process the event, then go back to what it was doing before the event.
Interrupts are the main feature that allows “multitasking” in a single processor or single core computer such as the ESP32. Interrupts have been used for this purpose from the dawn of the silicon age.
The ESP32 allows for touch button inputs to trigger interrupts instead of polling (checking for changes over and over) in a loop. The caveat is that (currently) touch interrupts only occur for “active” touches from “untouched” to “touched”, for example you won’t be able to tell if the button is held or released with interrupts, only that it was touched.
If you need to determine when a button is held or released then using touchRead() in a loop is probably the best way.
touchAttachInterrupt()
For interrupts to function the event has to be registered with the processor along with a function to call when the event happens.
For standard interrupts the function attachInterrupt() is used, however, for touch interrupts there is a more specific function that takes a touch threshold as an argument.
This function is called touchAttachInterrupt(), there is also an alternative called touchAttachInterruptArg().
The function touchAttachInterrupt() registers a basic touch interrupt based on a threshold. The alternative touchAttachInterruptArg() is slightly more advanced and can include other arguments to pass to the interrupt function.
Generally speaking the interrupt function is called a “callback function” or just a callback. The “attach interrupt functions” register the callback with the processor so it knows what to do when that specific interrupt or event happens.
To enable interrupts you have to first create your callback function outside any setup() or loop() functions, for instance:
//use a bool to store the last touch value

bool touch1detected = false;

//create a callback function to run when the touch event happens
//you don’t want to do a lot of processing in the callback function
//as this delays the processor from getting back to its normal loop

void touchInterrupt1(){

  //update the variable
  touch1detected = true;
}
Then you have to register the callback function in setup():
touchAttachInterrupt(TOUCH_PIN, touchInterrupt1, threshold); //put this in the setup() function
Then process the” touch1detected” state in the loop():
void loop(){

//check if a touch interrupt happened
 if(touch1detected){

   //reset the touch state and print out a message
   touch1detected = false;

   Serial.println("Touch 1 detected");
 }
}
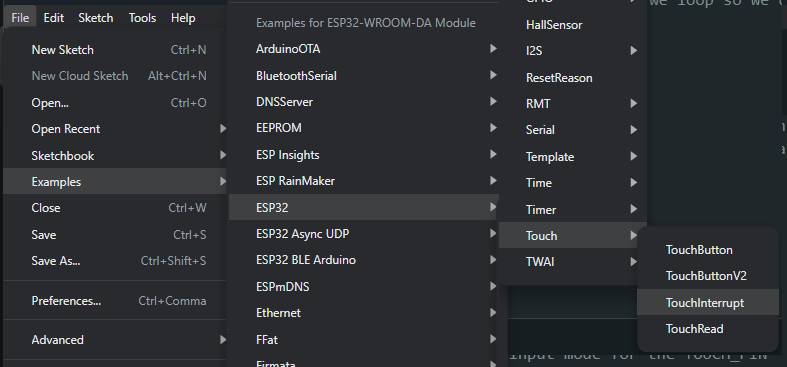
A complete touch button interrupt example can be found via the ESP32 examples in the File menu of the Arduino IDE: File > Examples > ESP32 > Touch > TouchInterrupt.
Robotic Skin and other Touch Button applications
There are many things you can do with touch buttons. There are enough button inputs on the Arduino Nano ESP32 to create a numeric keypad for instance.
Depending on the properties of the electrode connected to the GPIO pin, touch inputs can also detect proximity instead of physical touch. They can for instance detect a touch through a glass or plastic plate. This is useful for creating waterproof user interfaces.
They can also be used to create robotic skin by installing multiple touch buttons under the skin or exoskeleton via adhesive metal tape. These can be used to detect touch though the skin.
I have even seen people plug jumper wires from touch button GPIOs to things like fruit and they can detect when the fruit has been touched.
Touch buttons return a variable range depending on how close the “body” is to the touch electrode. This property can be used for gesture detection and one can determine if a finger or hand is moving toward or away from the touch button. This could be used to bend a musical note or vary the intensity of an LED.
The common application of the touch button is for finger touches, however there are other uses. For example touch buttons could also be used to cheaply identify different objects based on their capacitance or “capacitive tags” added to them. Say for identifying objects for interacting with a robot or toy.
Hopefully you’re as enthralled with some of these application ideas, but if you’re anything like me, you may be wondering how these touch pins work “under the hood”.
How do Touch Buttons “under the hood”?
As mentioned earlier, touch Buttons work by using the electrical attribute of capacitance.
As with most things in electronics the actual things that make them work are invisible and capacitance is no different! This is probably why electronics are confusing, so much of it is unseen 👻.
Capacitance is the ability of an electronic element to store charge, in the form of electrons building up on a surface and creating an electric field. The capacitive element can be wire, metal plates, or the human body.
Everything in electronics has some sort of capacitance; the traces on a circuit board, the junctions of a MOSFET, the wires connecting two circuits. For most applications this “parasitic” capacitance is negligible.
However, there is an electronic component where its primary function is storing charge, it is called (not by chance) a capacitor. There are various types of capacitors. Each type uses different methods to store charge.
A perfect capacitor stores charge but doesn’t allow current to flow after it is fully charged. A near perfect capacitor can be achieved by holding two metal plates as close to one another as possible without them actually touching.
This allows electrons to build up on the plates and creates an electric field between them but doesn’t allow current to pass between the plates. A Leyden jar or electrolytic capacitors are a good example of a near perfect capacitor.
Capacitors store a known amount of charge based on their physical properties, such as their surface area and materials used. Given the amount of resistance in the circuit leading to and from a capacitor the time it takes to charge the capacitor to a certain voltage is known exactly.
Capacitance in Touch Button
In touch button implementations, such as the circuits built into the ESP32, there is a known capacitor and resistor circuit (RC circuit) connected to the GPIO pin. The processor charges and discharges the RC circuit continuously and measures the amount of time it takes the capacitor to reach a certain voltage.
If the capacitance changes due to additional capacitance added to the circuit in the form of a human body touching the GPIO pin then the charge and discharge time of the circuit changes accordingly.
The touchRead() function returns this charge/discharge time. Therefore by reading this time and comparing it to known values one can determine if the pin is touched or untouched by an outside source!
This all sounds amazing, but you know the devil is in the details…
What Could Possibly Go Wrong?
Nothing!… I wish I could say. In real life there are many things that can interfere with touch button functionality, especially if you don’t have full control over the environment in which the touch button is used.
Capacitance is affected by anything that enters the electric field of the touch button, and the electric field often extends well beyond the physical limit of the button or the electrode.
In another life I built robotic toys, many of which used touch sensors/buttons for interaction. These toys also incorporated advanced animations that were mixed together on the fly and were therefore unpredictable.
What often happened was part of the toy would move into the electric field of its own touch sensors and effectively false trigger itself! There was no easy fix for this and depending on the play-pattern needed the touch sensors had to be deactivated based on specific animations.
Touch buttons are unique and offer an interesting interface and often give human-like senses to electronics but they can false trigger so keep that in mind when you are using them. Don’t use them for anything “mission critical” (I hope you’re listening NASA!)
Let’s Rehearse Your Lines…
Using touch buttons via an ESP32 based board is straightforward. All you need to do is set-up your pin via the pinMode() function and read the touch value with the touchRead() function.
Remember that the touchRead() function returns a variable range depending on the “amount of touch”. Compare this value with a threshold to use it to trigger something.
The “amount of touch” can be affected by the environment so you may get false triggers, take this into account if you plan on using them for anything mission critical!
Where to Go From Here…
All this Arduino code is great – and it looks easy enough, but if you’re struggling to understand the basic code structures, then it can really be a bear.
Which is why you should consider checking out our Arduino training program – it can take you from knowing nothing about Arduino programming to building your own projects.


Sounds like same as coding for a switch button, but this one is cooler because you can adjust the “amount of touch”. Mahalo for sharing.
Yes! It’s really neat. I feel like the ESP32 is full of neat tricks 🙂