Making a BLE Server with your ESP32 [Guide + Code]
- Test code for ESP32 BLE Server
- ESP32 BLE Server Code Walkthrough
- The Arduino setup() Function
- The Arduino loop() Function
- The Arduino BLE Client Sketch
- Testing The Arduino ESP32 BLE Server Sketch
- Where To Go From Here
Below is the code referenced in the above video. Our post continues below the code.
/*
  TODO

    [x] Create a BLE Device
        [x] Import BLEDevice Library
        [x] Name Device
        [x] Initialize Device

    [x] Create Server
        [x] Import BLEServer library
        [x] Create BLEServer

    [x] Create Server Callbacks
        [x] OnConnect
            [x] Turn on LED
        [x] OnDisconnect
            [x] Turn off LED

    [x] Create Service
        [x] Define a Service UUID
        [x] Create a Service
        [x] Start the Service

    [x] Create Characteristic
        [x] Define a Characteristic UUID
        [x] Create a Characteristic
        [x] Add Characteristic to Service

    [x] Create a Characteristic Callback
        [x] create sub-class to override BLECharacteristicCallbacks
        [x] Send millis value every time request comes in

    [x] Create a Descriptor
        [x] Add a Descriptor (2901)

    [] Advertise the Service
        [x] Get the Advertising object from Device
        [x] Create and set Advertisement Data
        [x] Create and set Scan Data
        [x] Add Advertisement and Scan Data to Advertising Object
        [x] Add Service UUID
        [x] Start Advertising

*/

/** Includes ***********************************/
#include <BLEDevice.h>
#include <BLE2901.h>

/** Defines ***********************************/
#define DEVICE_NAME "CIA Monitoring Device"
// See the following for generating UUIDs:
// https://www.uuidgenerator.net/
#define SERVICE_1_UUID "d9b4049b-c663-446c-9211-71754d930811"
#define CHARACTERISTIC_1A_UUID "596d9fe5-baf0-472b-89ee-bbb3ce27165a"
#define CHARACTERISTIC_1B_UUID "fd52c152-7b33-4059-80c6-090143a3d2f8"

/** Callbacks ***********************************/
class MyServerCallbacks : public BLEServerCallbacks {

  void onConnect(BLEServer *pServer) {
    digitalWrite(2, HIGH);
    Serial.println("Client Connected");
  }

  void onDisconnect(BLEServer *pServer) {
    digitalWrite(2, LOW);
    Serial.println("Client Disconnected");
    BLEDevice::startAdvertising();
  }
};

class MyCharacteristic_1A_Callbacks : public BLECharacteristicCallbacks {

  void onRead(BLECharacteristic *pCharacteristic) {
    uint32_t currentMillis = millis() / 1000;
    pCharacteristic->setValue(currentMillis);
  }
};


void setup() {

  Serial.begin(9600);
  Serial.println("ESP32 BLE Server setup beginning...");

  // Pin modes
  pinMode(2, OUTPUT);

  //Initialize Device
  BLEDevice::init(DEVICE_NAME);

  // Create Server
  BLEServer *pServer = BLEDevice::createServer();
  pServer->setCallbacks(new MyServerCallbacks());

  // Services
  BLEService *pService = pServer->createService(SERVICE_1_UUID);

  // Characteristics
  BLECharacteristic *pCharacteristic_1A = pService->createCharacteristic(
    CHARACTERISTIC_1A_UUID,
    BLECharacteristic::PROPERTY_READ | BLECharacteristic::PROPERTY_WRITE);

  pCharacteristic_1A->setCallbacks(new MyCharacteristic_1A_Callbacks());

  // Descriptors
  BLE2901 *pDescriptor_2901 = new BLE2901();
  pDescriptor_2901->setDescription("Time");
  pCharacteristic_1A->addDescriptor(pDescriptor_2901);

  pService->start();

  // Advertising
  // Get the Advertising object
  BLEAdvertising *pAdvertising = BLEDevice::getAdvertising();

  /*
  // Advertisement Data
  BLEAdvertisementData advertisementData;
  advertisementData.setFlags(ESP_BLE_ADV_FLAG_GEN_DISC | ESP_BLE_ADV_FLAG_BREDR_NOT_SPT);
  advertisementData.setName(DEVICE_NAME);
  advertisementData.setCompleteServices(BLEUUID(SERVICE_1_UUID));
  advertisementData.setPartialServices(BLEUUID(SERVICE_1_UUID));
  advertisementData.setServiceData(BLEUUID(SERVICE_1_UUID), "some data");

  // // Scan Response Data
  BLEAdvertisementData scanResponseData;
  scanResponseData.setName(DEVICE_NAME);

  // Add advertising data and scan response data to advertising
  pAdvertising->setAdvertisementData(advertisementData);
  pAdvertising->setScanResponseData(scanResponseData);
  */

  // Adertising settings
  pAdvertising->addServiceUUID(SERVICE_1_UUID);
  pAdvertising->setScanResponse(true);
  pAdvertising->setMinPreferred(0x06);  // functions that help with iPhone connections issue

  BLEDevice::startAdvertising();
}

void loop() {
  // put your main dog chow here, to run repeatedly:
}
BLE technology is an exciting technology that unlocks a whole new area of possibilities for the inexpensive and low power aspects of the ESP32! With the Arduino platform, we can set up an ESP32 device to operate as either a BLE Client or as a BLE Server.
In this article, we will be discussing how to use the ESP32 as a BLE Server. So now, let’s dive into what this technology is all about!
First let’s define some key concepts necessary for this article.
BLE stands for Bluetooth Low Energy. And, as the name implies, BLE is simply a power conserving version of the original Bluetooth technology. Bluetooth technology is a wireless communications technology used over short distances for personal area networks.
You are probably most familiar with BLE technology when you connect your smartwatch to your smartphone. Or, when you use a digital key to access your hotel room with your smartphone. BLE technology has become almost ubiquitous in our daily lives!
In the BLE Beacon Scanner article, we discussed how the ESP32 can simply operate as a Beacon or a lighthouse periodically notifying other nearby devices of its existence using BLE technology. This type of use is excellent for creating applications requiring proximity alerts, proximity awareness, etc.
Now in this article, we are going to take that concept a little bit further. Using BLE technology with the ESP32 and Arduino, we can create a client server style architecture for our devices to communicate with each other!
The ESP32 BLE Server will advertise itself to other BLE devices, the ESP32 BLE Client will scan nearby devices until it finds the ESP32 BLE Server, the ESP32 BLE Client will then connect to the BLE Server, and finally the ESP32 BLE Server will begin sending data to the BLE Client.
This type of communication is often referred to as point to point communication. Or as mentioned above, a personal area network.
In the code below we will be focusing on, and creating, the ESP32 BLE Server part of this client server architecture.
The process flow for the example sketch below will be to…
- Create an ESP32 BLE Server program and upload to an ESP32
- Create an ESP32 BLE Client program and upload to different ESP32
- Connect to the ESP32 BLE Server to ESP32 BLE Client
- Send some data from the ESP32 BLE Server to the ESP32 BLE Client
At the end of this article, you will be able to successfully create a BLE Client Server project with your ESP32 device(s). Let’s go!
NOTE: We also have an article that talks about using ESP32 as a BLE Client.
Test code for ESP32 BLE Server
The following is the entire example sketch of how to create and use a BLE Server with your ESP32. In the sections below, we will walk through this code together step by step.
If you want to see the final product right away, you can just upload this sketch to your ESP32 and try it out now!
//  BLE Server Example Sketch
//
//  Programming Electronics Academy
//

#include <BLEDevice.h>
#include <BLEUtils.h>
#include <BLEServer.h>

// See the following for generating UUIDs:
// https://www.uuidgenerator.net/

#define SERVICE_UUID        "4fafc201-1fb5-459e-8fcc-c5c9c331914b"
#define CHARACTERISTIC_UUID "beb5483e-36e1-4688-b7f5-ea07361b26a8"

void setup() {

  Serial.begin(115200);
  Serial.println("Starting BLE server setup!");
  BLEDevice::init("PEA - BLE Server Test");
  BLEServer *pServer = BLEDevice::createServer();
  BLEService *pService = pServer->createService(SERVICE_UUID);
  BLECharacteristic *pCharacteristic = pService->createCharacteristic(

                                         CHARACTERISTIC_UUID,
                                         BLECharacteristic::PROPERTY_READ |
                                         BLECharacteristic::PROPERTY_WRITE

                                       );

  pCharacteristic->setValue("We love Programming Electronics Academy");
  pService->start();
  BLEAdvertising *pAdvertising = BLEDevice::getAdvertising();
  pAdvertising->addServiceUUID(SERVICE_UUID);
  pAdvertising->setScanResponse(true);
  pAdvertising->setMinPreferred(0x06);
  pAdvertising->setMinPreferred(0x12);
  BLEDevice::startAdvertising();
  Serial.println("Characteristic defined!");

}

void loop() {

  // put your main code here, to run repeatedly:
  delay(2000);

}

ESP32 BLE Server Code Walkthrough
One of the great things about using the Arduino development environment is that there are so many awesome open source libraries available to use!
At the top of the program, we’ll take advantage of some of these libraries by including the BLE device, utilities, and server libraries.
So, remember that anytime you see references to “BLEDevice”, “BLEUtils”, or “BLEServer”, you will know when and where these libraries are being used throughout the code.
And, that’s just another reminder of what makes the Arduino platform so great….that we can take advantage of these libraries that have been shared by other developers!
#include <BLEDevice.h>
#include <BLEUtils.h>
#include <BLEServer.h>
Now, we need to define some unique identifiers for the BLE server that we will be creating. BLE devices broadcast a unique identifier (a UUID) for the device often along with other identifying characteristics.
A UUID is a Universally Unique Identifier. There are UUIDs for device services and for device characteristics. The BLE architecture is defined in a hierarchical structure. So, BLE devices have services and those services have characteristics. Each service and each characteristic that a device supports have their own unique identifiers (UUIDs).
BLE Services
A device profile is the top level of the BLE architecture. A BLE device profile may have one, or many, BLE services.
BLE Characteristics
A BLE Service has characteristics which contain the actual data for the service. And every BLE service can have one, or many, BLE Characteristics. An example of a typical BLE characteristic might be a humidity or temperature reading from a sensor connected to a BLE Server.
Below we have defined the BLE service UUID and BLE characteristic UUID of the BLE Server that our BLE Client will be searching for. If you have a sensor from a manufacturer, they will provide you with the UUIDs for their device. In our example, we needed to create our own UUIDs. Which we have done using the following free UUID generator: UUID Generator
#define SERVICE_UUID        "4fafc201-1fb5-459e-8fcc-c5c9c331914b"
#define CHARACTERISTIC_UUID "beb5483e-36e1-4688-b7f5-ea07361b26a8"
The Arduino setup() Function
As you may already know, in the Arduino environment the first thing that runs on startup of the ESP32 is the setup() function. And, the first thing we need to do in the setup() function, is to initialize the serial communication with the serial monitor using a baud rate of 115200.
Serial.begin(115200);
Now, create the new BLE Server device with the name of “PEA – BLE Server Test” using the init() function and the createServer() function.
BLEDevice::init("PEA - BLE Server Test");
  BLEServer *pServer = BLEDevice::createServer();
Create the BLE Service and BLE Characteristic for this BLE Server using the UUID’s we previously declared. And make sure the characteristic has both READ and WRITE properties set, so the BLE Client can access the BLE Server’s characteristics value.
BLEService *pService = pServer->createService(SERVICE_UUID);
  BLECharacteristic *pCharacteristic = pService->createCharacteristic(

                                         CHARACTERISTIC_UUID,
                                         BLECharacteristic::PROPERTY_READ |
                                         BLECharacteristic::PROPERTY_WRITE

                                       );
Initialize the BLE Characteristics value to “We love Programming Electronics Academy” and start the service. This is the value the BLE Client will see when it connects to our BLE Server.
pCharacteristic->setValue("We love Programming Electronics Academy");
  pService->start();
And, finally, start Advertising the BLE Service, so the BLE Client can find, connect, and communicate with our BLE Server.
BLEAdvertising *pAdvertising = BLEDevice::getAdvertising();

  pAdvertising->addServiceUUID(SERVICE_UUID);
  pAdvertising->setScanResponse(true);
  pAdvertising->setMinPreferred(0x06);
  pAdvertising->setMinPreferred(0x12);
  BLEDevice::startAdvertising();

  Serial.println("Characteristic defined!");
The Arduino loop() Function
The entire ESP32 BLE Server functionality occurs in the setup function. So, there is nothing to do in the Arduino main loop.
The Arduino BLE Client Sketch
In order to test the BLE Server sketch, we need to create and start a BLE Client!
The following code is the entire example sketch for creating a BLE Client with your ESP32. As I mentioned earlier, we have an entire lesson dedicated to the code below that you can check out here if you want more details.
Once you have connected an ESP32 to your computer, upload the whole sketch to your device.
After the sketch has been uploaded to your ESP32, press the reset (RST) button on your ESP32
//  BLE Client Example Sketch
//
//  Programming Electronics Academy
//

#include <BLEDevice.h>            // sets up BLE device constructs
// The remote service we wish to connect to.

static BLEUUID serviceUUID("4fafc201-1fb5-459e-8fcc-c5c9c331914b");
// The characteristic of the remote service we are interested in.

static BLEUUID charUUID("beb5483e-36e1-4688-b7f5-ea07361b26a8");
static boolean doConnect = false;
static boolean connected = false;
static boolean doScan = false;
static BLERemoteCharacteristic* pRemoteCharacteristic;
static BLEAdvertisedDevice* myDevice;
static void notifyCallback(

  BLERemoteCharacteristic* pBLERemoteCharacteristic,
  uint8_t* pData,
  size_t length,
  bool isNotify) {

    Serial.print("Notify callback for characteristic ");
    Serial.print(pBLERemoteCharacteristic->getUUID().toString().c_str());
    Serial.print(" of data length ");
    Serial.println(length);
    Serial.print("data: ");
    Serial.println((char*)pData);

}

class MyClientCallback : public BLEClientCallbacks {
  void onConnect(BLEClient* pclient) {

  }

  void onDisconnect(BLEClient* pclient) {
    connected = false;
    Serial.println("onDisconnect");

  }

};

bool connectToServer() {

    Serial.print("Forming a connection to ");
    Serial.println(myDevice->getAddress().toString().c_str());
    BLEClient*  pClient  = BLEDevice::createClient();
    Serial.println(" - Created client");

    pClient->setClientCallbacks(new MyClientCallback());
    // Connect to the remove BLE Server.

    pClient->connect(myDevice);
    Serial.println(" - Connected to server");

    // Obtain a reference to the service we are after in the remote BLE server.

    BLERemoteService* pRemoteService = pClient->getService(serviceUUID);
    if (pRemoteService == nullptr) {
      Serial.print("Failed to find our service UUID: ");
      Serial.println(serviceUUID.toString().c_str());
      pClient->disconnect();
      return false;

    }

    Serial.println(" - Found our service");

    // Obtain a reference to the characteristic in the service of the remote BLE server.

    pRemoteCharacteristic = pRemoteService->getCharacteristic(charUUID);
    if (pRemoteCharacteristic == nullptr) {

      Serial.print("Failed to find our characteristic UUID: ");
      Serial.println(charUUID.toString().c_str());
      pClient->disconnect();
      return false;

    }

    Serial.println(" - Found our characteristic");

    // Read the value of the characteristic.
    if(pRemoteCharacteristic->canRead()) {

      std::string value = pRemoteCharacteristic->readValue();
      Serial.print("The characteristic value was: ");
      Serial.println(value.c_str());
      Serial.println("");

    }

    if(pRemoteCharacteristic->canNotify())
      pRemoteCharacteristic->registerForNotify(notifyCallback);
    connected = true;

}

// Scan for BLE servers and find the first one that advertises the service we are looking for.
class MyAdvertisedDeviceCallbacks: public BLEAdvertisedDeviceCallbacks {

  // Called for each advertising BLE server.
  void onResult(BLEAdvertisedDevice advertisedDevice) {

    Serial.print("BLE Advertised Device found: ");
    Serial.println(advertisedDevice.toString().c_str());

    // We have found a device, let us now see if it contains the service we are looking for.
    if (advertisedDevice.haveServiceUUID() && advertisedDevice.isAdvertisingService(serviceUUID)) {

      BLEDevice::getScan()->stop();
      myDevice = new BLEAdvertisedDevice(advertisedDevice);
      doConnect = true;
      doScan = true;

    } // Found our server

  } // onResult

}; // MyAdvertisedDeviceCallbacks

void setup() {

  Serial.begin(115200);
  Serial.println("Starting Arduino BLE Client application...");

  BLEDevice::init("");
  // Retrieve a Scanner and set the callback we want to use to be informed when we
  // have detected a new device.  Specify that we want active scanning and start the
  // scan to run for 5 seconds.

  BLEScan* pBLEScan = BLEDevice::getScan();
  pBLEScan->setAdvertisedDeviceCallbacks(new MyAdvertisedDeviceCallbacks());
  pBLEScan->setInterval(1349);
  pBLEScan->setWindow(449);
  pBLEScan->setActiveScan(true);
  pBLEScan->start(5, false);

} // End of setup.

// This is the Arduino main loop function that runs repeatedly.

void loop() {

  // If the flag "doConnect" is true then we have scanned for and found the desired
  // BLE Server with which we wish to connect.  Now we connect to it.  Once we are
  // connected we set the connected flag to be true.

  if (doConnect == true) {
    if (connectToServer()) {
      Serial.println("We are now connected to the BLE Server.");

    } else {

      Serial.println("We have failed to connect to the server; there is nothin more we will do.");

    }

    doConnect = false;

  }

  // If we are connected to a peer BLE Server, update the characteristic each time we are reached
  // with the current time since boot.

  if (connected) {
    String newValue = "Time since boot: " + String(millis()/1000);
    Serial.println("nSetting new characteristic value to "" + newValue + """);

    // Set the characteristic's value to be the array of bytes that is actually a string.
    pRemoteCharacteristic->writeValue(newValue.c_str(), newValue.length());

  }else if(doScan){

    BLEDevice::getScan()->start(0);  // this is just an example to re-start the scan after disconnect

  }

  delay(1000); // Delay a second between loops.

}
Testing The Arduino ESP32 BLE Server Sketch
After you have started the ESP32 BLE Server sketch, on a separate ESP32 upload the ESP32 BLE Client sketch.
After the BLE Client sketch has been uploaded to this ESP32, press the reset (RST) button on your ESP32 device and you should see the following displayed on the serial monitor.
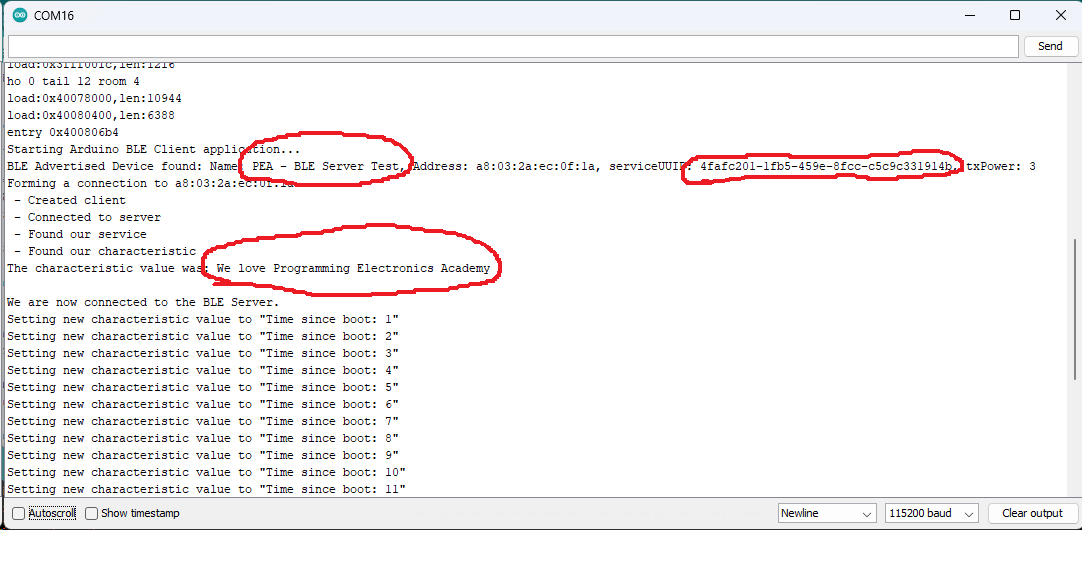
As you can see from the output, the ESP32 BLE Client found the ESP32 BLE Server named “PEA – BLE Server Test” with the service UUID we defined in our variable declarations. Our ESP32 BLE Client was connected to this service and found the characteristic UUID it was searching for which contains the string value “We love Programming Electronics Academy”.
Once the connection has been made, the ESP32 BLE Client repeatedly updates the characteristic value once per second in the Arduino main loop() function.
And that is all there is to it! It is that easy to create a BLE Server with your ESP32 device and the Arduino IDE!
Where To Go From Here
Making a BLE Server with your ESP32 device can create a whole new realm of possibilities for your ESP32 projects. This functionality is especially useful when using your ESP32 to exchange data with sensors (temperature, humidity, etc.) that are nearby your ESP32.
For practice, try changing your code to use your own generated UUIDs for the BLE Service and BLE Characteristic and then update the name of your BLE Server. Remember you will also need to update the UUIDs that your BLE Client is scanning for!


