ESP32 Hall Effect Sensor [Beginner Guide + Code]
The Hall Effect sensor is one of the numerous built-in components of the ESP32 that is often overlooked.
This sensor is a useful tool for developers since it can detect magnetic fields and has many uses. This article will examine the internal Hall Effect sensor of the ESP32, its working principles, and possible uses.
ESP32’s Built-In Hall Effect Sensor
A built-in hall effect sensor on the ESP32 development board allows it to monitor changes in the magnetic field around it.
The hall effect sensor is concealed below the metal cover of the chip:

This means you can add magnetic sensing to your projects without using additional parts. For applications where it is necessary to detect magnetic fields or the presence of magnets, this built-in sensor is highly useful!
For instance, the hall effect sensor can function as:
- a switch
- count the number of wheel spins
- calculate positioning
- determine proximity
- detect a door closing
- yada, yada…

Hardware Required
The Hall Effect sensor on the ESP32 can be used without any additional hardware. The microcontroller and sensor are internally connected.
- ESP32 Wroom Dev Module (NOTE: ESP32 S2, S3, and C3 models do not have Hall Effect sensors)
- USB Cable
- Magnet for testing
Programming the ESP32 Hall Effect Sensor
Below is some super basic code to test the ESP32’s built-in hall sensor.
Using the hallRead() method is all that is really required to read the hall effect sensor measurements. Take a look at this, and we’ll go through it line-by-line in the next section.
Programming Electronics Academy members, check out the Internet of Things (IoT) Course to start programming your own IoT devices.
Not a member yet? Sign up here.
Code
int val = 0;  // variable to store hall sensor measurement

void setup() {

  Serial.begin(115200);  // Start serial communication at 115200 baud rate

}

void loop() {  // Put your main code here to run repeatedly:

  int val = hallRead();  // variable to store value of hall sensor

  Serial.print("Hall sensor value: ");  // print the results to the serial monitor:

  Serial.println(val);

}
This little piece of code sets up the Hall Effect sensor pin on the ESP32 and periodically reads its value. The hall effect sensor’s value will be printed to the serial monitor if a magnetic field is detected.
Declaring Required Variables
int val = 0; // variable to store hall sensor measurement
“val” is an integer variable that is declared and initialized to 0 at the very start of the program. The measurements obtained from the Hall Effect sensor will be stored in this variable.
Setup
void setup() {

  Serial.begin(115200);  // Start serial communication at 115200 baud rate

}
After declaring the variable, we start our setup function. The setup function is only run once each time the ESP32 is powered on or reset. So any piece of code that you want to run only once goes here.
We start the serial communication at a baud rate of 115200. It establishes the communication path that enables the microcontroller to communicate with the computer through the USB connection to transmit and receive data.
Reading the Hall Sensor Measurement
void loop() {  // Put your main code here to run repeatedly:

  int val = hallRead();  // variable to store value of hall sensor

  Serial.print("Hall sensor value: ");  // print the results to the serial monitor:

  Serial.println(val);

}
Next, we start our loop function. As the name suggests, the loop function will run repeatedly. Therefore, any piece of code that you want to run again and again goes here.
Inside our loop function, we call the hallRead() function, which reads the current measurement of the hall sensor. This measurement is stored in the val variable we declared earlier.
Finally, we print the stored value on the serial monitor window.
The value is printed using the println() function, which also appends a new line at the end of the message. This way, the next time we print the sensor value, it will be printed on a new line.
The value will fluctuate if you pass a magnet near the ESP32.
The difference in measurements of the hall sensor is caused by two things:
- Magnetic Pole: Which pole, North or South, is near the Hall sensor
- Magnetic Field: How strong the magnet is and at what distance is it placed from the Hall sensor
Step-by-Step Procedure
- Launch the Arduino IDE
- Connect the ESP32 board to your computer with a USB cable.
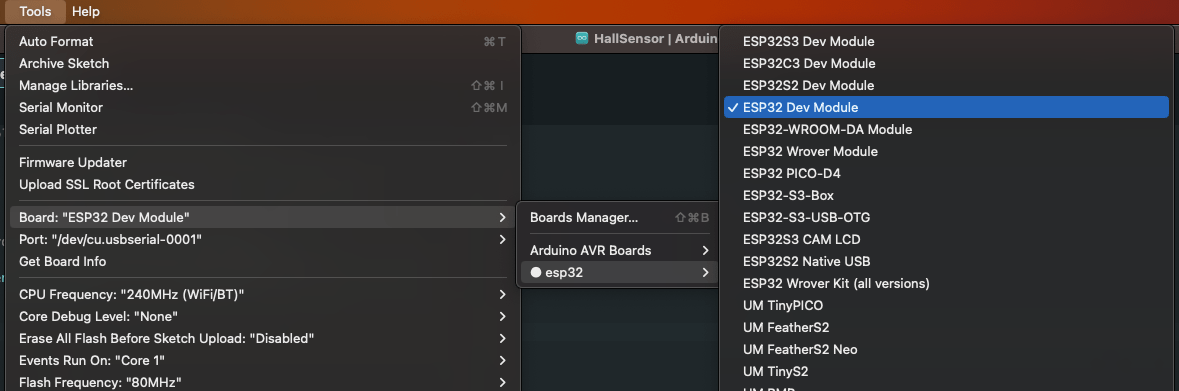
- From the Tools>Board>esp32 menu, select the board according to which board you are using. For us, it was the ESP32 Dev Module.

- From the Tools>Port menu, select the Serial Port to which the ESP32 is connected.
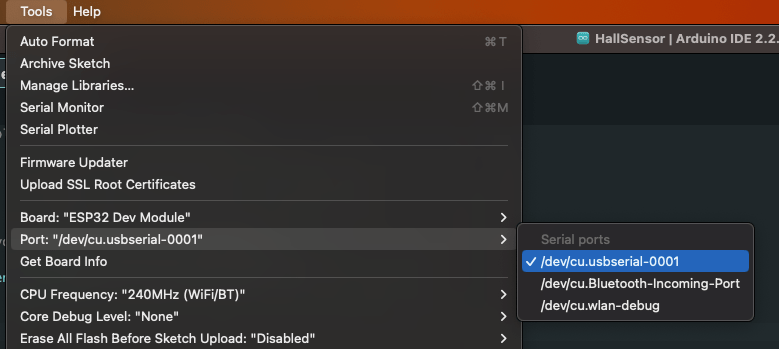
If you see multiple ports (usually shown as COM if you’re on a PC, or dev/cu on a Mac) and you’re unsure which one corresponds to your ESP32 board, that’s fine. Simply disconnect the ESP32 board from the computer and open the Tools menu again. Whichever option was available before but is not available now in the menu is the serial port your ESP32 board was connected to. Connect it again and choose that serial port. For us it was dev/cu.usbserial-0001.
- Use the code provided above. You can copy and paste it in the Arduino IDE if you like. However, it is a short code and we encourage typing it out yourself! This will familiarize you with the functions and get you into the habit of writing structured code.
- After selecting the appropriate board and port, upload the code either by clicking the upload button in the top left corner of the window (or by pressing Ctrl+U on a PC or Cmd+U on a Mac).
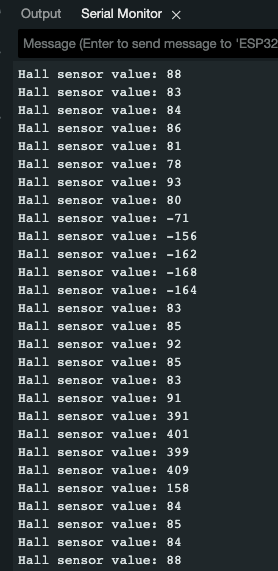
- When the code is uploaded, open the Serial Monitor window either by clicking on the Serial Monitor button in the top right corner of the window or by pressing Ctrl+Shift+M on a PC or Cmd+Shift+M on a Mac. The Serial Monitor will show something similar to this:
Understanding Hall Effect Sensors
You might be interested in how this hall effect actually works…here’s some back story!
American scientist Edwin Hall first identified the basic physical phenomenon known as the Hall Effect in 1879.
It shows how an electric current flowing through a conductor under the influence of a perpendicular magnetic field might result in the generation of a voltage difference across the conductor.
This voltage, known as the Hall voltage, can be measured and utilized for a variety of tasks, including determining a magnet’s location and calculating rotational speed.
The charge carriers, electrons, and holes are steered to one side when a magnetic field is positioned around them. As a result of this deflection, or imbalance, a voltage difference is created across the sensor material. The resultant voltage difference is used to measure the magnetic field’s intensity.

This effect is harnessed by the internal Hall Effect sensor in the ESP32 to detect changes in magnetic fields. And you can use it with a single line of code – pretty awesome!
But what to use it on?
Applications of ESP32’s Hall Effect Sensor
I’m sure you have a ton of ideas of how you might use the ESP32 hall sensor in a project, but just in case, here are a couple ideas…
- Proximity sensors: Use the sensor to look for magnetic objects, such as magnetic doors or magnets.
- Rotational Speed Measurement: Use a sensor attached to a magnet to measure the speed of a revolving item.
- Systems for home security: Construct a magnetic door sensor.
- Position detection: Identify a magnet’s location along a straight line.
- Smart Switches: Create smart switches that turn on when a magnet is nearby.
Try On Your Own Challenges
- Pass some magnets over your ESP32 – what effect do they have on the hall reading?
- Using the code given in this lesson as a foundation, develop a program that switches an LED on when a magnet is detected and switches the LED off when no magnet is detected. This concept can be implemented to develop a magnetic door sensor that alerts the user when the door is opened.
Where to go from here?
If you want to jump start your Arduino programming skills and start programming your own neat stuff, check out our Arduino training program – it can take you from knowing nothing about Arduino programming to building your own projects.


