Control your ESP32 with an Infrared TV Remote Control
- Basic Code Flow
- Get an IR Receiver
- Basics of TV Remote Commands
- Installing your IR Remote Software
- Example Program Using a Universal Remote
- Modify the Code for Your Specific ESP32 Setup
- First Time Running The Code and Debugging
- Example Output
- Extra Features and Software Noise Reduction
Have you ever wanted to control your ESP32 using a universal infrared TV remote control? Or, use the numbers on your remote to enter a password to a secret door in your house? Or, maybe control a robot with the arrow keys on your remote? Then this tutorial is for you!
The following tutorial will show you how to connect an IR receiver to your ESP32, give you free code to upload, and explain how everything works.
Basic Code Flow
When you press a button on a TV Remote, it transmits out a specific IR signal depending on the button you pressed. We will use some hardware (an IR Receiver) to intercept this signal, read it into our ESP32, and then based on what signal we receive, we can have different things happen.
For example, if you press the left arrow on your remote, you could write code that turns your robot left, or whatever you want! You’ll be writing code to match different remote button presses to different things you want to happen on your ESP32.
In the example code we provide, you’ll be trying to capture all the TV remote button presses, and printing information about each button signal to the Arduino IDE serial monitor.

Get an Infrared Receiver to Connect to ESP32
The first step is to choose your IR receiver/sensor and connect it to an ESP32. All IR receivers basically work the same. You got a ground pin, power pin, and a digital signal pin – that’s it!
You can find many IR receivers on Amazon. For this tutorial I’m using the TSOP36338TT by Vishay Semiconductors (I already own a few from a previous project).
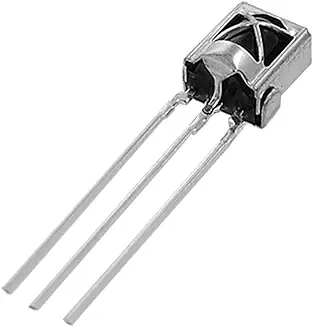
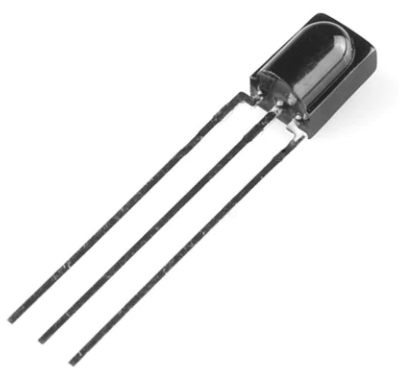


Fig. 1
A few example IR receivers you can buy for under $5.
The below diagram probably overcomplicates it, but basically you connect ground to ground, power to power, and receiver output to the microcontroller (ESP32). The C1 capacitor is likely already built into your ESP32 breakout board. If not, use 0.1uF. The resistor R1 can be ignored.
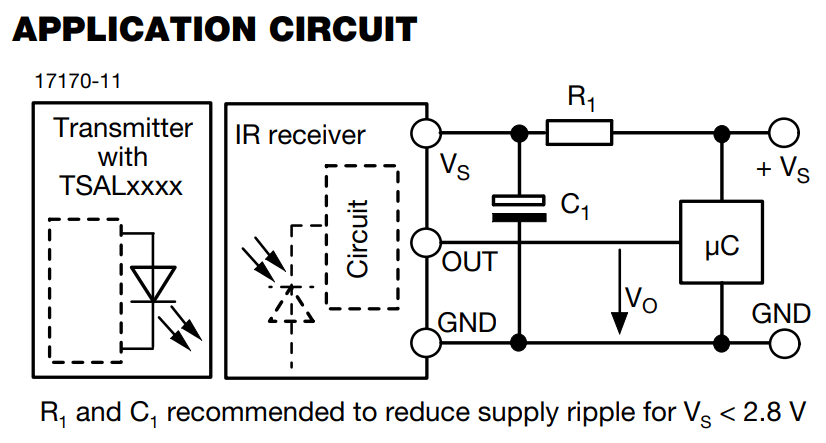
Fig 2. Basic wiring diagram
Basics of ESP32 Infrared TV Remote Commands
Remote controls from different brands all utilize unique proprietary infrared (IR) signals to communicate with their respective devices.
These signals are specific to each brand to ensure compatibility and prevent interference between different devices in the same vicinity. The exact encoding and modulation of the IR signals vary between brands, making them unique identifiers for each remote control.
While all major IR schemes use 38kHz today, the specific encodings can be quite different. Reverse engineering a proprietary code can be tedious.
Fortunately, there are open source libraries that handle a good 90% of all encodings commonly available. That said, brands can and will occasionally modify their encodings without documentation.
You may find a library that handles for example Samsung remotes, but then after using it you’ll find half the commands from your Samsung remote oddly aren’t being recognized.
<rant begin>
Speaking of Samsung, their latest TV remotes are funky. If you use it with a 2020 TV model, it’ll output an older Samsung code.
Then, when you use it with a 2022 TV model, the remote will secretly download new firmware from the TV and then start outputting a slightly different Samsung encoding.
And then the IR transmitter will stop working entirely without explanation, because its feelings were hurt and now it’ll only transmit using the built in bluetooth transceiver.
(translation: you used the IR remote but the TV didn’t respond, so the remote automatically swapped over to BLE to establish a connection).
<end rant>
The libraries typically all handle Sony, Sharpe, NEC, LG, Apple, BoseWave, Lego, air conditioner remotes, etc. You’ll have to read through the library documentation if you want to use a specific remote – not all encodings are enabled by default.
Long story short, we’re only going to use a traditional Universal Remote that you can buy for $10 everywhere.

Installing your Infrared Remote Software
There are a dozen different libraries available for receiving IR commands in the Arduino library universe, and I’ve tried them all.
They all generally work, but several had high error rates, some had issues with repeated commands, and some would pick up random noise from the environment and pass it as a valid command. I fiddled with the settings and even wrote code to handle these problems, but never got a satisfactory result.
The one library I had no problems with was IRremote, which is what we’ll use for this tutorial. Go to the Library manager and install it.
Note: check out the IRremote library on Github.
Example ESP32 Program Using a Universal Infrared TV Remote
In this example, we’ll use a basic universal TV remote to control your ESP32.
First, create a New Sketch, then add a .h file by selecting ‘New Tab’ via the ‘…’ menu on the top right of your Arduino IDE. Call it irremote.h.
Use this below code for your .ino file. The IR code is tucked away in the following separate .h file, compartmentalizing your software to keep it cleanly organized.
//our library

#include "irremote.h"

void setup() {

  //small delay for proper power up

  delay(150);

  Serial.begin(115200);//debug

  IR_setup();

}

void loop() {

  IR_loop();

}
Then, add the below code to your irremote.h file. I would recommend taking some time to look through this code, the comments do a good job of explaining what is happening!
/*
//choose your protocol
#define EXCLUDE_UNIVERSAL_PROTOCOLS
#define DECODE_DENON        // Includes Sharp
#define DECODE_JVC
#define DECODE_KASEIKYO
#define DECODE_PANASONIC    // alias for DECODE_KASEIKYO
#define DECODE_LG
#define DECODE_NEC          // Includes Apple and Onkyo
#define DECODE_SAMSUNG
#define DECODE_SONY
#define DECODE_RC5
#define DECODE_RC6
*/


#define EXCLUDE_EXOTIC_PROTOCOLS
#define DECODE_STRICT_CHECKS                             //helps with false readings
#define RECORD_GAP_MICROS 10000                          //helps with false readings
#define TOLERANCE_FOR_DECODERS_MARK_OR_SPACE_MATCHING 5  //helps with false readings


//for LED blip output (optional)
#define IR_FEEDBACK_LED_PIN 32
#define FEEDBACK_LED_IS_ACTIVE_LOW


#include <IRremote.hpp>


//pin for IR receiver
#define RECEIVER_PIN_1 19


//used for noise detection
#define MIN_BIT_LENGTH 32


void IR_setup() {


  IrReceiver.begin(RECEIVER_PIN_1, ENABLE_LED_FEEDBACK);


  Serial.print("code version 1-8-2024");
  Serial.print("\nReady to receive remote IR signals ");
  Serial.print("at pin ");
  Serial.println(RECEIVER_PIN_1);  //declares digital pin to receive IR signal
}


//clear out last IR readings
void IR_flush() {
  while (IrReceiver.decode())  //flush out IR buffer
    IrReceiver.resume();  //start receiving new IR commands
}


//call this function if a person pushes mute/unmute too fast on the remote, etc.
void IR_debounce() {
  //debounce
  delay(650);
  IR_flush();
}


void IR_loop() {
volatile uint32_t receivedHex = 0;


  //start decoding IR command
  if (IrReceiver.decode()) {


    //get rid of noise/junk
    if (IrReceiver.decodedIRData.numberOfBits < MIN_BIT_LENGTH) {
      IrReceiver.resume();  // Ignore short or invalid signals
      return;
    }


    receivedHex = IrReceiver.decodedIRData.decodedRawData;
    Serial.print("\n\n");
    IrReceiver.printIRResultShort(&Serial);  //print data to Serial Monitor to help with debugging


    //if signal has multiple repeats, do something
    //uncomment 'return' if you want to ignore repeat signals
    if (IrReceiver.decodedIRData.flags & (IRDATA_FLAGS_IS_REPEAT)) {
      Serial.print("\nrepeated command, re-using last hex value");
      IrReceiver.resume();
      //return;
    }


    //if command X received, then do Y
    switch (receivedHex) {
      case 0xFD020707:
        Serial.print("\npower toggle: Universal Remote");
        break;
      case 0xF8070707:
        Serial.print("\nvolume up");
break;
      case 0xF40B0707:
        Serial.print("\nvolume down");
        break;
      case 0xF00F0707:
        Serial.print("\nmute / vol push");  //volume push on main remote
        break;
      case 0xED120707:
        Serial.print("\nchannel up - universal");
        break;
      case 0xEF100707:
        Serial.print("\nchannel down - universal");
        break;
      case 0xE0E0D629:
        Serial.print("\nchannel list - Universal #2");
        break;
      case 0x946B0707:
        Serial.print("\nchannel list");
        break;
      case 0x9F600707:
        Serial.print("\nup - Universal");
        break;
      case 0x9E610707:
        Serial.print("\ndown - Universal");
        break;
      case 0x9A650707:
        Serial.print("\nleft - Universal");
        break;
      case 0x9D620707:
        Serial.print("\nright - Universal");
 break;
      case 0xFB040707:
        Serial.print("\ndigital 1");
        break;
      case 0xFA050707:
        Serial.print("\ndigital 2");
        break;
      case 0xF9060707:
        Serial.print("\ndigital 3");
        break;
      case 0xF7080707:
        Serial.print("\ndigital 4");
        break;
      case 0xF6090707:
        Serial.print("\ndigital 5");
        break;
      case 0xF50A0707:
        Serial.print("\ndigital 6");
        break;
      case 0xF30C0707:
        Serial.print("\ndigital 7");
        break;
      case 0xF20D0707:
        Serial.print("\ndigital 8");
        break;
      case 0xF10E0707:
        Serial.print("\ndigital 9");
        break;
      case 0xEE110707:
        Serial.print("\ndigital 0");
        break;
case 0x66990707:
        Serial.print("\nTV - universal");
        break;
      case 0xE51A0707:
        Serial.print("\nmenu - universal");
        break;
      case 0xE01F0707:
        Serial.print("\ninfo/options - universal");
        break;
      case 0xD22D0707:
        Serial.print("\nexit - universal");
        break;
      case 0xBA450707:
        Serial.print("\nrewind - universal");
        break;
      case 0xB8470707:
        Serial.print("\nplay - universal");
        break;
      case 0xB7480707:
        Serial.print("\nfast forward - universal");
        break;
      case 0xB54A0707:
        Serial.print("\npause - universal");
        break;
      case 0xB6490707:
        Serial.print("\nrecord - universal");
        break;
      case 0xDC230707:
        Serial.print("\n-hyphen");
        break;
      case 0xE0E0C43B:
        Serial.print("\n-hyphen");
        break;
      case 0xE0E0FC03:
        Serial.print("\nE-Manual");
        break;
      case 0xC03F0707:
        Serial.print("\nE-Manual");
        break;
      case 0xE0E0C03F:
        Serial.print("\nSleep");
        break;
      case 0xFC030707:
        Serial.print("\nSleep");
        break;
      case 0xE0E07C83:
        Serial.print("\npic size");
        break;
      case 0xC13E0707:
        Serial.print("\npic size");
        break;
      case 0xE0E0A45B:
        Serial.print("\nCC/VD");
        break;
      case 0xDA250707:
        Serial.print("\nCC/VD");
        break;
      case 0xB9460707:
        Serial.print("\nstop - universal");
        break;
      case 0x97680707:
        Serial.print("\nok / enter - universal");
        break;
      case 0x86790707:
        Serial.print("\nhome");
        break;
      case 0xEC130707:
        Serial.print("\nreturn / go back - universal");
        break;
      case 0xA7580707:
        Serial.print("\nreturn / go back");
        break;
      case 0xFE010707:
        Serial.print("\ninput - universal");
        break;
      case 0x936C0707:
        Serial.print("\nred - universal");
        break;
      case 0xEB140707:
        Serial.print("\ngreen - universal");
        break;
      case 0xEA150707:
        Serial.print("\nyellow - universal");
        break;
      case 0xE9160707:
        Serial.print("\nblue - universal");
        break;
    }
  }
  IrReceiver.resume();  // Receive the next value
}
Modify the Code for Your Specific ESP32 Setup
There are a few things you need to change to match your hardware before you can run the code.
First, choose the IR feedback pin (an LED), and define whether it’s active low or active high. This LED will blip whenever IR data is received, helping you with debugging. This feedback LED is optional, so comment out to disable if not needed.
//for LED blip output (optional)

#define IR_FEEDBACK_LED_PIN 32

#define FEEDBACK_LED_IS_ACTIVE_LOW
The second thing to change is the IR receive pin. The IR sensor output pin is connected here to your ESP32.
//pin for IR receiver

#define RECEIVER_PIN_1 19
If you want to decode a protocol other than Universal, go to the top of the .h file and uncomment your desired protocol(s).
Once changes are made, compile to verify there are no errors.
First Time Running The Code and Debugging
If it compiles fine, run your code and see what happens. Push some buttons on your remote.
If nothing happens when you use your TV remote, you probably entered the wrong receiver pin. Verify the pin in your header file and try again.
If you are receiving hex commands that don’t match those in the .h file, this is most likely because your receiver or remote is different from what I used. Just update the .h file to the IR commands you are receiving.
Example Output
The following output below was copy/pasted from my Serial Monitor while pushing various buttons on my universal TV remote (1,2,3,4,5,6,up,down,left,right). You’ll also see “repeated command” which can happen by holding the button down.
The output format is as follows:
Protocol=Samsung Address=0x707 Command=0x4 Raw-Data=0xFB040707 32 bits LSB first
The Protocol is the TV remote encoding. The received command is the Raw-Data hex code:
0xFB040707
My received output:
ets Jul 29 2019 12:21:46

rst:0x1 (POWERON_RESET),boot:0x13 (SPI_FAST_FLASH_BOOT)

configsip: 0, SPIWP:0xee

clk_drv:0x00,q_drv:0x00,d_drv:0x00,cs0_drv:0x00,hd_drv:0x00,wp_drv:0x00

mode:DIO, clock div:1

load:0x3fff0030,len:1344

load:0x40078000,len:13964

load:0x40080400,len:3600

entry 0x400805f0

E (101) psram: PSRAM ID read error: 0xffffffff

code version 1-8-2024

Ready to receive remote IR signals at pin 19

Protocol=Samsung Address=0x707 Command=0x4 Raw-Data=0xFB040707 32 bits LSB first

digital 1

Protocol=Samsung Address=0x707 Command=0x4 Repeat gap=46850us Raw-Data=0xFB040707 32 bits LSB first

repeated command, re-using last hex value

digital 1

Protocol=Samsung Address=0x707 Command=0x5 Raw-Data=0xFA050707 32 bits LSB first

digital 2

Protocol=Samsung Address=0x707 Command=0x5 Repeat gap=46800us Raw-Data=0xFA050707 32 bits LSB first

repeated command, re-using last hex value

digital 2

Protocol=Samsung Address=0x707 Command=0x6 Raw-Data=0xF9060707 32 bits LSB first

digital 3

Protocol=Samsung Address=0x707 Command=0x6 Repeat gap=46800us Raw-Data=0xF9060707 32 bits LSB first

repeated command, re-using last hex value

digital 3

Protocol=Samsung Address=0x707 Command=0x8 Raw-Data=0xF7080707 32 bits LSB first

digital 4

Protocol=Samsung Address=0x707 Command=0x9 Raw-Data=0xF6090707 32 bits LSB first

digital 5

Protocol=Samsung Address=0x707 Command=0xA Raw-Data=0xF50A0707 32 bits LSB first

digital 6

Protocol=Samsung Address=0x707 Command=0xA Repeat gap=46800us Raw-Data=0xF50A0707 32 bits LSB first

repeated command, re-using last hex value

digital 6

Protocol=Samsung Address=0x707 Command=0x60 Raw-Data=0x9F600707 32 bits LSB first

up - Universal

Protocol=Samsung Address=0x707 Command=0x60 Repeat gap=46800us Raw-Data=0x9F600707 32 bits LSB first

repeated command, re-using last hex value

up - Universal

Protocol=Samsung Address=0x707 Command=0x61 Raw-Data=0x9E610707 32 bits LSB first

down - Universal

Protocol=Samsung Address=0x707 Command=0x61 Repeat gap=46800us Raw-Data=0x9E610707 32 bits LSB first

repeated command, re-using last hex value

down - Universal

Protocol=Samsung Address=0x707 Command=0x65 Raw-Data=0x9A650707 32 bits LSB first

left - Universal

Protocol=Samsung Address=0x707 Command=0x65 Repeat gap=46800us Raw-Data=0x9A650707 32 bits LSB first

repeated command, re-using last hex value

left - Universal

Protocol=Samsung Address=0x707 Command=0x62 Raw-Data=0x9D620707 32 bits LSB first

right - Universal

Protocol=Samsung Address=0x707 Command=0x62 Repeat gap=46850us Raw-Data=0x9D620707 32 bits LSB first

repeated command, re-using last hex value

right - Universal
Extra Features and Software Noise Reduction
Look at the top of the irremote.h file for additional features.
First there is:
#define EXCLUDE_EXOTIC_PROTOCOLS
Unless you are using some obscure air conditioner remote or whatever, better to just save memory and keep this line.
When I first started using this library I was still getting the occasional false reading.
There are four settings you’ll find in the irremote.h file as shown below. I tweaked these values until my noise problems went away with my particular setup.
If you’re not getting commands occasionally, or you’re still getting bad readings, fiddle around with these values until it works for you. Refer to the IRremote library for further details.
#define DECODE_STRICT_CHECKS

#define RECORD_GAP_MICROS 10000

#define TOLERANCE_FOR_DECODERS_MARK_OR_SPACE_MATCHING 5

//used for noise detection

#define MIN_BIT_LENGTH 32
You may want to detect repeated commands, for example if the volume button is being held down.
Here is how to do it:
//detect repeated commands
//note: the Samsung remote I'm using transmits 0xE9E70E8C whenever a command is repeated
if(receivedHex==0xE9E70E8C || (IrReceiver.decodedIRData.flags & (IRDATA_FLAGS_IS_REPEAT)))
{
Serial.print("\nrepeated command");
}
Now, remember at the beginning I promised you can use your TV remote to control your robot?
Find this line:
case 0x9A650707:
        Serial.print("\nleft - Universal");
        Break;
And change it to this:
  case 0x9A650707:
        robot_turn_left();//your function to move your robot here
        break;
Done!


