ESP32 Deep Sleep Timer Wake-Up [Guide + Code]
Are you wasting battery power when you could be using an ESP32 timer wake-up?
The ability to use timers to wake up the ESP32 from deep sleep mode is one of its handy features. It’s known as a “timer wake-up,” and enables you to put the board to sleep for set intervals.
This way, your ESP32 can read the sensor data and then go to sleep instead of staying awake and burning up precious battery power.
In this lesson, we’ll examine the ESP32 timer wake-up from deep sleep mode in detail.
We’ll go over its advantages and implementation. By the end of this lesson, you’ll be able to:
- Put ESP32 board in deep sleep mode
- Use a timer to wake up ESP32 from deep sleep
Hardware Required
- ESP32 Dev Module
- USB Cable

Understanding ESP32 Deep Sleep Timer Wake-Up
Using a built-in timer, the ESP32 timer wake-up enables the microcontroller to go into deep sleep and periodically wake up at set intervals.
The ESP32 uses minimal power while in deep sleep mode, thus prolonging the battery life. When the timer runs out, the ESP32 wakes up, runs a specified job or code, and then goes back to deep sleep.
Benefits of Using ESP32 Deep Sleep Timer Wake-Up
| Benefits of ESP32 Timer Wake-Up | |
|---|---|
| Power Efficiency | The primary advantage of timer wake-up is that it can make battery life last longer in applications that use batteries. The ESP32's power consumption is minimized, resulting in longer operating lives, by minimizing the amount of time it is in active mode. |
| Just the right Interval | You need your sensor data - but how often do you really need it? Timer wake-ups allow you to space out the actions your microcontroller takes at intervals just right for your specific application - saving power and reducing unneeded data. |
| Code Simplified | The code for a timer wake-up is super easy! |
Hardware Setup
You will only need an ESP32 Dev Module (any board ESP32 dev module will work) and a USB cable. Connect the ESP32 Dev Module to the computer via a USB cable.
Programming Electronics Academy members, check out the Internet of Things (IoT) Course to start programming your own IoT devices.
Not a member yet? Sign up here.
Overview of a Basic Timer Wake-Up Program
A few steps must be taken in order to implement a timer wake-up on the ESP32. Let’s examine each step in detail:
1) Determine sleep interval
Determine the interval at which you want the device to wake up from a deep sleep when setting the timer. Based on the particular needs of your application, you can modify this interval. Find a balance between how long you stay up and how much energy you use.
2) Configure wake-up source
There are various different ways to wake up your ESP32 (timer, external, and touch). In this lesson, we select the timer wake-up method, which employs the ESP32’s RTC timer for the job.
3) Enabling deep sleep
Start the ultra-low power mode to put the ESP32 into deep sleep.
4) Waking up
When the timer’s set interval is reached, it instructs the timer to wake up and perform the necessary actions before entering deep sleep mode again.
Whenever the ESP32 wakes up from deep sleep, the entire sketch is run again. Just like pressing the reset button, but anything saved in the RTC memory will be recovered.

Arduino Code
Here is the minimal code to start using an ESP32 timer wake-up. We’ll go through it line-by-line below:
int TIME_TO_SLEEP = 5;  // Time ESP32 will go to sleep (in seconds)

unsigned long long uS_TO_S_FACTOR = 1000000;  // Conversion factor for microseconds to seconds

RTC_DATA_ATTR int bootCount = 0;  // Number of reboots

void setup() {

  Serial.begin(115200);  // Start serial communication at 115200 baud rate

  ++bootCount;  // Add 1 to the current value of bootCount

  Serial.println("Boot number: " + String(bootCount));  // print the value of bootCount on the serial monitor

  Serial.println("Going to sleep now");  // Print when the ESP is about to go into deep sleep mode

  /* Now we wrap up for Deep Sleep - I hope you did everything you needed to... */

  esp_sleep_enable_timer_wakeup(TIME_TO_SLEEP * uS_TO_S_FACTOR);  // Set up timer as the wake-up source and set sleep duration to 5 seconds

  Serial.flush();  // Make sure the serial port is empty

  esp_deep_sleep_start();  // Start the deep sleep mode

}

void loop() {

  // This is not going to be called

}
Declare Required Variables (before setup)
The time, in seconds, that the ESP32 must be in deep sleep is specified by TIME_TO_SLEEP. However, the ESP32 measures time in microseconds, so we introduce uS_TO_S_FACTOR, which is the multiplier to convert time from seconds to microseconds.
int TIME_TO_SLEEP = 5;  // Time ESP32 will go to sleep (in seconds)

unsigned long long uS_TO_S_FACTOR = 1000000;  // Conversion factor for microseconds to seconds
Another variable we introduce is bootCount, which stores how many times the ESP32 has booted. For the code provided in this lesson, the first boot is triggered by default, and all the boots that follow are triggered by the timer.
RTC_DATA_ATTR int bootCount = 0; // Number of reboots
You might also notice RTC_DATA_ATTR written next to bootCount. This tells the ESP32 to save the value of bootCount in the RTC memory, so it is not lost when the ESP32 sleeps.
Do Your Stuff Here
You may be used to putting the majority of your code in the Arduino loop() function, but in this example, we’ll be putting the bulk of our code in the setup() function.
At the top of setup() is the code we want our ESP32 to run while it is awake. In this example, we start serial communication, increment the boot count, and print a few messages on the serial monitor.
void setup() {

  Serial.begin(115200);  // Start serial communication at 115200 baud rate

  ++bootCount;  // Add 1 to the current value of bootCount

  Serial.println("Boot number: " + String(bootCount));  // print the value of bootCount on the serial monitor

  Serial.println("Going to sleep now");  // Print when the ESP is about to go into deep sleep mode

  /* Now we wrap up for Deep Sleep - I hope you did everything you needed to... */
Configure Wake-up Source and Sleep Duration
The esp_sleep_enable_timer_wakeup() function is used to choose the RTC timer as the wakeup source. With this function, you must provide the sleep duration in microseconds.
In this example, we’re making the ESP32 sleep for a duration of five seconds, and we’ll use the multiplier we declared at the start of the code to convert the seconds to microseconds.
esp_sleep_enable_timer_wakeup(TIME_TO_SLEEP * uS_TO_S_FACTOR); // Set up timer as the wake-up source and set sleep duration to 5 seconds
Prepare for Sleep
Once you’ve set the wake-up source, now you need to do your housekeeping and make sure everything is wrapped up for sleep.
If there are any peripheral devices connected, before going into deep sleep, take the appropriate safety measures, including turning off any unused peripherals, closing any open connections, and putting sensitive information in non-volatile memory to prevent loss during the low-power stage.
In this example, we do not have any devices connected to the ESP32 board, and we have already instructed the ESP32 to save the bootCount variable in the non-volatile RTC memory. However, we need to clear out the serial port.
Serial.flush(); // Make sure the serial port is empty
Enter Deep Sleep Mode
The moment of truth has come, when you put your ESP32 to a restful sleep. 💤
The ultra-low power mode is enabled by using the esp_deep_sleep_start() function.
esp_deep_sleep_start(); // Start the deep sleep mode
Step-by-Step Instructions
- Launch the Arduino IDE.
- Connect the ESP32 board to your computer with a USB cable.
- From the Tools menu, select the board according to which board you are using. For me, it was the ESP32 Dev Module.

- Select the Serial Port to which the ESP32 is connected.

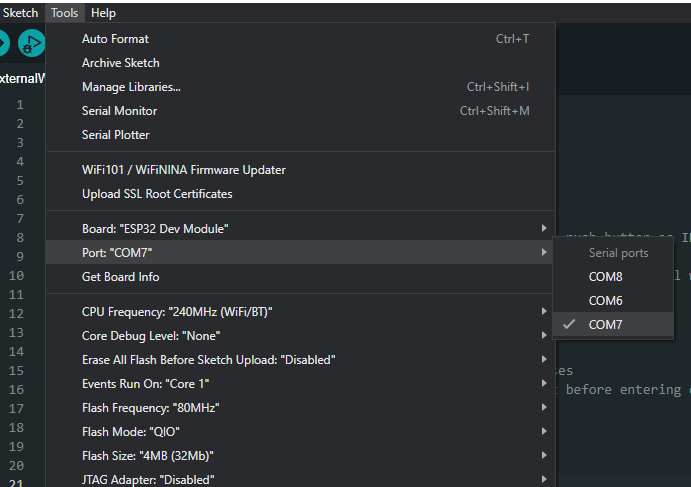
If you see multiple ports (usually shown as COM if you’re on a PC, or dev.cu on a Mac) and you’re unsure which one corresponds to your ESP32 board, that’s fine. Simply disconnect the ESP32 board from the computer and open the Tools menu again. Whichever option was available before but is not available now in the menu is the serial port your ESP32 board was connected to. Connect it again and choose that serial port.
- Use the code provided above. You can copy and paste it in the Arduino IDE if you like, but we encourage typing it out yourself! This will familiarize you with the functions and get you into the habit of writing structured code.
- After selecting the appropriate board and port, upload the code either by clicking the upload button in the top left corner of the window (or by pressing Ctrl+U on a PC or Cmd+U on a Mac).
- When the code is uploaded, open the Serial Monitor window either by clicking on the Serial Monitor button in the top right corner of the window or by pressing Ctrl+Shift+M on a PC or Cmd+Shift+M on a Mac. The Serial Monitor will show something similar to this:
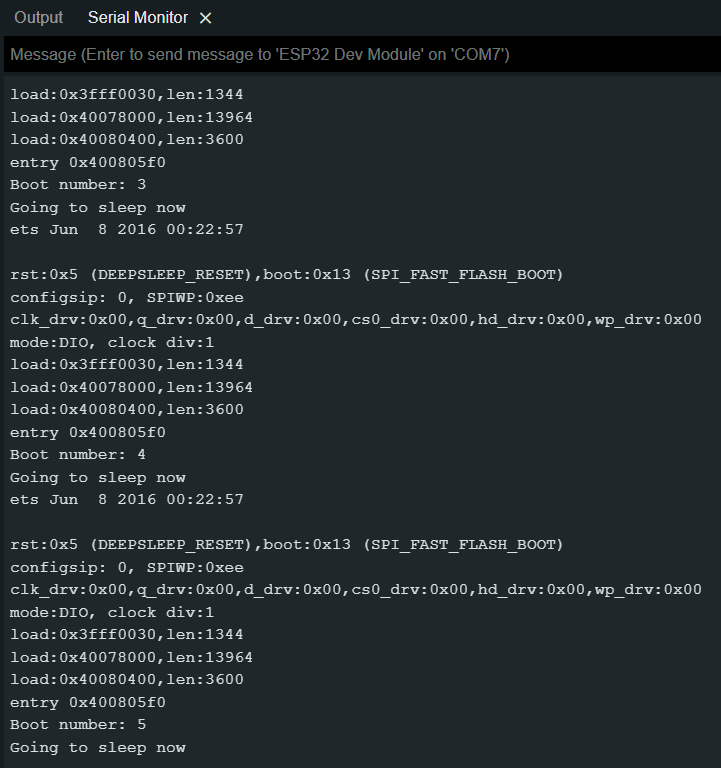
You will see how the ESP32 is booting again and again, with the boot number count going up by one with each boot.
Try On Your Own Challenges
Now that you have seen first-hand how to put the ESP32 into deep sleep mode, now’s your chance to reinforce what you have learned:
- Write a program that puts an ESP32 into deep sleep for a longer period of time. A minute? Five minutes? Ten minutes? How long can you go?
- Write a program that puts an ESP32 into deep sleep for 15 seconds. But what if you did this in the loop() function? Think it would work?
Where to go from here
We have several articles on ESP32 Deep Sleep mode:
Programming Electronics Academy members, check out the Wireless Thermometer Project for practice building useful IoT devices.
Not a member yet? Sign up here.


