ESP32 Deep Sleep Touch Wake-Up [Guide + Code]
In this lesson, we delve into how to use the ESP32 capacitive touch pins to wake up the microcontroller from Deep Sleep.
It’s pretty easy – in fact, it’s only a couple lines of code (that we will walk through in detail below).
The basic concept is simple – you designate some pins to be “touch buttons”. When something interacts with the touch pin (like a person’s finger), the ESP32 is roused from its deep sleep mode.
The beauty here is that no physical button is required, AND you can attach things to the touch pin to extend their sensory field. You can read this post if you’re interested in how capacitive touch pins work under the hood.
By the end of this lesson, you will have learned how to put an ESP32 into deep sleep mode and wake it up using the built-in touch sensor.
Hardware Required
- ESP32 Dev Module
- USB Cable
- 2x jumper wires

Which Pins can be used as ESP32 Touch Wake-up?
There are specific GPIO pins that can be used to trigger the touch wake-up.
On some common ESP32 development boards, these are pins 4, 2, 15, 0, 13, 12, 14, 27, 33, and 32.

The pin numbers may very well be different depending on the ESP32 dev board you are using, so be sure to check your specific board’s pinout diagram.
Usually, the pinout diagram will identify them for you.
In the diagram above, they’re labeled as TOUCHX in pink. Where X is the identification number of the touch sensor connected to that pin.
For example, touch sensor 1 is connected to GPIO 0, touch sensor 3 is connected to GPIO 15, and so on. In total, there are ten touch sensors in the ESP32, and 14 on ESP32 S2 and S3.
Basic ESP32 Touch Wake-Up Program
We have put together the minimum code to test the touch wake-up feature of the ESP32.
Give the code a read once, and then we’ll explain the code line-by-line.
Code
int THRESHOLD = 40; // Sensitivity threshold

RTC_DATA_ATTR int bootCount = 0; // Number of reboots

touch_pad_t touchPin; // GPIO pin that triggered the wake-up

void setup() {

Serial.begin(115200); // Start serial communication at 115200 baud rate

++bootCount; // Add 1 to the current value of bootCount

Serial.println("Boot number: " + String(bootCount)); // Print the value of bootCount on the serial monitor

delay(1000); //Take some time to open up the Serial Monitor

touchPin = esp_sleep_get_touchpad_wakeup_status(); // Store which touch sensor was activated from wake-up data

if (touchPin == 3) {

Serial.println("Touch detected on GPIO 15");

} // Check which touch sensor triggered the wake-up and display its corresponding GPIO pin number

else if (touchPin == 7) {

Serial.println("Touch detected on GPIO 27");

}

else

{

Serial.println("Wakeup not by touchpad");

}

touchSleepWakeUpEnable(T3, THRESHOLD); // Enable touch sensor 3 as wake-up source

touchSleepWakeUpEnable(T7, THRESHOLD); // Enable touch sensor 7 as wake-up source

Serial.println("Preparing to sleep now"); // Print when the ESP is about to go into deep sleep mode

Serial.flush(); // Make sure the serial port is empty

esp_deep_sleep_start(); // Enable the deep sleep mode

}

void loop() {

//This will never be reached

}
Declare Required Variables (before setup)
At the very start of this Arduino sketch, we declare three variables that will be used later in the code.
The first variable we declare is THRESHOLD, which will basically be the sensitivity of the touch sensor that we’ll use. The higher the value of THRESHOLD, the more sensitive the touch sensor will be. You can choose a threshold value in the range of 0 to 100. However, for this lesson, we have set this value to 40.
The second variable is bootCount, which is a counter for how many times the ESP32 has booted. Note that while declaring the bootCount variable, we added the prefix RTC_DATA_ATTR. This saves the value of bootCount in the RTC memory, which is not wiped during deep sleep mode.
The third and last variable we declare is touchPin. This will be used to store the number of the touch sensor that triggers the wake-up.
int THRESHOLD = 40;   // Sensitivity threshold
RTC_DATA_ATTR int bootCount = 0;  // Number of reboots

touch_pad_t touchPin;  // GPIO pin that triggered the wake-up
Setup()
In the next chunk of code, you can program what you want your ESP32 to do while it is awake. In this lesson, we start the serial communication at a baud rate of 115200, increment the value of bootCount by one, and print it on the serial monitor window.
void setup() {

  Serial.begin(115200);  // Start serial communication at 115200 baud rate

  ++bootCount;  // Add 1 to the current value of bootCount

  Serial.println("Boot number: " + String(bootCount));  // Print the value of bootCount on the serial monitor

  delay(1000);  //Take some time to open up the Serial Monitor
Determine ESP32 Wake-Up Cause
The function esp_sleep_get_touchpad_wakeup_status() returns which touch pad triggered the wakeup. Keep in mind that the touch pad number IS NOT the same as the GPIO number. So you have to match up the touch pad number with the GPIO pin number to determine which GPIO pin triggered the wake-up.
Here, we use an if/else statement to check the touch pad numbers, and serially print off the corresponding GPIO number to the serial monitor.
touchPin = esp_sleep_get_touchpad_wakeup_status(); // Store which touch sensor was activated from wake-up data

if (touchPin == 3) {

Serial.println("Touch detected on GPIO 15");

} // Check which touch sensor triggered the wake-up and display its corresponding GPIO pin number

else if (touchPin == 7) {

Serial.println("Touch detected on GPIO 27");

}

else

{

Serial.println("Wakeup not by touchpad");

}
Set ESP32 Touch Wake-Up Source
Next, we let the ESP32 know which GPIO pins will be poking it awake, quite literally. 👉
touchSleepWakeUpEnable() is a built-in function you can use in the Arduino IDE that appoints a GPIO pin as a “trustworthy guard” to awaken it whenever something is up (AKA when it senses a capacitance change above the set threshold).
This function accepts two arguments. The first is the touch pad (AKA touch sensor) number, and the second is the threshold for that sensor.
Simply check what number touch sensor corresponds to the GPIO you want to use. In this lesson, we have used GPIO 15 (touch sensor 3) and GPIO 27 (touch sensor 7) as wake-up sources.
Notice the “T” used in front of the touch sensor number. This is a reserved keyword in the ESP32 library that will map the touch sensor number to a specific pin corresponding to the type of ESP32 development board you have selected in the Arduino IDE.
touchSleepWakeUpEnable(T3, THRESHOLD);  // Enable touch sensor 3 as wake-up source

touchSleepWakeUpEnable(T7, THRESHOLD);  // Enable touch sensor 7 as wake-up source
Prepare for sleep
The next thing we need to do is some housekeeping and prepare the ESP32 for sleep. You know – it seems like the ESP32 is very lazy and we have to do all its chores. 😑
You’ll want to make sure that any connected peripherals are turned off, any sensitive information is stored in the non-volatile memory, and any open connections are closed.
In this example, we do not have any devices connected to the ESP32 board, and we have already instructed the ESP32 to save the bootCount variable in the non-volatile RTC memory.
However, we could clear out the serial port buffer. We’ll use the flush() function, which makes sure that the transmission of outgoing serial data is completed.
Serial.flush(); // Make sure the serial port is empty
Enable ultra-low power mode
Ultra-low power mode sounds like something you might hear Iron Man say in a movie, but it’s a standard feature of the ESP32 .
In one line, we can put our ESP32 to sleep:
esp_deep_sleep_start(); // Start the deep sleep mode
This gets the microcontroller switched to Deep Sleep power-saving mode and completes our work.
Hardware Setup
- Identify GPIO pin
Connect the jumper wires on GPIOs 15 and 27. The task of detecting touch events will fall to these pins.
- Connect ESP32 to your computer
Connect the ESP32 Dev Module to your computer via the USB cable.
Step-by-Step Instructions
- Launch the Arduino IDE
- Connect the ESP32 board to your computer with a USB cable.
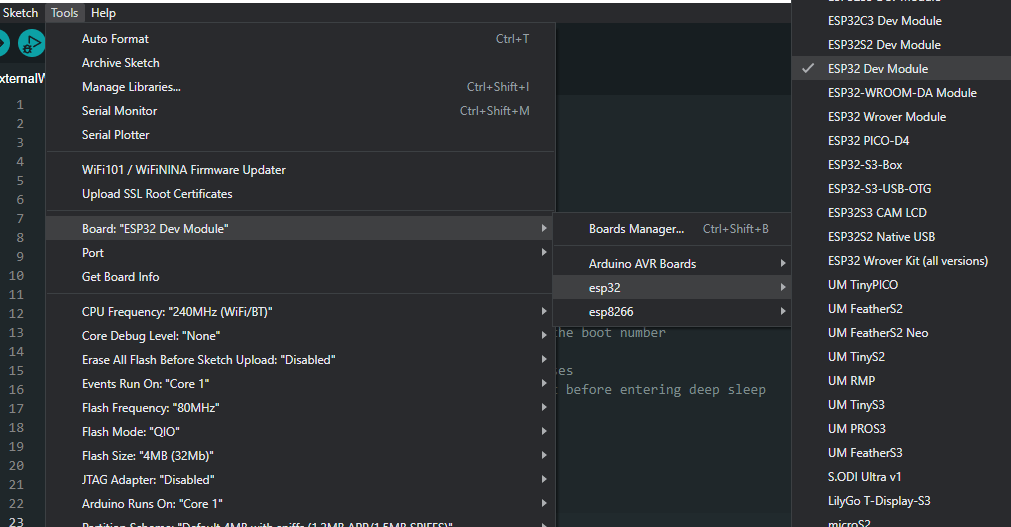
- From the Tools menu, select the board according to which board you are using. For me, it was the ESP32 Dev Module.

- Select the Serial Port to which the ESP32 is connected.
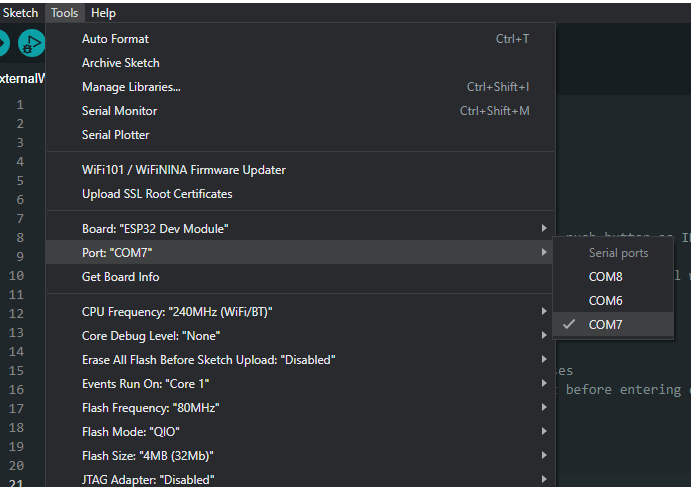
If you see multiple ports (usually shown as COM if you’re on a PC, or dev.cu on a Mac) and you’re unsure which one corresponds to your ESP32 board, that’s fine. Simply disconnect the ESP32 board from the computer and open the Tools menu again. Whichever option was available before but is not available now in the menu is the serial port your ESP32 board was connected to. Connect it again and choose that serial port.
- Use the code provided above. You can copy and paste it in the Arduino IDE if you like, but we encourage typing it out yourself! This will familiarize you with the functions, get you into the habit of writing structured code, and help you become the ultra-pro-max programmer the world has never seen.
- After selecting the appropriate board and port, upload the code either by clicking the upload button in the top left corner of the window (or by pressing Ctrl+U on a PC or Cmd+U on a Mac).
- When the code is uploaded, open the Serial Monitor window either by clicking on the Serial Monitor button in the top right corner of the window or by pressing Ctrl+Shift+M on a PC or Cmd+Shift+M on a Mac. The Serial Monitor will show something similar to this:
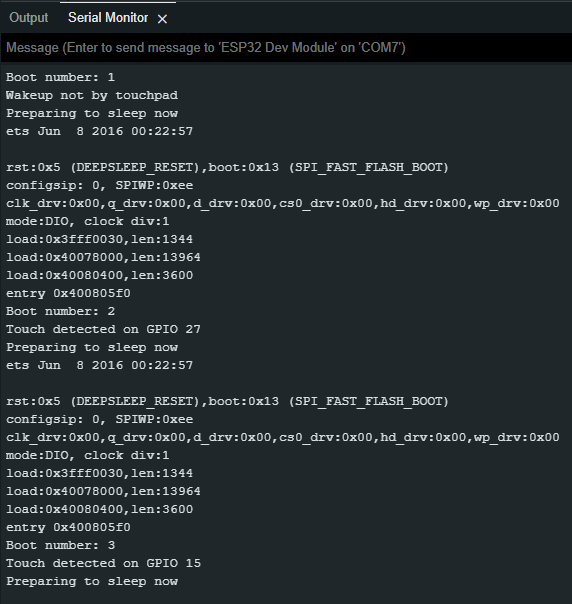
You should see the boot number, which is the number of times the ESP32 has started, and the GPIO pin that caused the touch wake-up.
The first boot is by default, which occurs when the ESP32 is powered. Every boot after that is a result of you poking the ESP32 awake!
Your Journey Begins
As you set out on your journey through the ESP32 universe, don’t forget about these fun and useful capacitive touch pins.
With a simple touch, you’re breathing life into your microcontroller, awakening it from its digital slumber. This feature gives you countless opportunities to develop projects that are not only smart but also interactive, regardless of your level of coding expertise.
Try on Your Own Challenges Related to ESP32 Touch Wake-Up
- Write a program that uses all ten touch sensors. Will you be able to handle them all? 😅
- Edit the provided code with two touch wake-up sources to control two LEDs. Switch on a different LED for each touch sensor to indicate which GPIO caused the wake-up. This can also be used as a buzzer in quizzes. You can add as many as ten LEDs, depending on how many participants there are in the quiz.
Where to go from here
If you are interested in learning more about ESP32 deep sleep, be sure to check out these posts:
- A Practical Guide To ESP32 Deep Sleep Modes
- From Naptime To Action: ESP32 Deep Sleep With External Wake-Up
For more information about the capacitive touch features of the ESP32, check out this article:
If you want to jump start your Arduino programming skills and start programming your own neat stuff, check out our Arduino training program – it can take you from knowing nothing about Arduino programming to building your own projects.


