ESP32 WiFi Client mode for connecting to WiFi [explained for beginners]
You’re stoked to start programming a new microcontroller that uses WiFi, but not sure where to start? Enter ESP32 WiFi Client mode for the win! This tutorial will show you how to easily log onto a WiFi network with an ESP32 so you can start building your own custom IoT projects.
The standard Arduino library already contains all the code you’ll need to get your ESP32 microcontroller wirelessly connected to your home router, office network, or to other IoT devices.
This tutorial assumes you already know how to set up a basic ESP32 project in the Arduino IDE – but don’t worry, if you’re completely new to ESP32, check out this article to quickly get your ESP32 up and running your own code!
ESP32 WiFi Client mode basics
Once you’ve got your ESP32 hooked up, the next thing you’ll need to know is what WiFi connection mode you’re going to use for your project.
What’s a WiFi connection mode?
In the context of Arduino programming, WiFi connection modes determine how a device interacts with other devices over WiFi. You’re probably familiar with the process of logging into a WiFi network from a laptop, phone, or tablet. If not, we’re very impressed that you’ve found this article 😀
In these WiFi login scenarios, you can think of the tablet or laptop as a client of the WiFi network, and you can think of the WiFi router or access point as the host of the WiFi network.
The terms client and host can mean different things in different areas of networking, web technologies, and computing in general, so please bear with us for a moment while we use them specifically in the context of ESP32 WiFi connectivity.
Here’s a table that breaks down the two most common WiFi modes used by the ESP32:
| ESP32 WiFi Client Mode | ESP32 Access Point (AP) Mode |
|---|---|
| ESP32 connects to an existing WiFi network | ESP32 creates (hosts) a new WiFi network |
| Requires an existing WiFi router and login credentials to connect to it | ESP32 becomes like a WiFi router; other devices log into the ESP32 via WiFi |
| Arduino calls this Station (STA) mode | Arduino calls this Access Point (AP) mode |
| Relatively low CPU overhead | Requires more CPU overhead to manage client connections |
| ESP32 just loves itself some WiFi | Even in AP mode, ESP32 loves WiFi ! |

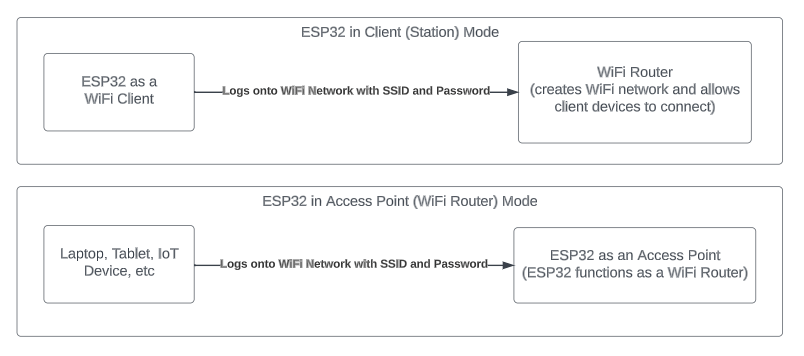
Client Mode Diagram
Here’s a diagram to visually explain how Client mode and Access Point mode differ:
If you want to get real savvy, you can also set up a mesh network with ESPNow, or combine any of the above with AP+Station mode for some real fun.
Any of these combinations can also run a web server, so you’ve got plenty of options to turn your ESP32 into a tiny wireless networking beast! But I’m getting ahead of myself…
Simplest Use Case for Connecting to WiFi + Example Code
The simplest way to start using ESP32 WiFi will generally be in Client Mode. As you saw in the table and diagram above, client mode is a good choice when you’ve already got an existing WiFi network available.
If you need to create a new WiFi network for your project, then Access Point mode is the right choice.
I’m willing to bet you’ve most likely already got WiFi available wherever you practice the brilliance of microcontroller wizarding, so all you need to do to get your ESP32 logged into your WiFi network is follow these next couple steps:
If you want to jump right in, paste the code below into your IDE, replace “mySSID” and “myPass” with your WiFi network name and password, and hit Upload. This will get you connected to a WiFi network and ready for the next steps shared at the bottom of this article.
Or continue reading for an explanation of what’s happening in this example.
#include <WiFi.h>  // use Arduino's standard WiFi library

const char* ssid     = "mySSID";  // your SSID (network name) here

const char* password = "myPass"; // your WiFi password here

void setup()

{

  Serial.begin(115200);  // start a serial connection to monitor the WiFi connection process

 // print the connection credentials to the serial monitor

  Serial.print("nConnecting to WiFi network: ");

  Serial.print(ssid);

  Serial.print(" ");

  WiFi.begin(ssid, password);  // WiFi.begin turns on WiFi on the ESP32, and defaults to client mode using the ssid and password constants defined above

  while (WiFi.status() != WL_CONNECTED) {  // this will loop until the connection is made, printing "..." to the serial monitor until the ESP32 connects to the WiFI access point

      delay(500);

      Serial.print(".");

  }

  // the next few lines will print out connection details to the serial monitor after the connection succeeds

 Serial.println("");

 Serial.print("Successfully connected to: ");

 Serial.print(ssid);

 Serial.print(" with IP address: ");

 Serial.println(WiFi.localIP());

 Serial.println("Exiting setup() ...");

} // end of setup() function

void loop(){

  // continually print out connection details to the serial monitor

  Serial.println("");

  Serial.print("Connected to SSID: ");

  Serial.print(ssid);

  Serial.print(" with IP address: ");

  Serial.print(WiFi.localIP());

  Serial.println("");

  Serial.println("Now go be an ESP32 IoT Device Building Hero!");

  delay(1000);

}
That’s it! If you’re keen eyed, you’ll notice that all the magic really happens within this one line:
WiFi.begin(ssid, password);
Here is the crazy part – that one line of code is what allows you to put your ESP32 into Client Mode. In fact WiFi.begin() not only turns on the WiFi, it also puts the ESP32 into client mode as default. They’ve thought of everything!
Let’s walk through the rest of it.
ESP32 WiFi Client Code mode walkthrough
First we included the Arduino WiFi.h library:
#include <WiFi.h>
This tells the Arduino IDE compiler to go find the WiFi.h library, and invisibly attach it to the top of our file. It essentially allows us to pull in the thousands of lines of code needed to make WiFi work right into our own Arduino sketch with just one #include statement!
Next we told the compiler that we’re going to use two variables: [ssid] and [password] to hold our WiFi login credentials:
const char* ssid     = "mySSID";  // your SSID (network name) here

const char* password = "myPass"; // your WiFi password here
Fun fact: these values are stored as pointers, allowing us to easily use credentials of varying lengths.
Programming Electronics Academy members, learn how data is stored in memory in the Using Pointers course.
Not a member yet? Sign up here.
What’s an SSID you may ask? It stands for “Service Set Identifier”, which is a boldly technical term that translates to: “the name of this WiFi network”. I don’t know about you, but for me all this jargon is just 🧑🍳!
Next we set up a Serial connection with a baud rate of 115200 so that the ESP32 can communicate connection information back to the Serial Monitor so that we can monitor the connection process:
Serial.begin(115200);  // start a serial connection to monitor the WiFi connection process

 // print the connection credentials to the serial monitor

  Serial.println("");

  Serial.print("Connecting to WiFi network: ");

  Serial.print(ssid);

  Serial.print(" ");
Here’s that Wifi.begin() call again. The ESP32 is now trying to establish a connection to the WiFi network and as mentioned before will put the board into Client Mode.
Next is a while statement that loops continuously until the WiFi connection has succeeded.
“WiFi.status() != WL_CONNECTED” evaluates to true until the ESP32 successfully connects to the access point, so this while loop will continue printing periods every 500 milliseconds until the WiFi connection is completed.
This is a common way of waiting for the WiFi connection to start, so don’t be surprised when you see a while loop like this in other ESP32 code 😉
  WiFi.begin(ssid, password);  // WiFi.begin turns on WiFi on the ESP32, and defaults to client mode using the ssid and password constants defined above

  while (WiFi.status() != WL_CONNECTED) {  // this will loop until the connection is made, printing "..." to the serial monitor until the ESP32 connects to the WiFI access point

      delay(500);

      Serial.print(".");

  }
Once the connection is made, we’ve got a few more Serial.print() statements to let us know that the connection was successful, and to report the IP address the ESP32 was assigned by the access point.
Serial.println("");

 Serial.print("Successfully connected to: ");

  Serial.print(ssid);

  Serial.print(" with IP address: ");

  Serial.println(WiFi.localIP());

 Serial.println("Exiting setup() ...");

}  // end of setup() function
Nothing really happens inside the loop() function of this program, except repeating the connection info, and reminding us that there’s so much more that can be built on top of the ESP32’s ability to connect wirelessly to other WiFi devices.
void loop(){

  // continually print out connection details to the serial monitor

  Serial.println("");

  Serial.print("Connected to SSID: ");

  Serial.print(ssid);

  Serial.print(" with IP address: ");

  Serial.print(WiFi.localIP());

  Serial.println("");

  Serial.println("Now go be an IoT Device Building Hero!");

    delay(1000);

}
If everything worked properly, you should see something like this in your Serial Monitor:

Next Steps – Communicating over WiFi with ESP32
Now that you’ve got your ESP32 connected to your WiFi network, you’re probably feeling overcome with awe at the raw power you possess to make awesome WiFi connected microcontroller projects (cue mad scientist laugh).
This feeling is entirely appropriate, and you should enjoy having pride in a job well done. But, eventually you will come to realize that you can’t really do anything with it yet.
Having a WiFi connection without a communication protocol is like having an expressway with no vehicles.
Programming Electronics Academy members, check out the Internet of Things (IoT) Course to start programming your own IoT devices.
Not a member yet? Sign up here.
Which begs the question: “What’s a communication protocol?”. And maybe also: “So we get to build hotrods now?”. And of course: “Can mine be electric??”.
Well to that I say: “Slow down – I can’t type that fast!”. Now that I think of it, my fingers do kinda hurt, so it’s probably best to deal with these topics in a separate article.
Check out “Communicating over WiFi with ESP32” where we’ll introduce several ways you can start putting your newfound WiFi powers to use, including TCP and UDP packets, Web Servers, MQTT, and more!


