Unique Arduino Lamp Retirement Gift (Member Project)
Creativity is great, but even better is having the skill to express that creativity in a useful and fun way.
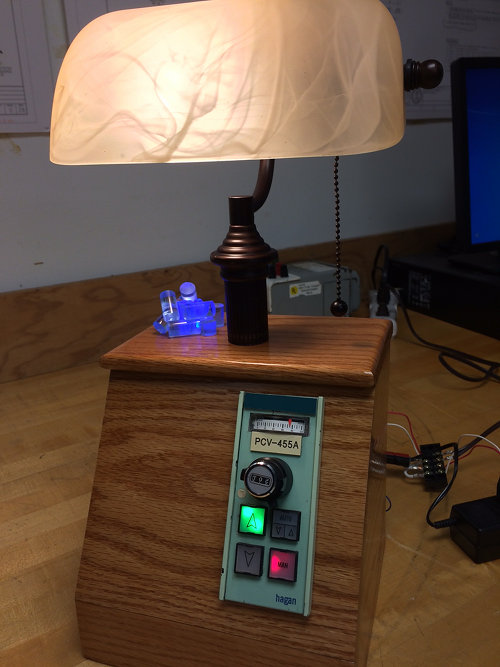
This unique Arduino lamp was created by James, a member of the Programming Electronics Academy as a retirement gift for a fellow employ of a power plant.
This project was submitted by one of our members. You can see more of our member's projects here.
Not a member yet? Sign up here.
James Writes:
“I was recently approached by a co-worker to create a unique retirement gift. They had some obsolete electronic modules, the idea was to make it function as a desk lamp.
The electronic module had 4 push buttons marked ” up, down, manual and auto”. A potentiometer and meter. I decided that when in the manual mode the up and down would simply turn the light on and off.
While in the auto mode, the lamp would turn on and off by using a photo-resistor and display its value via the meter and be trimmed by the potentiometer.
A pulsating blue glow below some plexiglass tubes would simulate a nuclear pile.”
James was kind enough to provide all the code and schematic for his project.
You have done an excellent job putting together a comprehensive course that is easy to understand and follow. It has helped me progress very quickly in my understanding how Arduino works.
James Greever
Arduino Lamp Code:
/* This program is to use a 4 button controller with POT and meter, to control a desk lamp.
 If AUTO is depressed, the CPU will look at a photosensor to determine light level and automatically lite
 the lamp. Its sensativity is determined by the POT and displayed on the meter.
 If MANUAL is depressed, the user must select the UP (ON) or DOWN (OFF) button to turn the lamp on or off.
 */

// 4 push buttons
int autoSw = 11; // white wire
int manSw = 12; // yellow wire
int manOnSw = 9; // green wire
int manOffSw = 10; // blue wire
// led lamps inside push buttons
int manlite = 7;
int manOnlite = 6;
int manOfflite = 5;
// auto has two sets of lights
int autolite1 =4;
int autolite2 =2;
// blue nuclear pile lite
int bluelite = 3;
int brightness =0;
int fadeAmount =5;
// light sensor, which can be adj with POT
int lightSensor = A1;
int lightVal = 0;
// relay that will control lamp
int lampRelay = 8;
int manual;


void setup(){
  pinMode(manSw, INPUT);
  pinMode(manOnSw, INPUT);
  pinMode(manOffSw, INPUT);
  pinMode(autoSw, INPUT);
  pinMode(lampRelay, OUTPUT);
  pinMode(manlite, OUTPUT);
  pinMode(manOnlite, OUTPUT);
  pinMode(manOfflite, OUTPUT);
  pinMode(autolite1, OUTPUT);
  pinMode(autolite2, OUTPUT);
  pinMode(bluelite, OUTPUT);
  digitalWrite(lampRelay, LOW);

}

void loop(){
  analogWrite(bluelite,brightness);
  brightness = brightness + fadeAmount;
  if (brightness == 0 || brightness == 255){
    fadeAmount = -fadeAmount;
  }
  // if the MAN switch was depressed and the UP/ON button then turn on lamp
  if (digitalRead (manSw) == HIGH){
    manual = 1;
  }
  if (manual == 1){
    Serial.println("turn lamp ON");
    digitalWrite (manlite, HIGH);
    digitalWrite (autolite1, LOW);
    digitalWrite (autolite2, LOW);
    MANUAL();
  }

  // if the AUTO switch was depressed then run sub-routine AUTOMATIC
  else if (digitalRead (autoSw) == HIGH){
    manual = 0;
  }
  if (manual == 0){
    Serial.println("autoSw");
    AUTOMATIC();
  }
  delay(30);
}


void AUTOMATIC(){
  // read the light sensor value and install in variable "lightVal"
  lightVal = analogRead(lightSensor);
  Serial.println(lightVal);
  delay (100);
  // now check to see if that value is < 500 and if yes, turn the lamp on
  if (lightVal < 360){     digitalWrite(lampRelay, HIGH);   }   // else if the value is > 500, then turn the lamp off
  else if (lightVal > 400){
    digitalWrite(lampRelay, LOW);
  }

}

void MANUAL(){
  if (digitalRead (autoSw) == HIGH){
    manual = 0;
  }
  if (manual == 0){
    digitalWrite (manOnlite, LOW);
    digitalWrite (manOfflite, LOW);
    digitalWrite (manlite, LOW);
    digitalWrite(autolite1, HIGH);
    digitalWrite(autolite2, HIGH);
    AUTOMATIC();
  }
  if (digitalRead (manOnSw) == HIGH & manual == 1){
    digitalWrite (manOnlite, HIGH);
    digitalWrite (manOfflite, LOW);
    digitalWrite (autolite1, LOW);
    digitalWrite (autolite2, LOW);
    digitalWrite (lampRelay, HIGH);
  }
  else if (digitalRead (manOffSw) == HIGH & manual == 1){
    digitalWrite (manOfflite, HIGH);
    digitalWrite (autolite1, LOW);
    digitalWrite (autolite2, LOW);
    digitalWrite (manOnlite, LOW);
    digitalWrite (lampRelay, LOW);
  }
}
Arduino Lamp Schematic:


