LiquidCrystal Library Functions Tour Part 1
The LiquidCrystal Library is the key to easily using LCDs with Arduino. What is great is that it comes preinstalled with your Arduino software – so you don’t have to download anything special to make it work.
The library is chock full of handy functions; functions for scrolling text to blinking the LCD screen – and pretty much everything in between. You will quickly find out that understanding how the cursor works is vital to controlling the display properly.
This lesson will include:
- Where to find everything you need to use the LiquidCrystal library
- How to implement the LiquidCrystal library in your Arduino sketches
- Understanding how text is displayed on the LCD (Indexing)
- Understanding the Cursor
- How to turn on and off the display with code.
- How to beat Vegas with only 5 dollars and old tennis shoes.


Basecamp for the LiquidCrystal Library
My favorite page on the Arduino website is the reference page – this is where all the functions are explained in detail. Libraries also have reference pages, and the LiquidCrystal Library is no exception.
Check it out here: http://arduino.cc/en/Reference/LiquidCrystal
You will find every available function listed, each hyperlinked to a page that describes the parameters of each. You may find that parameters alone are not sufficient to grasp the “concept” of the functions – which is what I will do my best to explain here.
Better yet for this library, it also includes several examples which you can reference to get a feel how the creators of the library implemented specific functions in their sketch. You can open up the sketches directly in your Arduino IDE by going to File > Examples > LiquidCrystal.

Regardless though – make sure to get familiar with the LiquidCrystal library reference page – it is an indispensable resource when you need to recall something about a particular function.
How to implement the LiquidCrystal library in your Arduino sketches
Every time you want to use the LiquidCrystal library there are three pieces of code that you MUST include in your sketch. The first is a funky looking #include statement:
// include the library code:

#include
This should be the very first line of code in your sketch (after any comments explaining the program). The #include statement lets the compiler know where to look for different function declarations. When the program gets compiled, it will interface with the LiquidCrystal header file [that’s the part] to find the function declarations it needs.
But don’t worry if this makes no sense to you right now – it didn’t make sense to me for a long time. The point of this tutorial is to get your LCD up and running – so don’t sweat the small stuff, just include the #include .
The second thing you must do is declare, name and initialize a LiquidCrystal object. You can put this right after the include statement at the top of the sketch.
// declare, name and initialize the library with the numbers of the interface pins
LiquidCrystal lcd(12, 11, 5, 4, 3, 2);

This might look pretty crazy too, but it is actually pretty simple. What you are doing here is creating an “object”. An object in Arduino (which goes for C++) is a special construct that can have data associated with it and functionality.
For example, a “car” object might have the data (color, model, year) associated with it. It would also have some functionality, maybe like drive(), stop(), honk(). When we declare the LiquidCrystal object, we simply write the type of object, which is LiquidCrystal – followed by a space and name the object. Here we are naming it “lcd”. You could name it mamaJama if you wanted – it doesn’t matter.
Finally, you pass it some data using the parenthesis. The numbers in the parentheses tell the new object which Arduino pins to associate with it. As long as we have our pins connected to the LCD correctly, all the work of handling the pin assignments is taken care of behind the scenes.
When we start using the functions for this object, we will preface each one with the name of the object. So in this example we named it “lcd”. So when we use the blink() function from the LiquidCrystal library, we would write:
lcd.blink();
If we had named it mamaJama, we would instead write:
mamaJama.blink();
So let’s sum this up – and remember understanding this in minute detail is not that important for getting your LCD up and running – the details will fill in with time. If you want results – just include this at the top if your sketch:
// include the library code:

#include

// initialize the library with the numbers of the interface pins

LiquidCrystal lcd1(12, 11, 5, 4, 3, 2);
The final “administrative” type of code you must include goes inside setup:
void setup() {

  // set up the LCD's number of columns and rows:

  lcd.begin(16, 2);

} //close setup
We use the begin() function from the library to pass the LiquidCrystal object the size of the LCD. The format is (COLUMNS, ROWS). Here I am using a 16 Column by 2 Row LCD screen, hence lcd.begin(16,2). Remeber, if you are using a name other than lcd, it would be:
yourName.begin(Columns, Rows);
What is awesome about the LiquidCrystal library is that it will support all types of LCD screen sizes – and the only thing you have to change is the numbers you pass in the begin() function. Now let’s move on to some important aspects of using the LiquidCrystal library – namely, understanding indexing.
Understanding how text is displayed on the LCD (Indexing)
Let’s start by taking a look at the print() function. In setup() we can write:
void setup() {

  // set up the LCD's number of columns and rows:

  lcd.begin(16, 2);

  lcd.print("hello, world!");

}//close setup
Not surprisingly, this will display the words “hello, world!” on the LCD screen. Now recall that setup() only runs once – but the text “hello, world!” will stay up on your LCD screen. This is a really handy feature of LCDs – the text you print is “sticky” – that is, unless you need to change the text or the location of the text on the screen, then there is no need to continually update it in the sketch.

The next thing to note about the display is the default location the text is shown – it always starts in the top left corner unless you tell it otherwise. This location is called (0, 0). Or the “zero index”, or the “home” position.Now you might be wondering why the zeros? Isn’t it actually the first row and first column. And yes it is, but the LCD is “zero” indexed. This means, that to reference the first position of the row or column, you use zero. To reference the second position, you use the number one.
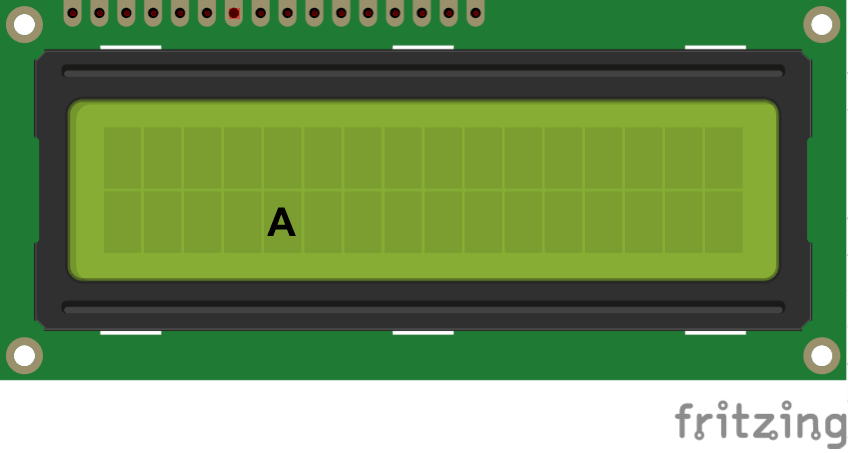

I know – strange – but you will find after time that it works quite well and that most structures in programming are referenced this way. So let’s do a little practice. Look at the images below and determine what the index of the letter “A” is.The first image would be indexed as (4, 1). The second would be (15, 1).
So how do we set the where the LCD? And more importantly why does it matter?
To set the cursor, we use the function setCursor(COLUMN, ROW); So if we want our cursor to be on the third column in the second row, we would write:
lcd.setCursor( 2 , 1 ); //set the cursor to third column in the second row
Yes – I know – the zero indexing takes some time to get used to – but if you remember to subtract one from the physical location of the column and row, it will give you the index location. So why do we care about the location of the cursor? The location of the cursor determines where text will be displayed on the screen. So if we use this combination in the loop():
void loop(){

  lcd.setCursor( 5 , 1);

  lcd.print(“MAMA”);

}// close loop

We would get the following on our display:The next important thing to understand about the cursor is that it auto-advances. So anytime you display something on the screen – the cursor location will auto-advance to the position after the character of text. To visualize this, let’s use a function that displays the cursor. The cursor is displayed as an underscore “_” on the LCD screen.
void loop(){

  lcd.setCursor( 5 , 1);

  lcd.print(“MAMA”);

  lcd.cursor();

}// close loop

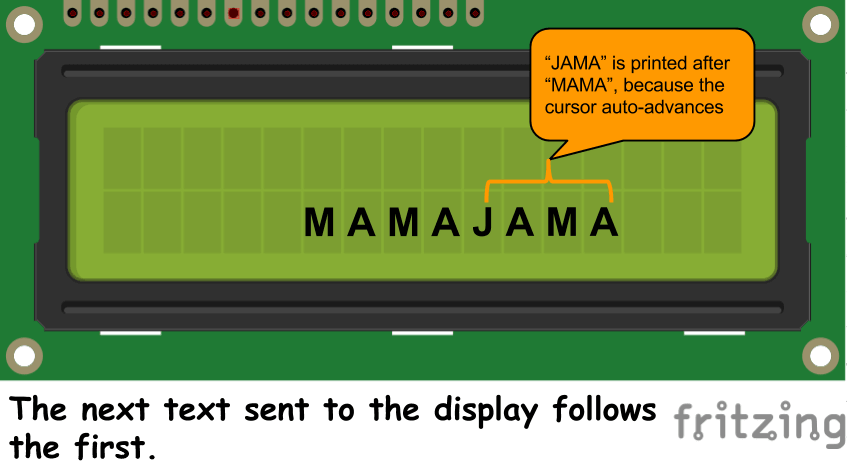
This will display the following:This handy for a ton of reasons – but the most useful is that you don’t have to constantly tell the LCD where to put the next bit of text – it will default to after the current displayed text. So let’s take a look at what would happen if we sent this command to the LCD:
void loop(){

  lcd.setCursor( 5 , 1);

  lcd.print(“MAMA”);

  lcd.print(“JAMA”);

}// close loop
Let’s finish up talking about the cursor with some more functions used to visualize it. The function blink() and noBlink() will blink the entire segment of the display, not just the underscored cursor. Let’s take a look at the output of this code:
void loop(){

  lcd.cursor();

  lcd.blink();

}// close loop
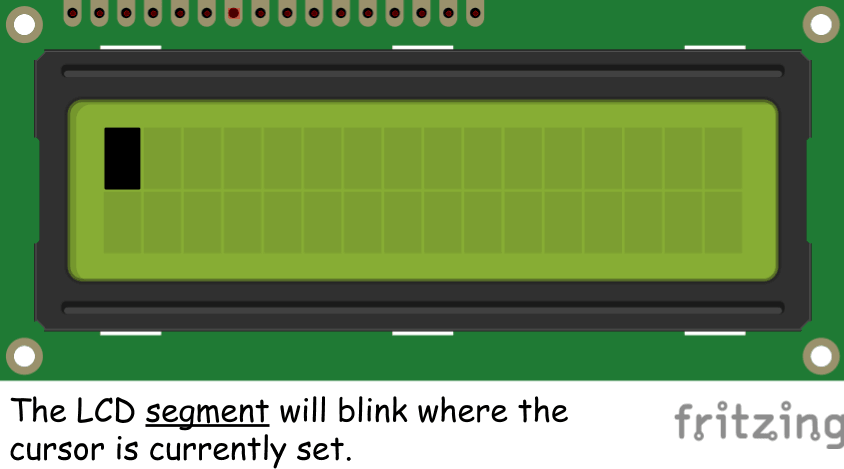
To stop the cursor form blink, you simply use the noBlink() function.
How to Turn On and Off the Display with Code.
Sometimes you will not want anything at all to show on your LCD display or you might want it go into a sleep mode. It is simple to do this using the noDisplay() and display() functions.
void setup() {

  // set up the LCD's number of columns and rows:

  lcd.begin(16, 2);

  lcd.print("hello, world!");

}//close setup


void loop(){

  lcd.noDisplay();

  delay(500);

  lcd.display();

  delay(500);

}// close loop
This code will turn on and off the display every half second. An important thing to note is that the previous text is maintained on the screen even after it has been turned off and turned back on.
Challenge:
So now it’s your turn to display some stuff on your LCD screen – give these challenges a shot.
- Try to use all the function demonstrated so far.
- Check out the LiquidCrystal reference page on the Arduino website and try some other functions on your own.
Further Reading:


There's a better way to select your ESP32 pins


[…] LiquidCrystal Library Functions Tour Part 1 […]
[…] How to set up an LCD with Arduino 2. LiquidCrystal Library Functions Tour Part 1 3. LiquidCrystal Library Functions Tour Part […]