What happens when chatGPT and Arduino have a baby?
Can you integrate the power of a chatGPT terminal into your own Arduino projects?
I don’t mean using chatGPT to help write your code, I mean incorporating the textual responses from chatGPT to do something for your project.
The answer is a bold yes!

What it will look like depends a lot on what you’re trying to achieve.
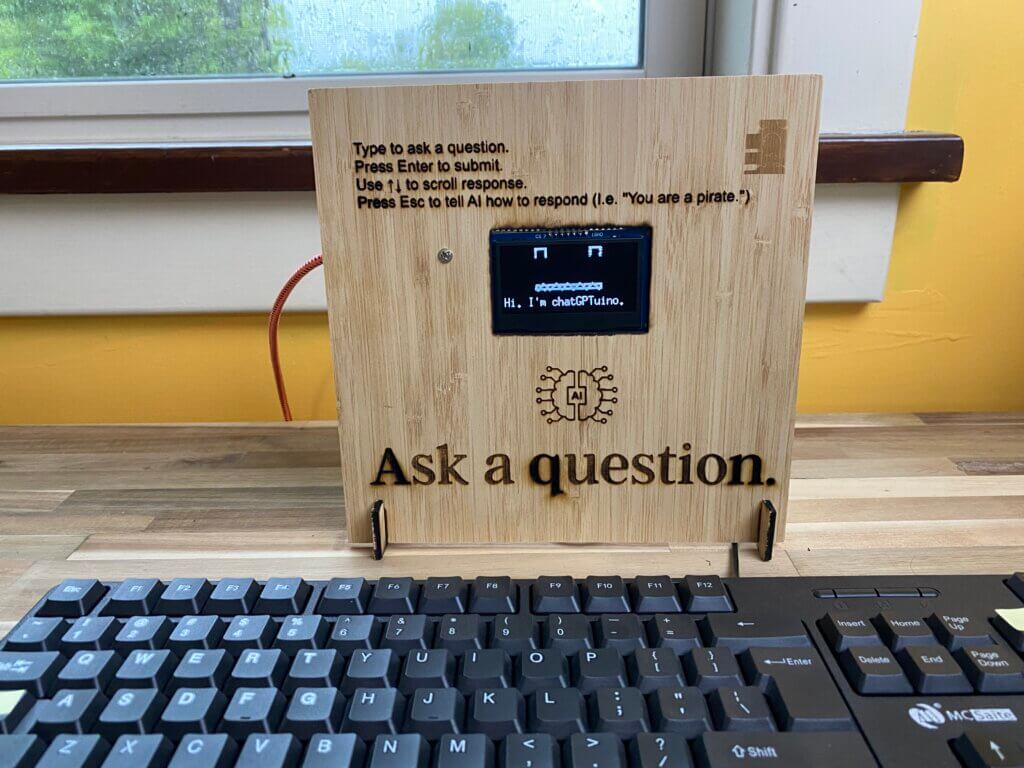
In this exploratory project you’ll interface an Arduino compatible wireless ESP32 with the OpenAI API and create a standalone “retro” chatGPT terminal using a keyboard as the input device and an OLED as the display.
This is really just the starting point.
Once you understand how to access and parse the chatGPT API from a wireless microcontroller you open up a ton of new and unexplored possibilities. From autonomously intelligent control of hardware to next level human interface devices.
What we are doing here is pulling the power of AI out of the cloud and figuring out how to substantiate it.
Hardware is eating AI, and you’re the chef.
Why a chatGPT Terminal?
The truth is, millions (if not billions) of dollars is going to be generated by embedding intelligence into hardware devices. There is an enormous financial incentive for pushing AI to the edge.
But how it all plays out remains to be seen, and what ends up actually being useful and solving problems that people are willing to pay for – it’s anybody’s guess.
What is starting to happen on a huge scale at this very moment is the prototyping of AI edge applications.
We all see the hint of immense usefulness in these large language models like chatGPT, but how can we bring them to bear in the physical world?
So we could all sit back in an armchair and come up with some conceptual ideas about how this technology could be useful.
Or we could take a more practical approach, and just try things. By trying different things, we can gain insight into what sounds like a great idea, and what actually has some traction.
What you need now is a way to get started pronto and try as much as you can.
This chatGPT terminal can be your first stab in the dark.
Our friend Arduino
What better way is there to try things fast and cheap than digging into the Arduino treasure trove?
Arduino has a huge ecosystem of developers, tons of inexpensive interoperable hardware, and arguably the most extensive open source code base for working with external hardware than any other development board in the known universe.
It’s a prototyper’s dream. PLUS it’s just not that hard to work with compared to many other options. So even if you’re a novice programmer, you can get up and running pretty quickly especially if you invest in some good training (shameless plug 😉).
The Arduino ecosystem is the place to start.
Programming Electronics Academy members, learn about the Arduino IDE toolchain in the Familiarization section of the Arduino Course for Absolute Beginners.
Not a member yet? Sign up here.
chatGPT Terminal operation in a nutshell
Here is a quick outline of this simple chatGPT Terminal.
- You type your chat on an old school keyboard
- An Arduino compatible ESP32 records your keypresses and sends a POST request to the OpenAI API
- When the response comes back, you show the text on an OLED.
- Repeat.
Pretty straight forward!
Now I am SURE you’re thinking – why not didn’t make this voice-to-text input and text-to-audio output – like a mini Alexa?
I can assure you that it is something I considered, and something I plan to explore more.
But this project is an exploration of interfacing with the chatGPT API then figuring out how to make something that understands me better than Alexa.
Using an external keyboard turned out to be a really easy way to input text that my code could easily parse.
An additional benefit of the keyboard is that everybody knows how to use one, so when it’s laying out, people assume they can type into it.
Major components for the chatGPT terminal
There are 3 major components you’ll need for this project:
- Microcontroller Dev Board
- PS/2 Keyboard
- OLED
Microcontroller Dev Board

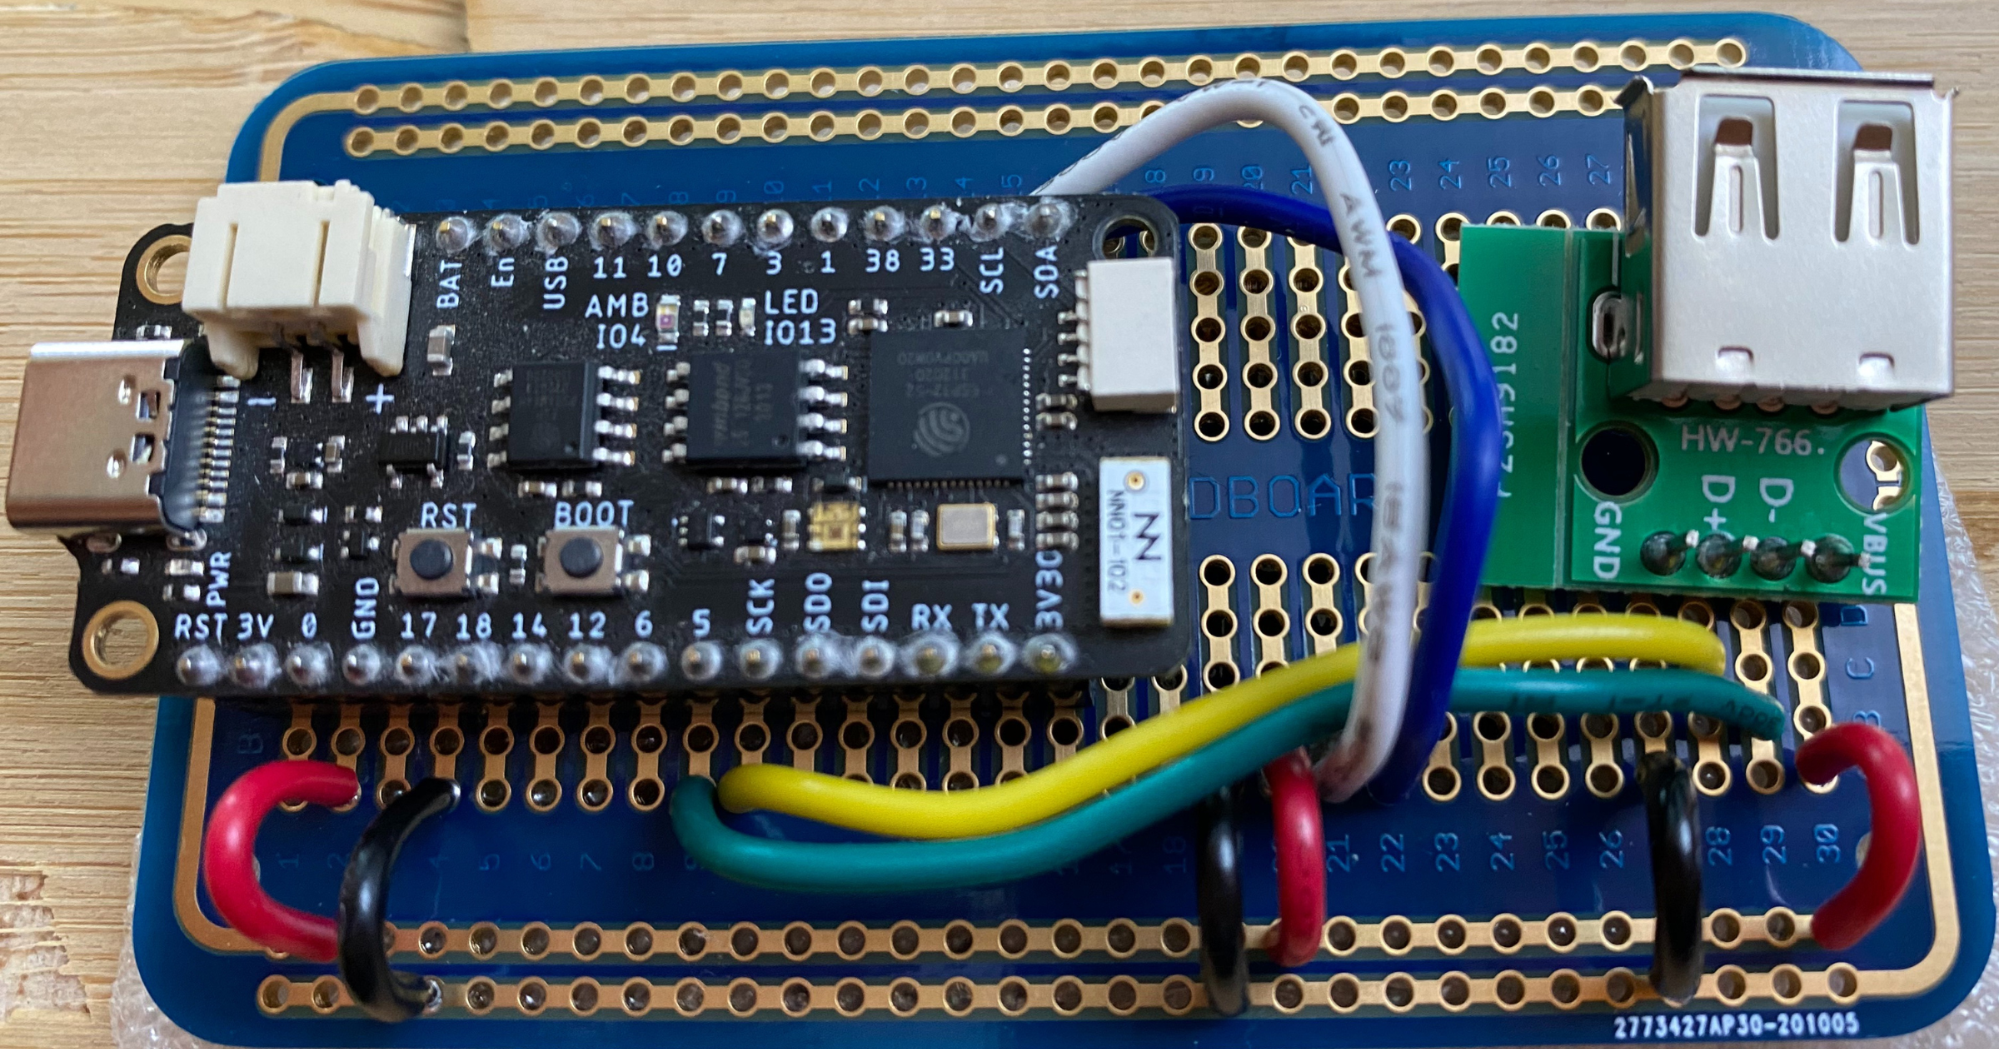
For this project we’ll use the FeatherS2 – ESP32-S2 by Unexpected Maker as the brains of the project.
The ESP32 is a WiFi (and bluetooth) enabled microcontroller, and they have tons of great development boards for them.
You definitely don’t need this exact model, any ESP32 (or ESP8266) would probably work just fine.
Programming Electronics Academy members, check out the Internet of Things (IoT) Course to start programming your own IoT devices.
Not a member yet? Sign up here.
PS/2 Keyboard

You’ll also need a PS/2 style keyboard – these are old school keyboards that have what is not a very outdated connector type. The reason I went with this style keyboard is because the software to read the incoming keypresses is simple to implement and available in multiple different Arduino libraries.
OLED
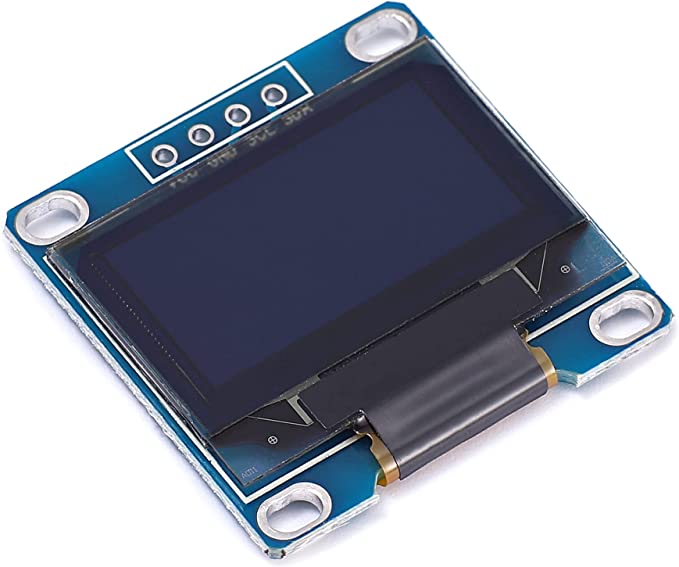
Finally you’ll need an OLED display to show the text in stunning 8 kilo-pixel resolution! OK, maybe not the most high resolution screen you could dream up, but these 128 x 64 px displays are everywhere.
You can use different display sizes as long as the pixel ratio stays the same, otherwise you’ll need to adjust the code. I’ve used 0.94”, 1.3”, and 2.42” OLED displays.
Other Stuff
Check the bottom of this post for a link to the full Bill of Materials (BOM) which includes all the stuff you’ll need, plus some tools you may want.
We’ll do a more thorough walk through of the Bill of Materials (BOM) in the later lessons.
Laser Engraved Enclosure
To make the enclosure I used a 40W Monport Laser Engraver to cut and engrave the enclosure from sheets of bamboo.
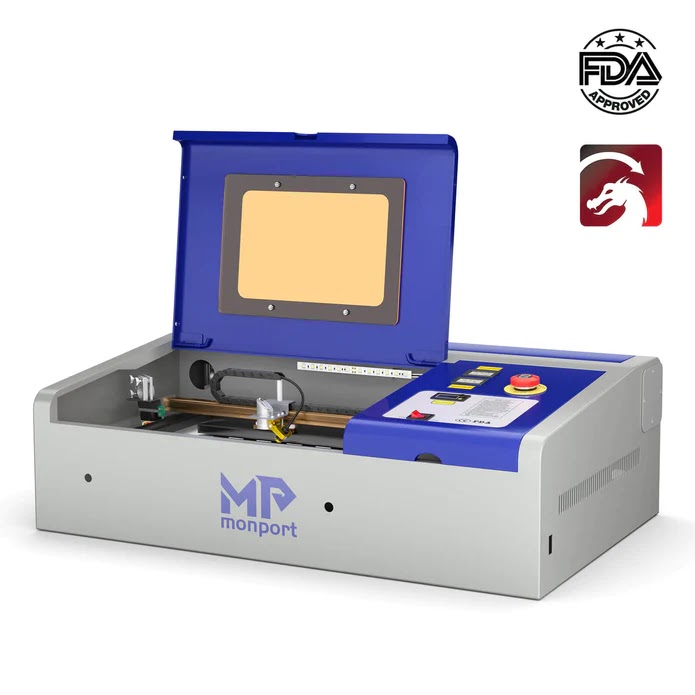
It’s a great desktop engraver, and I was surprised how easy it was to get up and running. They packaged the thing great, and it arrived pretty much fully assembled.
The monport laser came ready to use with Lightburn, a software for operating laser engravers. I’d never used it before, but it was relatively straightforward.
It is nice to have a “Laser” to use now. (If you want to get one of these, you can save 6% by using code Academy6 when you check out).
The Connections
This wiring diagram lays out the connections you’ll need between the major components of your chatGPT terminal. This shows using an I2C OLED display, you’ll need to change up the connections for using SPI.
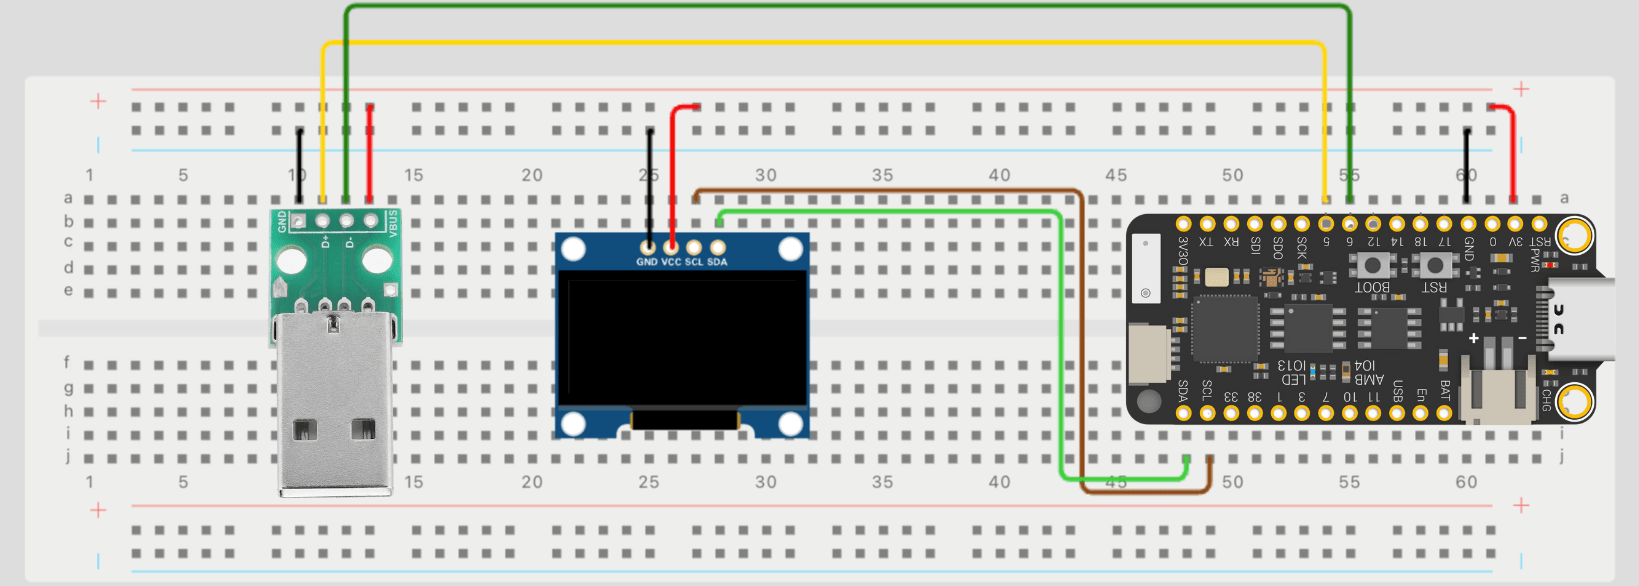
| Function Used | ESP32 Chip Pin # | GPIO Number | For Peripheral | FeatherS2 Silk Screen Marking |
| I2C – SCL | 14 | IO9 / D11 | OLED – I2C (SCL) | SCL |
| I2C – SDA | 13 | IO8 / D10 | OLED – I2C (SDA) | SDA |
| SPI – SCLK | 40 | IO36 / D25 | OLED – SPI – (SCK) | SCK |
| SPI – MOSI | 39 | IO35 / D24 | OLED – SPI – (SDA) | SDO |
| SPI – SS | 37 | IO33 / D20 | OLED – SPI – (CS) | 33 |
| SPI – DC | 42 | IO38 / D21 | OLED – SPI – (DC) | 38 |
| GPIO | 11 | IO6 / D18 | Keyboard | 6 |
| Interrupt | 10 | IO5 / D19 | Keyboard | 5 |
For the above pins, keep in mind if you plan on using I2C with the OLED then you only need 2 pins, whereas if you use SPI, you’ll need 4. The SPI labeling may be a bit wonky, because the OLED graphic driver implemented a non standard SPI protocol.
If you’d like a more in-depth walk through of assembly, we have a full walk through of this project in our training program.
chatGPT terminal Code
The code flow for this system is not too complicated.
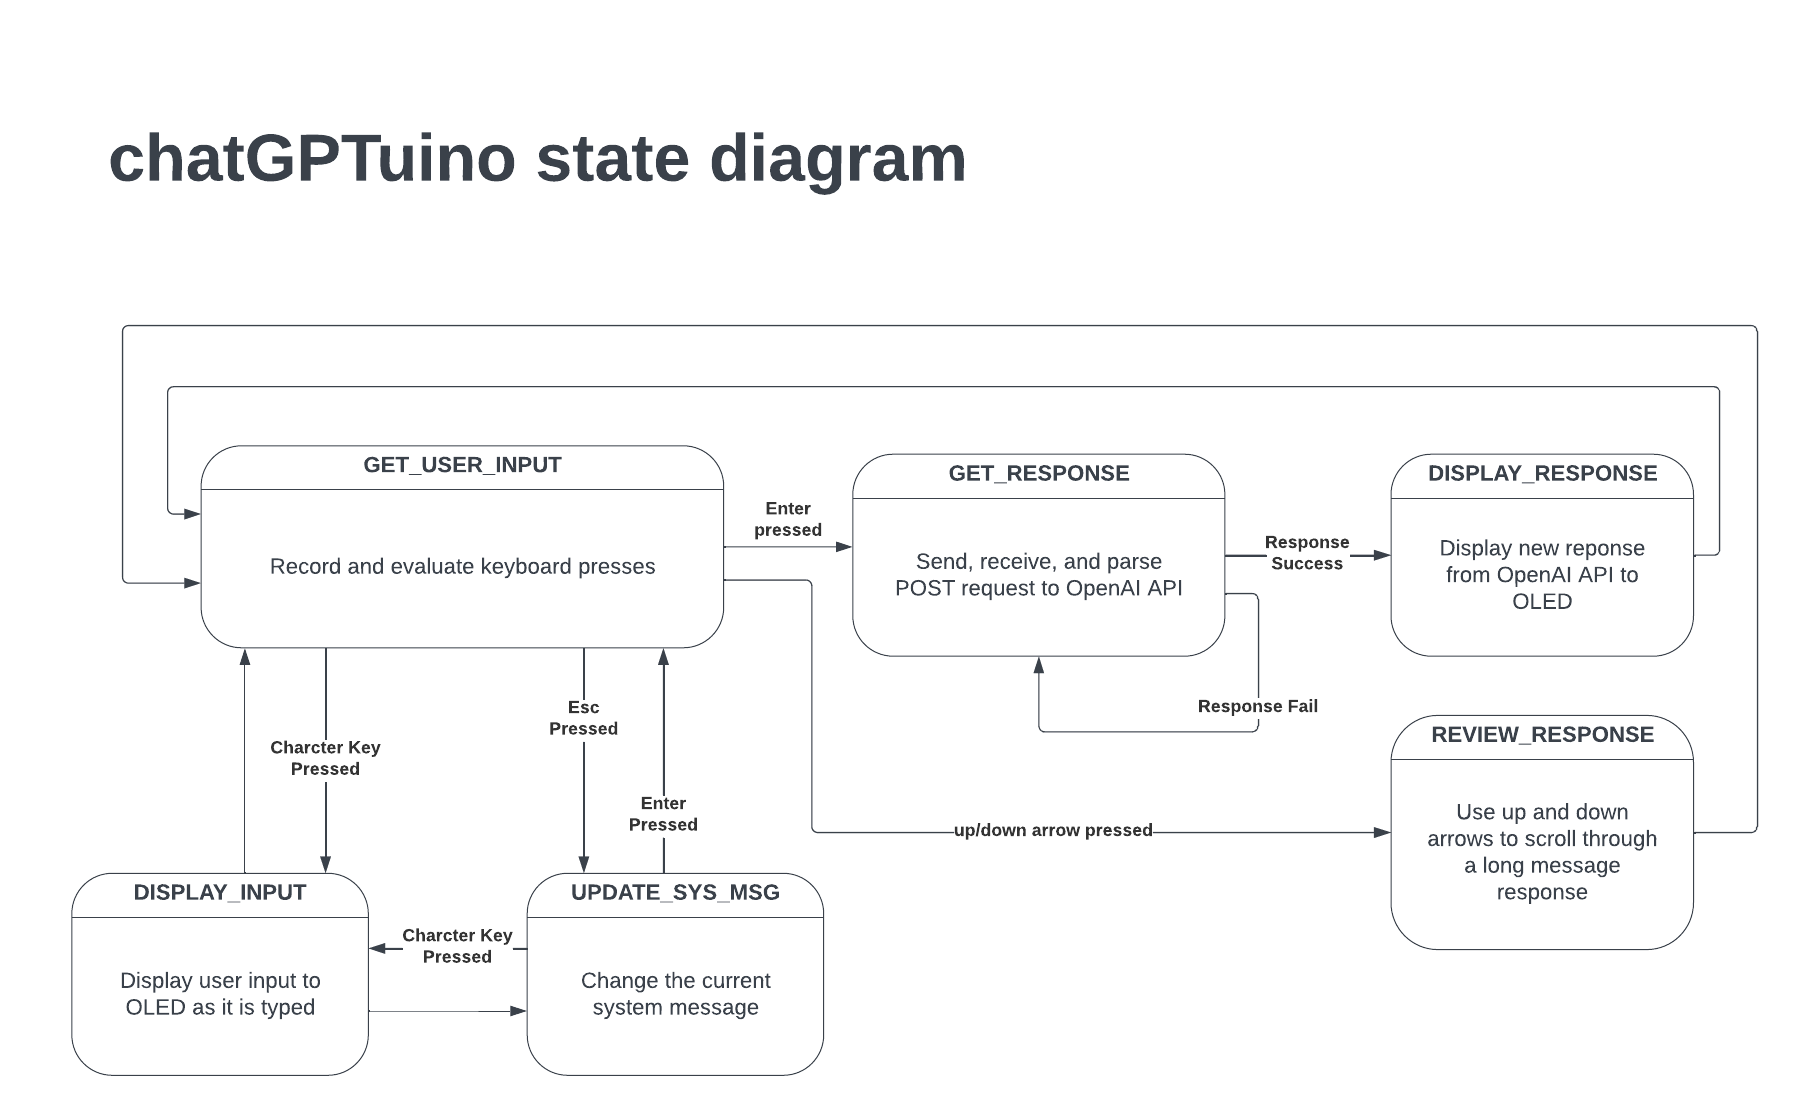
Basically, the system is always waiting for keyboard input. If the keyboard input is part of a chat message, it saves it to a special message array. If it’s a command key, like SHIFT, or ENTER, then it take the appropriate action.
When a message is submitted by the user, an API call is made to the chatGPT API to get a response.
The response is then parsed by the code, and the pertinent information saved to the messages array.
Finally, it’s displayed on the OLED one word at a time (mimicking the web chatGPT interface), where the user can then use the up and down arrows to scroll through the response.
And that’s pretty much a full cycle. Read keypresses, hit API, display response.
There is also a way to inject system messages (learn more about the system role here) that help steer the response from chatGPT. The default system message is “Respond like a pirate”. To change the system message you press escape and you’ll be prompted to type a new one.
In order to link up the code with your WiFi and OpenAI API Secret Key, you’ll need to make fill in your info on the credentials.h file.
The full code for this project is below. If you’d like more details of the program’s structure we have a full walk through of this project in our training program.
The major libraries use are the:
- WiFi – for connecting the ESP32 to the internet
- WiFiClientSecure – for making a secure connection to the OpenAI server
- U8g2lib – Universal Graphics Library for using the OLED
- ArduinoJson – for handling JSON formatting for API calls
- PS2KeyAdvanced – for handling keyboard input
- PS2KeyMap – for handling more details of keyboard input
A full walk through of this chatGPT Terminal
I think there should be more than enough information above to help you build your own chatGPT Terminal.
That being said, if you would like a more in-depth walk through of the Bill of Materials, a step-by-step instruction of wiring the project, and a high level understanding the code flow, then we offer a full walk through of this chatGPT Terminal project in our training program you can check out here >>
chatGPT Terminal Resources


Just use Chrome
Extension ‘Speak to ChatGPT’ instead of using SIRI. It works very well. cheers!
Thanks for the recommendation Steve!
I want to use it in esp-wroom-32.
Please help..
The wroom-32 should work pretty well with this.
Hi , Michael James
I need a help ! Can i use ESP32 Dev Board CH340 USB-C board for this project ?
Hi !
I need a help !!
Can I use this ( ESP32 Dev Board CH340 USB-C) in this project ?
Yes, that should work fine Khairul.
Yes, that should work fine.
Hi Michael,
Can I use USB keyboard instead PS/2 keyboard ?
If I can use , can you please give me USB keyboard library for this project and a datils text how to use that .
A USB keyboard will not work with this code. The way we detect keypresses is with a PS/2 arduino library.
How can I set the keyboard
and I used esp32 DEVKIT V1 is it ok?
The esp32 DEVKIT V1 should work fine. You need to make sure to have a PS/2 stle keyboard for this – not a USB keyboard.
When I ask, only appaears 3 dots answer “…” why?
Hi Felipe, it could be a couple things.
1. Are you sure you have the right password and network settings for your wifi?
2. Do you have your Open API key correct?
If you connect the ESP32 to to your computer via USB, and look at the serial monitor, there are some serial prints that might help you out.
Hi Michael, thanks for your answer. The problema was that I have no more tokes. The solution pay $10 USD on the chatGPT page and the problem was solved. Thanks.
Great – glad you figured it out. I hope you are having fun with the project!
Do the connection part to part
can i use esp32